 In this TiVoToGo series of posts I've been talking about ways to usher recorded TV shows from your TiVo DVR to your Mac and then play them on your Apple TV.
One good way involves using a software "bucket brigade":
- TiVo Desktop to copy recordings from the TiVo to the Mac — see Using TiVo Desktop in Windows.
- VideoReDo TVSuite to edit out commercials, and also decrypt the original file — see Using VideoReDo TVSuite on a Mac.
- VisualHub to convert the decrypted-and-edited file to a format compatible with Apple TV. (Edit: Unfortunately, since this post originally appeared, Techspansion, the creator of VisualHub, has closed its doors.)
The first two run in Windows XP, which runs in Parallels Desktop for Mac — see Using Parallels Desktop for TiVo-to-Apple-TV Transfers. The third, VisualHub, is the topic of this post. It runs under Mac OS X.
 VisualHub (whose logo appears to the right) is "the universal video converter for Macintosh," which means it can convert virtually any video file (with or without audio) into any of several formats. One of the input formats VisualHub can convert is MPEG-2, signified by an .mpg filename extension. (VisualHub cannot read an encrypted MPEG-2 file with a .TiVo extension, such as one created by TiVo Desktop. This is one reason why I use VideoReDo, which reads in a .TiVo file and exports an .mpg.)
VisualHub in turn reads in an .mpg file and converts it to an .mp4 file — an extension signifying MPEG-4 as opposed to MPEG-2. MPEG-4 encoding is more space- and bitrate-efficient than the MPEG-2 format used on DVDs.
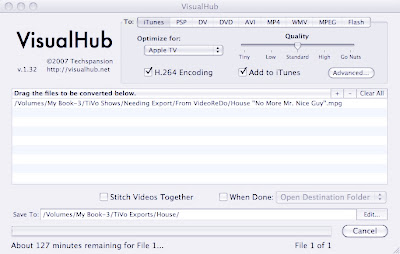
Yet more efficient is the h.264 version of MPEG-4, which is what VisualHub produces when told (1) to export to iTunes ... (2) a file optimized for Apple TV ... (3) using h.264 encoding:

Setting up the VisualHub conversion illustrated above was simple. I simply dragged an .mpg file icon to the VisualHub icon in the Dock. (I could also have dragged it into the VisualHub main window shown above, after manually having opened the VisualHub application.)
I then clicked on the iTunes tab at the left end of the To: row. I checkmarked H.264 Encoding. I used the pop-up menu to select optimizing for Apple TV ... instead of, say, iPod Touch or iPod Nano.
One thing that did was make sure my output file uses "B frames," handy ways of encoding individual video frames or pictures. B frames hold the output file size and bitrate down. If B frames aren't used, the output consists of just I frames and P frames, which use more bits than B frames. However, since B frames impose a heavy load on the decoder of the file, iPods don't support them. Apple TVs do.
I didn't have to move the Quality slider to Standard, because that was the default position. The different slider positions make for different levels of video quality in the output file by increasing or decreasing the video bitrate (and consequently the file size). I find that standard quality is fine for TiVo standard definition files, resulting in video that plays without artifacts. The file size is, meanwhile, quite compact.
I clicked on the Edit... button to tell VisualHub where to put the output file. By default, VisualHub puts the output file in the same folder as the input file. If you want it to go in a different place, use the Edit... button. (One thing lacking in VisualHub is the ability to give the output file any name you like. Instead, the output file always has the same name as the input file, with a different extension.)
I checkmarked Add to iTunes since I wanted my output file to play through iTunes on an Apple TV. The Add to iTunes option avoids having to add the output file manually.
Finally, I clicked on the Start button (which was replaced by the Cancel button seen in the screen shot above). VisualHub began the conversion of the input file to the output file, a process which lasted over two hours. The result was a file playable by iTunes and likewise by Front Row and Apple TV.
You can gain additional control over how the output file is rendered by using the VisualHub Advanced Options window. More on that in Using VisualHub Advanced Options.
No comments:
Post a Comment