Thursday, May 27, 2010

TiVo Premiere Is Here!

There's a new kid on the block in TiVo town, the TiVo Premiere. Along with its more capacious brother, the Premiere XL — the XL's larger internal hard drive holds 156 hours of HD programming to 45 for the Premiere — it brings TiVo digital video recorders into their fourth generation.

TiVos are "digital video recorders": boxes that let you record TV programs digitally. DVRs are like videocassette recorders without the cassettes — anybody remember VCRs? A TiVo DVR can be set up to "tape" dozens or even hundreds of your favorite programs on its internal hard drive, where they sit until you play them. You play them whenever.

Personally, I'm extremely glad a TiVo is (finally) fast enough to stream back to itself high-def recordings that have been archived a computer, without pausing all the time because it can't buffer the received data fast enough. I'll talk more about that later. But, first ...


Meet the TiVo Premiere

Here's what the TiVo Premiere looks like (click to enlarge):


Its height is considerably less than earlier TiVos'. So is its depth, front to back. It's as wide as the TiVo HD model it replaces.

Its back panel offers a number of connection options:


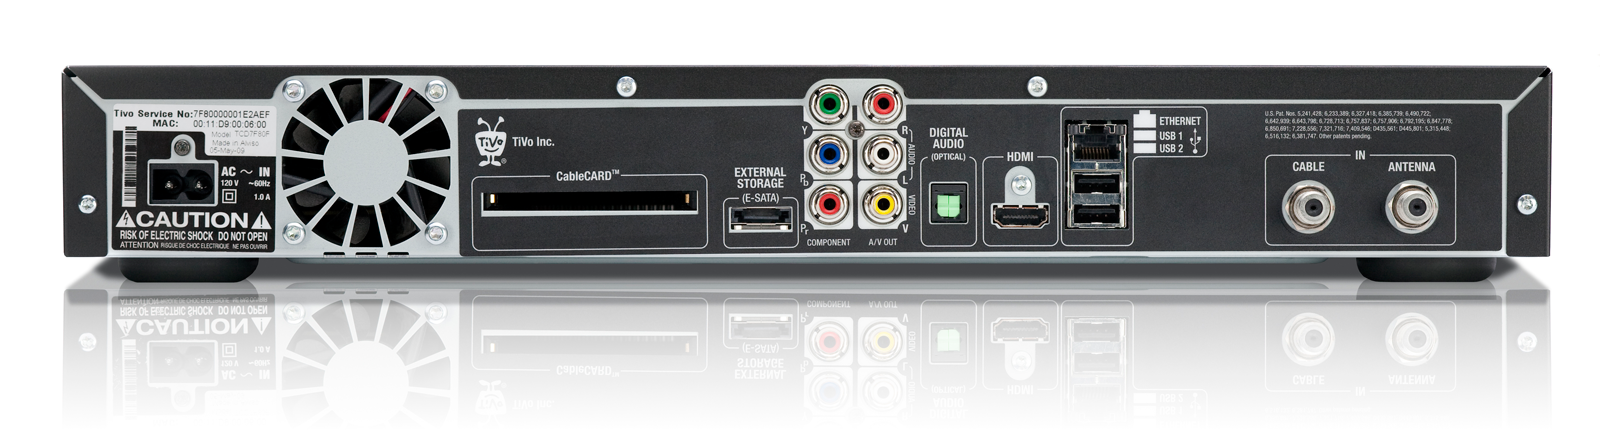
The best way to connect the Premiere to a recent-model HDTV is via its HDMI (version 1.3) connector, which carries both video and audio. For HDTVs without HDMI input, the Premiere also offers red-blue-green component video connectors, to be used along with audio output from its optical digital connector — and, for antique TV sets, it has yellow-red-white A/V outputs. If you use the latter, the TiVo downconverts HD material to SD.

Networking is done through the Ethernet port or (depending on what type network adapter you have) one of its two USB ports. If you don't have a home computer network, you'll hook a TiVo phone adapter (sold separately) to a USB port to connect the Premiere to the TiVo service to fetch electronic program guides and software updates.

Notice that there are inputs for both cable (or Verizon FIOS) and over-the-air antenna, which can be used simultaneously.

Popcorn handy? The TiVo Premiere comes with a 320 GB internal hard drive that can hold some 45 hours of HD programs, or over 400 hours of SD. You can mix and match HD and SD recordings on it. The Premiere XL's 1-terabyte internal drive holds up to 150 HD hours or up to 1,350 SD hours (!). You can keep track of how much space is left by looking at the My Shows menu:


Here, 7% of the drive has been filled.

The image above of the My Shows screen shows the 720p high-definition user interface introduced with the TiVo Premiere; older models used an SD menu system with no visual graphics or picture-in-picture showing (at upper right) the currently tuned channel or currently playing program. The new menu system is based on Flash Lite and is supported (since it requires a lot of processing power) by a dual-core Broadcomm BCM7413 CPU.

There have been criticisms concerning the sluggishness of the HD menus in responding to buttons on the remote. The software of the Premiere awaits an upgrade later this year that will allow it to use both processors in the Premiere's dual-core CPU. Right now, the software disables the second core, making user-interface response sluggish.

The top part of HD user-interface screens such as My Shows is filled by a Discovery Bar that contains a scrollable row of selectable poster images for TV programs, movies, videos, and other fare that you may want to record or download.

In a carryover from the Series3 TiVos, the Premiere allows you to record programs originated in 1080i and 720p HD. The original TiVo Series3 DVR was the first to do HD; Series2 and earlier TiVos were SD-only. The original Series3 was followed as an HD-capable TiVo by the less pricey TiVo HD, also a Series3, and its big brother the TiVo HD XL. The new Premiere adds 1080p to the list of supported video formats, a list which also includes 480i and 480p SD.

If you are a TiVo newbie and you buy a TiVo Premiere (or any other TiVo), be aware that you can dispense with your present cable box; the TiVo replaces it. But in order to allow the TiVo Premiere to pick up digital cable channels, including premium channels, your cable company (or Verizon FIOS) needs to install an M-type CableCard in the Premiere. "M" stands for "multi-stream"; this one "M-card" allows the two tuners of the Premiere to receive two digital channels at one time. Some older TiVo models could accept two S-type ("single-stream") cards instead of one M-type card, but the Premiere has just one CableCard slot and forces you to use an M-card. The Premiere, by the way, also lets you connect an over-the-air antenna to it, in addition to its cable TV or Verizon FIOS input connection.

The Premiere has spiffy high-definition (720p) user-interface menu screens. Like the My Shows screen pictured above, the outermost screen, called TiVo Central ...


... shows you in one of its corners, the upper-right, a miniature picture-in-picture of the program that is currently playing. In a panel on the left side of the TiVo Central screen are the screen's main functions. Scroll to one of these, and the panel on the right side shows you its sub-functions.

As shown by an earlier graphic, you can see your current list of recordings by selecting My Shows, which in older TiVos used to be called Now Playing. Twice-pressing the TiVo button at the top of the remote is a shortcut to the My Shows screen.

The remote that comes with the Premiere ...


... is much nicer than the crappy one that came with the TiVo HD and is something like the "Glo" remote that came with the original Series3. (Neither the TiVo HD nor the original Series3 is still available from TiVo.com, by the way. I have two TiVo HDs and an original Series3, in addition to my new TiVo Premiere.) The remote's buttons have a crisp, positive feel. The Select button is now where it should be: in the middle of the Top-Right-Bottom-Left ring, not below it. The Aspect (ratio) selection button has been renamed "Zoom."

There are four new buttons on the Premiere remote. Coded yellow, blue, red, and green, they have functions that depend on which menu screen or activity you're in. For instance, the blue button toggles the way the programs in My Shows are sorted (by name or by date). The red button toggles between grouping My Shows items of the same name in folders to reduce clutter, or not doing so. Both of those buttons take on other roles when you are using the Premiere's Search capability, for instance, or when you use the Premiere's Browse TV capabilities, etc. I have also read that the colored buttons do interesting things when you are accessing Video On Demand content, something I haven't confirmed.

The remote that comes with the basic Premiere isn't backlit, though the nicer remote for the XL is; the latter is also a "learning" remote that can adopt the behaviors of your other remotes and replace them.

Coming soon for the Premiere and Premiere XL, an optional upgrade remote ...


... has a slide-out QWERTY keyboard and uses Bluetooth, which means you won't have to point it at the TiVo!

Oddly, the Premiere remote lacks the TiVo HD remote's slider switch to identify it as either Remote #1 or Remote #2. If you have a Premiere and another TiVo in the same room, as I do, Controlling two TiVo boxes with separate remotes tells how to pair each TiVo's remote to its appropriate TiVo. However, If you would like to control two TiVos with just the Premiere remote, you're out of luck. Controlling two TiVo DVRs with one remote can tell you how to use a non-Premiere remote with a "1-2 switch," such as that for TiVo HD, to control (say) a TiVo HD and a Premiere. You lose the A, B, C, and D color-coded button shortcuts for the Premiere HD menus if you do that.

Also, if you own two Premieres and hook them to the same TV, you have to use two remotes.

There is much more to say about the sophisticated functionality of the TiVo Premiere, but at this point I'll just refer you to an in-depth technical review of the TiVo Premiere by K. Fowler ("bkdtv") in PDF form here.


Multi-Room Viewing

The Premiere, as the first Series4 TiVo, lets you finally do a full range of network-y things with your TiVos, things that you could admittedly — with drawbacks — do before; now, with the Premiere, you can do them faster and better.

For instance, Series3 TiVos were the first to let you view recordings from TiVo #1 on TiVo #2 in a different room. This capability was dubbed multi-room viewing (MRV). Using a home Wi-Fi or Ethernet network, a copy of a program sitting on TiVo #1 could be sent to TiVo #2. You could play the copy on the receiving TiVo as it was being transferred, or you could wait until some future time to begin playback. So if you recorded a show on your living room TiVo on Saturday night and wanted to watch it in bed on Sunday morning, you could pull it up to your bedroom TiVo on Sunday and lie there in your pajamas watching it as it was being transferred.

Unfortunately, Series3 TiVos couldn't MRV recordings fast enough to keep the playback-during-copying capability from pausing repeatedly due to TiVo #2's buffer running short of incoming data.

The Premiere, like its predecessors, supports MRV. But the Premiere is faster than its elder brothers, so (if you have the right network gear; see below) the blue LED that indicates a MRV copy is in progress turns off faster, showing you that the copying is finished.

In addition to MRV, Series3 TiVos — including the original Series3 and the TiVo HD — allowed you to copy TiVo recordings to your computer via your home network. Once on the computer, they could be deleted from the TiVo, if desired, thereby freeing space on the TiVo's hard drive. Then they could be copied back from the computer to any TiVo in your house whenever you wanted to watch them again. They could even be streamed back from your computer: you could view them at will without making a new copy of them on the TiVo.

Sadly, though, the third-generation TiVos couldn't move data fast enough from your computer back to themselves, no matter how fast your network happened to be. So, though you could stream a high-definition recording from your computer to your TiVo, the TiVo kept pausing because it couldn't fill its buffer fast enough with incoming data.

The TiVo Premiere is finally fast enough.


TiVo Premiere with 802.11n Networking

If you are using an 802.11n router on your home network — check out the Netgear Rangemax WNDR3700 Dual Band Wireless-N Gigabit Router at Amazon.com for under $135; it's the router TiVo Inc. features on its website, for more money — and if to the Premiere you attach the new TiVo Wireless-N Network Adapter shown at right, you'll be able to wirelessly stream high-definition video from your computer archive to the Premiere and watch it in real time, without pauses. (Of course, if you are using wired Ethernet, which is even faster than wireless-N, the same is true.)

The TiVo Premiere costs $299.99. You can order it from TiVo Inc. and add a Wireless-N Adapter for $67.49. A lifetime service plan — provided you already have another TiVo with a lifetime service plan — costs $199. Add enough extra dough for TiVo Inc. to UPS the hardware to you, and bob's your uncle.

Don't believe the higher price shown for the N adapter on the TiVo website, by the way. If you order by phone (877 BUY-TIVO; 877 289-8486) and mention the lower price for the N adapter at Amazon.com, then TiVo Inc. will match it or better (or so I found when I ordered my Premiere).

What is the TiVo service plan, you ask? Any TiVo needs to be fed with things like the program guide it consults to know when to record a program, as well as occasional updates to its operating software. These things come to it over your Internet-connected home network, as long as you have a paid subscription to the TiVo service. Ordinarily, you'll pay $12.95/month, $129/year, $299 for three years ... or $399 for "lifetime" service that lasts as long as the TiVo does. This "TiVo service," naturally, is in addition to your cable TV or Verizon FIOS subscription.

If you buy a Premiere from TiVo.com, there are service plan discounts for present TiVo owners. If you presently have a TiVo that you've already paid for lifetime service on, and you now buy a Premiere or Premiere XL in a package deal from TiVo Inc., then a life-of-the-Premiere service plan is only, as I said earlier, $199. You don't even have to stop using the TiVo you already have!

Of course, if you wind up with two TiVos in your home — a Premiere and a Series3, say — and you want to MRV recordings between them, you'll be well-advised to get a second TiVo Wireless-N Adapter for the other TiVo. Both TiVos have to be on the same 802.11n network to get MRV transfers going between them at wireless-N speed, so both need N adapters. You can't have one TiVo using 802.11g with a G adapter and the other using 802.11n with an N adapter, and expect them to talk to each other at wireless-N speed.

What is the G-to-N speed difference? 802.11g, or "G," is the familiar Wi-Fi standard that's been in use for the last ten years or so, and it runs at 2.4 GHz. For, oh, say, five years now, 802.11n, Or "N," which runs at over twice G speed, at 5.0 GHz, has been waiting in the wings to replace 802.11g. It's now ready for prime time. 5.0 GHz is, in my practical testing, a lot better than 2.4 GHz.

As I indicated earlier, if you have a router that runs at G speed and doesn't support N, you'll probably want to replace it someday. But there's at least one other option. You can buy an extra TiVo Wireless-N Network Adapter and hook it to the Ethernet port of your G router as a "bridge" device. It serves as an N-speed conduit between the N adapters on your TiVos — assuming that you have two or more TiVos with N adapters.

However, you don't have to buy all this new gear right away. If you have a G network in place, and/or if your existing TiVo uses a G adapter, fine. The N adapter you get for the TiVo Premiere will slow itself down to G speed for you. Later on, when you spring for an N adapter for each older TiVo in your home and you either upgrade to an N router or add an extra N adapter as a "bridge," the N adapter on the TiVo Premiere will automatically start using N speed.

If you insist you'll never need N speed, you currently can still buy the TiVo Wireless-G adapter for around $40 and use it with the Premiere to interface with your G router and any other G-networked TiVos you have in your home. If you don't want to buy a TiVo Wireless-G adapter from Amazon, call TiVo Inc. at 877 BUY-TIVO (877 289-8486) and ask to have Amazon's typically lower price matched for you.


Premiere Networking Speed

How fast is the TiVo Premiere at doing networking tasks? I tested mine by transferring a 1 hr. 30 min. HD recording: "Foyle's War, Series V: Broken Souls," broadcast  in HD on "Masterpiece Mystery"on a local PBS station recently and received in HD on Comcast cable.

Here are the transfers I tried, with transfer speeds in megabits per second shown in parentheses:

  1. From the TiVo HD that recorded it to my TiVo Premiere (22.22 Mb/s)
  2. From the Premiere back to the TiVo HD (20.53 Mb/s)
  3. From the Premiere to my iMac (20.62 Mb/s)
  4. From the iMac back to the Premiere (46.65 Mb/s)

The Premiere-to-iMac transfer (#3) was done using the kmttg Java application in Mac OS X. The iMac-to-Premiere transfer (#4) was done using pyTivoX: specifically, its pyTivo functionality (as distinct from its StreamBaby functionality). In all cases, the transfers were done over an 802.11n network running at a nominal speed of 5.0 GHz, with both TiVos using wireless-N adapters. My network router is an Apple AirPort Extreme base station. The transfer speeds shown were obtained from the Premiere's Messages & Settings/Settings/Network & Phone/View network diagnostics/Transfer history menu.

All of the transfers happened in much better than real time. That is to say, the rate at which the transfers took place far exceeded the playback speed of the recording — though I did not actually play the recording as the transfers were in progress.

This particular recording's file size, 3.7 GB, was not very large for an hour-and-a-half HD show. Its nominal bitrate was only 5.98 Mb/s. (No wonder all of the transfers happened in much better than real time.)

Most HD recordings that I have been working with originate at bitrates up to twice this one's. The highest bitrate of all the recordings that reside at the moment on my living room TiVo HD is 14.95 Mb/s, according to kmttg. The lowest transfer speed I saw in my testing, 20.53 Mb/s, far exceeds 14.95 Mb/s. Accordingly, I expect that any HD recording I make on any of my various TiVos will transfer to or from my Premiere in faster than real time, whether the device at the other end of the connection is my iMac or another TiVo.

I also found that running the same kind of transfer tests using my living room TiVo HD or my original Series3 in the bedroom, rather than my TiVo Premiere, typically gives slower-than-real-time results when I try to transfer ("upload") recordings of HD material that have nominal bitrates over (say) 8 Mb/s from my iMac to the TiVo. The TiVo HD is slower than the original Series3, but neither older TiVo can upload typical HD material in real time. The fault is with the TiVos themselves; I have run these tests using both wireless-N and Ethernet connections and gotten approximately the same kind of results with both network types.

I have found, accordingly, that the determining factor for transfer speeds in TiVo networking typically is the internal processing power of the TiVo making the transfer, and that when two TiVos are doing an MRV transfer, the speed is limited by that of the slower TiVo.

Happily, I find that using wireless-N (or Ethernet) makes HD MRV go faster-than-real-time even for transfers between older-model TiVos, e.g., from the TiVo HD to the Series3. The throughput of MRV transfers between slower TiVos is facilitated by the fact that the "transport stream" of the recording does not have to be altered. When a recording is downloaded to a computer, on the other hand, the "transport stream" has to be "remuxed" into a "program stream" by the downloading TiVo, and if the TiVo has minimal processing power, the speed of the download suffers. However, the Premiere, with its faster processor, seems to do downloads about as fast as it does MRV.

Because older, slower TiVos handle MRV transfers pretty well, a Premiere is not really needed if you just want to MRV HD material — as long as your network has at least wireless-N speed. Using wireless-G, the network speed becomes the limiting factor to throughput, whether the TiVos doing the MRV transfer are Premieres, older models, or a combination of the two.

But a Premiere is needed (along with wireless-N or better networking) if you want to stream HD material in faster-than-real-time from a computer. Neither my TiVo HD nor my original Series3 can keep up with HD streaming from my iMac using pyTivoX's StreamBaby functionality. This is true whether I use wireless-N or Ethernet. Only the Premiere gives me fast enough StreamBaby streaming.

I have also found that the Premiere copies recordings back from my iMac, using the non-streaming pyTivo functionality of pyTiVoX, at faster speeds than I saw for any of the other transfer types I tested. The 46.65 Mb/s shown above for the upload from the iMac to the Premiere was more than double the 20.62 Mb/s of the same program's download from the Premiere to the iMac.

Thinking this result was possibly bogus, I tried additional uploads to see whether they would give me throughput speeds closer to those for the other three transfer types. The two other upload tests I tried gave me speeds of 37.59 Mb/s and 51.3 Mb/s! So it looks as if uploads — copying programs from a computer to a TiVo — are somehow privileged with the Premiere. They go much faster than other transfers, at least on my own particular wireless-N network. Also, the actual upload speed appears to be highly variable — 46.65 Mb/s; 37.59 Mb/s; 51.3 Mb/s — while throughputs for the other types of transfers seem to hover consistently in the low-20 Mb/s range.


Useful TiVo Premiere Links

  • You can read an in-depth technical review of the TiVo Premiere by K. Fowler ("bkdtv") in PDF form here.
  • The PCMag.com review of the Premiere is here.
  • The Endgadget review is here.
  • The TiVo Premiere FAQ at the TiVo Community forum is here.

Wednesday, May 19, 2010

Archive HDTV Recordings to Your Mac, Then Stream Them Back to Your TiVo!

It's not hard to turn your Mac or a PC into an archive for your TiVo recordings. Then you can delete the recordings from the TiVo itself, and play them from your Mac to your TiVo any time you want.

I like to record classic movies from channels like TCM HD. Then I move them via my home wireless network to an external hard drive on my iMac. After that, I decode them into a non-copy-protected form that can be streamed back to a TiVo anytime I want to watch the movie again. Meanwhile, the original recording can be deleted from the TiVo's hard drive.

In Viva pyTivo! I detailed how I use the freeware pyTivoX app to send Mac media content to my TiVo units. Stream, Baby, Stream gave more information on the freeware StreamBaby app, which is what pyTivoX actually uses to stream media content to a TiVo. pyTivoX incorporates StreamBaby, so you don't have to install or configure StreamBaby on your Mac manually.

With pyTivoX-cum-StreamBaby you can, using the TiVo itself, pull archived TiVo recordings from your Mac back to your TiVo and watch them as they stream. Streaming Mac videos to a TiVo avoids having to make copies of them on the TiVo's hard drive, so if space is limited there, streaming is the way to go.

But how do you get the original recordings from your TiVo to your Mac in the first place?

An excellent way to download TiVo files and store them on a computer is to use kmttg. kmttg, which is Java-based freeware, implements its own version of what is generally called "TiVo To Go," or TTG. kmttg downloads files from the TiVo and decodes them into non-copy-protected form. (It also allows you to do other neat things with the files it downloads and decodes, but I won't cover those here.) kmttg runs on several platforms, including the Mac which I use, an iMac running Mac OS X 10.5.8.

If you want to use kmttg on your Mac, check out the official installation instructions here. Also, you may want to make sure you have the latest version of Java on your Mac. You can do that by invoking the Software Update feature available on the Apple menu.

The same kmttg download package works on all supported platforms, and the current package as of this writing is kmttg_v0p7l.zip. (The screen shots below were captured using an earlier version of kmttg.) On a Mac, download and unzip it to a folder named kmttg_v0p7l, then open the folder and launch kmttg.jar.

You may be warned that "kmttg.jar" is a Java application which was downloaded from the Internet.  Are you sure you want to open it? You'll just click "Open."

Then you'll see (click to enlarge):


What this means is that kmttg wants to download several free software tools, such as tivodecode, MEncoder, HandBrake, and FFmpeg, and to put them in appropriately named folders within the kmttg_v0p7l folder. Click "Yes." You'll then wait for several minutes while the downloads take place, and then you'll see (click to enlarge):


The media access key, or MAK, of your TiVo is a ten-digit number you can discover by navigating to TiVo Central -> Messages & Settings -> Account & System Information -> Media Access Key on your TiVo. You enter it into the dialog box and click "OK." (If you have more than one TiVo, they all have the same MAK, so you just need to find one of them.)

Now kmttg will give your Mac access the Now Playing list (NPL) for each of your TiVos. You just click on the name of any TiVo — such as, for me, "Bedroom TiVo" — and click the "Refresh" button. When the NPL appears after several seconds, you can scroll through it to find a movie or other recorded program to copy to your Mac. In the screen shot below (click to enlarge), I've selected "Shane," recorded from TCM HD:


Now comes a tricky part. You have to configure kmttg in advance to download your .TiVo files to whatever intended folder you have set up to receive them. In Finder, I created a TiVo Transfers folder on an external drive. Within it I created a Just Transferred folder.

Then I selected File: Configure ... at the upper left of the kmttg window. It brought up a dialog (click to enlarge):


in which I configured where kmttg is to put the files it downloads or creates. In the box next to where it says TiVo Output Dir (for "directory") I double-clicked to bring up a folder selection dialog. In it I had to navigate to find the Just Transferred folder within the TiVo Transfers folder that I set up on my external hard drive (click to enlarge):


I clicked Choose Directory once that folder was named in the File: box in the dialog. I also did the same thing for the other directories that kmttg configures via this dialog, including, crucially, the .mpg Output Dir.

In addition, I clicked check boxes to tell kmttg to Remove .TiVo after file decrypt — that meant that the downloaded TiVo file, after being decrypted into a more usable .mpg file that lacks copy protection, wouldn't permanently take up space on my Mac's external hard drive — and to Overwrite existing files in situations where I reinitiate jobs that have failed to run to completion previously.

When all that was done, I saw (click to enlarge):


At this point I clicked "OK," and kmttg was configured the way I wanted it.

Once you have everything configured, you need to select which kmttg services you want to use for the next job you initiate (click to enlarge):


Here I am using (in addition to the kmttg "download" functionality, which is assumed as a default) "metadata" and "decrypt," so I have clicked on each of those at the top of the kmttg window to turn on the check mark next to them. All of the other services have no check marks next to them.

I have in the screen shot above also initiated the transfer of "The Gallant Hours" from my Living Room TiVo. I did this by
  • selecting the Living Room TiVo tab and clicking the Refresh button
  • selecting "The Gallant Hours" from the Now Playing list that appeared after several seconds
  • clicking the START JOBS button
At the point at which the screen shot above was taken, the "metadata" job had already been executed, giving me a file in my receiving folder called The Gallant Hours (04_30_2010).mpg.txt. It contained:

title : The Gallant Hours
seriesTitle : The Gallant Hours
description : Adm. William F. "Bull" Halsey Jr. outwits Japanese Adm. Yamamoto in the 1942 Pacific. 
time : 2010-04-30T06:15:00Z
mpaaRating : N8
movieYear : 1960
isEpisode : false
isEpisodic : false
showingBits : 1024
starRating : x6
displayMajorNumber : 890
callsign : TCMHD
vActor : Cagney|James
vActor : Weaver|Dennis
vActor : Costello|Ward
vActor : Jaeckel|Richard
vActor : Tremayne|Les
vActor : Burton|Robert
vActor : Bailey|Raymond
vActor : Reid|Carl Benton
vActor : Sande|Walter
vActor : Swenson|Karl
vActor : Landers|Harry
vActor : Carlyle|Richard
vActor : Lontoc|Leon
vActor : Yagi|James
vActor : Zaremba|John
vDirector : Montgomery|Robert
vProducer : Montgomery|Robert
vProgramGenre : Biography
vSeriesGenre : Biography
vSeriesGenre : Documentary
vSeriesGenre : Movies

A subset of this metadata will wind up being displayed by StreamBaby on my TV screen when I stream my recording of "The Gallant Hours" back to my TiVo.

You can see in the screen snap above that the "download" job is still in progress, and has been executing for 2 hours, 3 minutes, 19 seconds. The "decrypt" job is queued pending the completion of the "download" job.

Now, in the following screen shot (click to enlarge), the "decrypt" job has finally begun executing:


The "decrypt" job invokes an app, tivodecode, that decrypts the The Gallant Hours (04_30_2010).TiVo file that was just downloaded, making a file named The Gallant Hours (04_30_2010).mpg in the same directory. This .mpg file contains the entire original recording at the original bitrate, file size, and quality. The only difference is that it is unencrypted. StreamBaby can accordingly stream it back to a TiVo.

kmttg offers a wide range of functionality beyond what I've just described, but this should be enough to get you started. You now know how to get kmttg, install it on your Mac, and begin using to to download, decrypt, and save metadata from recordings on your TiVo. These can be high-definition or standard-definition recordings — your choice. I generally download HD ... but be warned: HD takes a lot more time to download and a lot more space on your Mac's hard drives.

And HD is just about impossible to stream back, without a lot of undesirable pauses, to any TiVo model other than the new TiVo Premiere. Only the Premiere can do network input/output fast enough to keep up with pause-free HD streaming. Older TiVo models simply cannot do this — I know, I have three of them. To get a Premiere to stream HD video in "real time," you'll also need to equip it with a wireless-N adapter, or hook it up to wired Ethernet, since anything slower is too slow for real-time HD streaming.

It is possible, though, to use the PyTivo part of PyTivoX to transfer archived HD (or SD) recordings back to a non-Premiere TiVo's Now Playing List (i.e., to the TiVo's own hard drive). You'll just have to initiate the transfer some time in advance of when you want to watch the recording. If you allow sufficient lead time, you'll be able to watch the program, pause-free, even while the transfer is still ongoing.

But for pause-free spur-of-the-moment streaming of HD material that you have archived to your Mac, consider getting a TiVo Premiere with a wireless-N adapter. I personally love my own Premiere/wireless-N setup for just that reason.

Wednesday, May 12, 2010

TiVo Wireless-N Adapter: First Impressions

I wrote in TiVo Wireless-N Adapter Arrives! about a newer, faster way to network TiVo boxes wirelessly. It's the TiVo Wireless-N Network Adapter, presently $70.35 at Amazon.com

This new adapter can replace the wireless-G adapter that you may now use on your TiVo, but it's a little different. It's bigger, for one thing: about the size of a cellphone. It plugs into the TiVo's Ethernet port, not a USB port. It also plugs into an external source of electrical power; the G adapter doesn't.

The benefit? The N adapter can operate at 5.0 GHz, over twice the theoretical data delivery rate of the G adapter's 2.4 GHz.

I bought two N adapters and tried them out on my bedroom TiVo Series3 and my living room TiVo HD. My main hope was to be able to stream HD movies from my Mac to either TiVo fast enough to avoid pauses for rebuffering. The G adapter couldn't even begin do that. With the G adapter, streaming HD movies became a chore of continually having playback interrupted by rebuffering pauses. Would the N adapter be fast enough?

Sadly, no. I'll discuss that result later, along with another significant problem I ran into. But, first ...

Setup and installation

I found my first adapter's setup and installation process to be difficult, though after I cleared those hurdles the setup of the second adapter was easy. I'll go into some detail about the hurdles I encountered with the first adapter in just a bit.

First I should note that the N adapter's included Installation Instructions booklet is generally well-organized and clearly written. Still, I ran into problems with the first adapter because at least one of the things it says is plain wrong, and there are also some things it doesn't tell you that maybe it should.

The booklet gives three options for doing the setup. (There is also mention of what you need to do if your TiVo currently uses a phone line instead of a computer network to connect to the TiVo service.)

(1) The easiest setup method:

This method applicable if you have a wireless-N router with a WPS button; WPS stands for "Wi-Fi Protected Setup." After you attend to basic hardware necessities like setting a switch on the adapter to the "Client" position, hooking up the adapter to its set of three interconnected cords and cables that end up forming a Y, plugging one of the Y's three cable ends into a standard power outlet, and hooking another of the three into the Ethernet port on your TiVo (the third end plugs into the adapter itself), you just press and hold down the WPS button on your N router until it starts blinking. Once the N router's WPS button starts blinking, you have one minute to press and hold down the WPS button on the adapter itself. When that button starts blinking, WPS automatically syncs your router's security (including its passphrase, etc.) with your adapter.

When that WPS sync process is complete, a signal-strength LED on the adapter will turn either solid green or solid blue. If it's solid green, the adapter's operating in G mode, at 2.4 GHz; blue, at 5.0 GHz.

My N router (an Apple AirPort Extreme base station) doesn't have a WPS button, so I couldn't use this easy-as-pie setup method.

(2) The next-easiest setup method:

This is what you do if you have a wireless-G (or wireless-B) router, but not a wireless-N router. To get your N adapter working using this method, you need a pair of TiVo Wireless-N Network adapters. You hook one of them to one of your G/B router's Ethernet ports, while the other N adapter is hooked to your TiVo's Ethernet port. The router-connected adapter's switch is set to "Bridge" instead of "Client"; the other's switch is set to "Client." You press and hold down the WPS button on the TiVo-connected adapter — there isn't a WPS button on the G/B router itself, remember — until the button starts blinking, then within one minute press and hold down the WPS button on the router-connected adapter until it starts blinking. At that point, WPS automatically syncs the two adapters. The signal-strength indicators on both adapters turn solid blue.

This method didn't apply to me. I have an N router, albeit one with no WPS button.

(3) The manual setup method ...

... is the one I had to use, and it can be the hardest. Whether it's hard or easy depends on how you presently have your wireless router and your computer configured for networking.

For me, setting up the first adapter of the two that I bought was hard. I had to overcome several hurdles. In a moment, I'll detail them. But first, I need to emphasize that overcoming those hurdles for the first adapter made setting up the second adapter a snap. I'm going to put the process I went through to set up the first adapter in blue below, so that if you don't want to read it all, you can easily skip ahead. And you probably don't need to read it if:

  • You already have your computer's network preferences set to configure the IP address of its Ethernet connection "Using DHCP"
  • You have your computer's Wi-Fi/AirPort wireless adapter turned on
  • You don't use anything like pyTivo, pyTivoX, or StreamBaby to move content from your computer to your TiVo

That said, here's what I went through to get my first wireless-N adapter up and running:

After setting the switch on the first adapter that I received to "Client" and assembling its cords and cables, I was told by the Installation Instructions to hook the wireless-N adapter to an Ethernet port on my computer — not on my router, not on the TiVo that it would eventually connect to — in order that I could run the TiVo Network Adapter's Setup Wizard in my computer's web browser.

Well, I was already using my iMac's only Ethernet port to connect it to my router/base station. So I had to disconnect that existing Ethernet cable from the back of my iMac. Then I hooked the Ethernet connector of the adapter into the vacated Ethernet port.

Also, I had the AirPort wireless capability turned off on my Mac, which actually seemed fine because the Installation Instructions booklet says, wrongly, "You may need to disable your computer's wireless connection before proceeding." Yes, that turned out to be exactly wrong!

Anyway, for reasons I won't go into here, I had Network Preferences on my Mac set up (under Built-in Internet) to configure "Using DHCP with manual address." I had set the Mac's manual IP address to 10.0.1.201. I would soon have to change that ...

The Installation Instructions told me to go to 192.168.10.1 in my web browser — which is an IP address hard-coded into the firmware on the N adapter — in order to run Setup Wizard.  However, when I did so, my browser reported not being able to find the web page associated with 192.168.10.1!

After I diddled around with different ways of entering the 192.168.10.1 IP address into the browser's URL field and having no success whatsoever, I finally had a look at my iMac's Network Preferences. Lacking anything better to try, I changed my Built-in Ethernet IP-address configuration mode to just plain "Using DHCP," without "with manual address."

Within seconds of my hitting the Apply button, my Mac's IP address changed from 10.0.1.201 to 10.0.1.12.

Once that happened, my browser was able right away to find the Setup Wizard at 192.168.10.1. Moral: make sure you're not using a way of configuring your computer's Ethernet IP address other than "Using DHCP," or you may not be able to access 192.168.10.1 and run the Wireless-N Adapter Setup Wizard.

That hurdle cleared, I started following the step-by-step instructions fed to me in my browser window by the Setup Wizard. Pretty quick, the Wizard asked me to select my wireless network from a list of those whose signals could be detected in the vicinity. Sadly, my own network was not on the list!

Uh oh.

I scratched my head vigorously for a minute and finally came up with: Well, sure. How could my network show up if ...


  • my computer was not connected via Ethernet to my router (since I had unplugged the Mac-to-router Ethernet cable in order to plug the Ethernet cable of the adapter into my Mac) and
  • my Mac had its AirPort wireless connectivity turned off?

I turned on my Mac's AirPort capability — contrary to the Installation Instruction I mentioned above — and my network finally appeared in the (duly refreshed via a button click) list in Setup Wizard. I then told the Wizard to connect to that network ... and after many, many long seconds of watching a progress bar inch its gradual way rightward ... was told that a connection could not be established!

Oh, wonderful.

What could be wrong now?

Failing to think of a single blessed thing that I could do differently, I fell back on that age-old solution, "Why not just try it again and see if it works?"

Guess what? After the progress bar inched and inched and inched rightward, I finally saw:


It worked the second time around! Go figure!

Next step: move the now-successfully-configured N adapter to my Series3 TiVo and hook it up there.

To do that, at first I had to struggle with the adapter's Y-configuration of cords and cables once again, plus I had to add an extra power strip to my entertainment center, so I could plug in the adapter. Once that manual chore was over, I followed the Installation Instructions and tried to connect my TiVo to the TiVo service. To do so, I went to Messages & Settings > Settings > Phone & Network > Connect to TiVo service now" on the TiVo.

After the usual long wait for "Preparing ... ", I was told that the attempt to connect had failed due to not finding a DHCP server.

Sheesh!

The TiVo's network settings screen at that point showed what I considered to be an unusual IP address it was 192.168.10.nn, as I recall. (Also, the type of network connection was shown — quite correctly, since the adapter goes into the TiVo's Ethernet port — as "Ethernet.")

I had to change my network settings on the TiVo from "Get automatically from a DHCP server (typical)" — which is what the Troubleshooting section in the adapter instructions recommends — to "Let the DVR assign itself an IP address." Once I did that, my TiVo's IP address turned to the more usual 10.0.1.nn, and I was able to connect to the TiVo service. Oddly enough, during the process of coping with some further problems which I am about to describe, I tried reverting the TiVo's network settings to "Get automatically from a DHCP server (typical)," and I was pleased to see that the IP address of the TiVo remained 10.0.1.nn!

Why did the IP address of the TiVo show up at first as 192.168.10.nn? I have no idea.

Anyway, be aware at this point that I use pyTivoX on my Mac to share video files with my TiVo. pyTivoX incorporates StreamBaby, which is a way of streaming the same videos to the TiVo without having to move copies of them onto the TiVo's hard drive. So pyTivoX gives two ways for a video file to be shared: via Mac folders that show up in my TiVo Now Playing list, and via the same Mac folders that show up within a pyTivoX menu item that appears towards the bottom of the TiVo's Music, Photos, & Showcases menu.

Confusingly, my pyTivoX video share folders now each showed up twice in the TiVo's NPL, but only one item of each seemingly identical pair worked properly. Later on, I realized that this problem could be cured by deleting all the video "share" folders from the pyTivoX configuration window, respecifying them all over again, and hitting the Apply button. (But hitting the Apply button multiple times during the reconfiguration process causes redundant entries to appear in the TiVo Now Playing list.)

Meanwhile, the "pyTivoX - iMac.local" menu item that should have appeared towards the bottom of the TiVo's Music, Photos, & Showcases menu was missing. It was the second of these two problems which concerned me most. The TiVo's pyTivoX menu item unlocks the StreamBaby interface of pyTivoX.

Streaming is slightly faster than copying. I won't go into the reasons for that here, but I wanted the fastest possible connection, so I set about figuring out why the pyTivoX menu item was missing from the TiVo.

To do that, I figured I'd look at the streambaby.ini initialization file which pyTiVoX uses to configure StreamBaby. It's in the ~//Library/Application Support/pyTivoX folder. The file contained ip=10.0.1.201, the former IP address of the iMac running pyTivoX.

10.0.1.201 was the right IP address before I changed my Network Preferences for Built-in Ethernet to configure the Mac's Built-in Ethernet port "Using DHCP," i.e., without using a "manual address." After that change, the Mac's IP address became 10.0.1.12. Yet the streambaby.ini file being used by pyTivoX still had ip=10.0.1.201.

I fixed that problem by quitting pyTivoX, trashing my ~/Library/Application Support/pyTivoX folder, and then restarting pyTivoX on my iMac so that the streambaby.ini file and other key files in the folder would be recreated ... after which (irritatingly) I had to respecify my three video share folders in pyTivoX all over again, and hit the Apply button just once at the end of the process.

When I went back to my TiVo after that, I found to my satisfaction that the pyTivoX menu item had duly reappeared near the bottom of the TiVo's Music, Photos, & Showcases menu. I was able to use it to stream videos from my Mac, and it all worked just fine.

The moral here is that if you are using pyTivoX and you change your Mac's IP address in order to get a TiVo Wireless-N Network Adapter up and running — or for any other reason, at any time down the road — you need to re-initialize pyTivoX in the way I've just described.


So, at this point, I finally had a working wireless-N adapter on one of my TiVos. It was time to test it out.

Initial testing

When I made my first tests of Mac-based movie playback on the TiVo Series 3 in my bedroom, using the first of my two new N adapters — the second had yet to arrive — I was disappointed to find that they played with a certain amount of pixellation and, now and then, some brief breaking up of the image. The flaws showed up only occasionally, but I knew they shouldn't be there at all, since the video files I was using contain no such flaws.

I considered the possibility that the CPU of the TiVo, known not to be very powerful, simply couldn't keep up with rendering the image properly, given the increased speed at which the video file was now being copied to the TiVo. Maybe the TiVo couldn't do the work of buffering all that incoming data and properly rendering the image at the same time.

If that was the case, I realized, there was probably going to be no cure for the problem.

Of course, I knew that soon I would also be trying out the pyTivoX StreamBaby interface on the TiVo— I was using the pyTivoX non-streaming interface at this point — and perhaps it would function better.

First, though, I thought I'd just try restarting the TiVo and hoping that would cure the problem. And it did! Moral of story: after installing a new N adapter, it is a good idea to restart your TiVo, even though it's not officially necessary to do so.

After I got rid of the pixellation and other picture glitches in that way, I discovered only then that the pyTivoX menu item that should have appeared towards the bottom of the TiVo's Music, Photos, & Showcases menu was missing. I've already told in the section in blue above about what I had to do to fix that problem.

Once it was fixed, I tried streaming HD video via the StreamBaby interface. It played flawlessly, and a 5-min. snippet of a recent TCM HD broadcast of the classic movie "High Society," having an average bitrate of 12,561 kbps, gave me no unwanted pauses when I streamed it to my bedroom Series3 TiVo! The same snippet, when played via the pyTivoX Now Playing list interface on the TiVo, did give me buffering underruns and hard pauses. That seemed to confirm my assumption that streaming works faster than playing the same file as it is being copied over the network to the TiVo's hard drive.

That's key, so I'll repeat it: Streaming, using pyTiVoX's StreamBaby interface, works faster than playing the same video file as it is being copied over the network to the TiVo's hard drive, using pyTivoX's main interface. My first test of wireless-N speeds seemed to show that streaming can keep up with a fairly high average bitrate of 12,561 kbps.

Speed issues

That result, alas, did not hold up for long. I'll tell why in a moment. First, some technical background:

On the TiVo, in the menu hierarchy within the StreamBaby interface, you can see what the average bitrate of a video file is. When you see a number like 12,561 kbps, you know that it's the average bitrate of the file: the number of bits in the file divided by the number of seconds in the running time of the video. You can be sure that the moment-to-moment bitrate will fluctuate around this number, sometimes higher and sometimes lower. How much higher it gets, and how long it stays high, will likely determine whether there occurs a pause-inducing buffer underrun at any point during the streaming of the file.

If there is a buffer underrun, playback pauses. You have to hit Play again to get it to resume.

At any time during playback, you can hit the Play button on the TiVo remote to see how far ahead of the actual playback point the green bar is moving. The green bar indicates how much of the unplayed part of the video has already been buffered. The further ahead of the actual playback point the green bar is, the less the chance of a buffer underrun any time soon.

In my experience, 12,561 kbps is a typical average bitrate for HD material. If that average bitrate won't stream without pausing, I knew my experiment with wireless-N would be (because I'm so interested in streaming HD video to my TiVos) something of a failure. So I was quite happy that my 5-min. test snippet didn't pause on my Series3 TiVo.

However:
  • It did pause on my living room TiVo HD, once I'd hooked the second N adapter to it at 5.0 GHz
  • The full-length movie that it was extracted from had a higher average bitrate, well over 13,000 kbps. Its playback stream kept pausing, over and over, on my TiVo HD and (to a lesser extent) on my Series3
Not only that, but I could tell by looking at the green buffering bar on the TV screen when I hit Play on the TiVo remote that my 5-min. snippet was in imminent danger of incurring a buffer underrun just as it wrapped up on my Series 3, so I knew even at that point that my initial success story might not hold up.

It didn't.

Believe me, I tried to pull every rabbit I could out of every hat I could think of, but I could not find a way to achieve that last little increment of speed that would avert repeated buffering pauses on HD material. I even ran an Ethernet cable from the router in my upstairs office to the Series 3 in my upstairs bedroom and to the TiVo HD in my downstairs living room, since I would have bet the farm that shifting to Ethernet speed would cure the problem.

It didn't.

And, in further testing, the buffering pauses turned out to be just as rife with Ethernet as with wireless-N!

It finally hit me that the only explanation — in my various tests I had eliminated all other possibilities — was that the network speed between my Mac and my TiVos was not the bottleneck.

In fact, the bottleneck had to be the speed of the TiVo itself, and in particular, its slow CPU.

The upshot here is that neither the original Series 3 TiVo nor the TiVo HD can keep up with HD video streamed via a wireless-N adapter. In fact, a TiVo HD is worse at it than an original Series 3.

However, I have learned that the new TiVo Premiere, which is considered a Series 4 TiVo, can keep up. In fact, as I write this, I have a Premiere on order that I will test out as soon as I receive it. I'll report on that in a future post.

MRV is faster

Meanwhile, I have this to add about using wireless-N adapters for TiVo multi-room viewing (MRV) from a TiVo HD to a Series 3: it is fast enough to keep up with an HD program that is being watched as it is being MRV-transferred.

In order to test that, I had first to receive my second wireless-N adapter, set it up, and hook it to the TiVo HD in my living room. That went without a hitch — though there was still one more problem to be dealt with, which I'll discuss momentarily. Once I had dealt with it, I tried MRV'ing HD programs from the living room TiVo HD to the bedroom Series 3. I found to my great satisfaction that there were basically no playback pauses!

Specifically, I tried MRV'ing "High Society," the movie that I couldn't stream from my Mac to the bedroom Series 3 without repeated pauses, from the living room TiVo HD to the bedroom Series 3, and I was pleased to note that the green progress bar stayed about 30-40% ahead of the playback point!

For instance, as playback reached the 15-min. mark the progress bar was at least about 20 min. ahead of playback, a 33% outpacing of playback. It could even (since the ticks on the bar are at crude 15 min. intervals apart) have been 40% ahead of playback. (I started playback immediately after initiating the MRV transfer, and I did not pause playback at all and let buffering gain an unfair advantage over playback.)

This showed me that wireless-N is a tremendous success, compared with wireless-G, at speeding up MRV to the point where playback-amid-transferring can keep up with the transfer itself!

Obtaining 5.0 GHz operation

However, as I mentioned earlier, I had to confront yet another problem before I could get that success story to happen. I found that I had to reconfigure my N router, an Apple AirPort Extreme base station, to allow my two new N adapters to operate at their top 5.0 GHz speed.

My N router has four "radio modes," two of which are important to this discussion:

  1. 802.11n (802.11b/g compatible)
  2. 802.11n only (5 GHz)

I originally had my router using radio mode #1, "802.11n (802.11b/g compatible)," because I have several devices on my network that are not 802.11n-compatible, one of these being my iPhone, when it is in Wi-Fi mode. Using b/g compatibility radio mode on my N router allowed me to mix and match on my network G devices operating at 2.4 GHz and N devices at 5.0 GHz.

I found, however, that when I had my N router in b/g compatibility mode, my TiVo Wireless-N Network Adapters did not operate at 5.0 GHz. They operated at 2.4 GHz instead!

I could tell this simply by looking at the adapters. Each adapter has two LED status indicators, one for power and one for an active wireless network connection. When both indicators are a solid green, the adapter is connected to the network and operating at 2.4 GHz. When both are a solid blue, the adapter is connected to the network and operating at 5.0 GHz.

With my router operating in b/g compatibility mode, both adapters had solid green indicators. They were operating at 2.4 GHz, meaning that they could transfer data no faster than wireless-G adapters!

To get my adapters' indicators to turn solid blue, thereby switching to 5.0 GHz operation, I had to change the radio mode of my N router to mode #2, "802.11n only (5 GHz)." When I did that, the adapters' indicators automatically turned solid blue within about one minute of my making the change. I did not have to go through any rigmarole such as powering the adapters down and up again to get them to switch to the new rate of operation.

Update: Thanks to a comment by Anonymous (Paul) below, I now realize that my need to fiddle with the radio mode of my AirPort Extreme base station (AEBS) was due to the fact that it is not a current model AEBS. According to the Wikipedia article on Apple's AirPort product line, "On March 3, 2009, Apple unveiled a new AirPort Extreme with simultaneous dual-band 802.11 Draft-N radios. This allows full 802.11 Draft-N 2x2 communication in both 802.11 Draft-N bands at the same time."

I interpret this as saying that newer AEBS's than mine output 2.4 GHz and 5.0 GHz signals, both at the same time, as they provide 802.11n compatibility. If I had one of the newer AEBS's — mine is from circa 2005 — I believe I could have obtained blue status lights on my N adapter right away, after initial setup.

I'm not familiar with the wider, non-Apple world of routers, but I have to think that some or all wireless-N routers that are available today do the same trick: generate both 2.4 GHz and 5.0 GHz signals at the same time as they provide N-compatibility. If you have one of those dual-band N routers, fine. If not, you may have to get creative, as I did.


Switching my AirPort Extreme base station to 5.0 GHz operation was well and good, but it left me with another problem. With my AEBS in "802.11n only (5 GHz)" radio mode, none of my 802.11g devices could get on the network.

Fortunately, I had at hand a ready solution to the problem. I have a second router, an older-model Apple AirPort base station, that operates in 802.11g mode. It can also use 802.11b mode or a b/g compatibility mode. It does not support 802.11n operation.

I'll call these two routers my "N router" and my "G router."

I won't bore you with the details, but it was possible to back-to-back the G router with the N router, with the former acting, technically speaking, as a "bridge" to the latter. The G router is in its 802.11g radio mode, while the N router is in its 802.11n-only mode. The N router connects to the Internet via a cable modem and "shares a public IP address" with the G router, and via the G router with all the G devices on my network.

In short, by back-to-backing two routers, I created what Apple calls a "dual band, 5.0 GHz and 2.4 GHz network," with Internet access on both bands.

Given this configuration, my two TiVo Wireless-N adapters now connect with the N router (ignoring the G router entirely) and operate at 5.0 GHz. Their indicators are a solid blue.

I have no idea, though, why my TiVo wireless-N adapters operate at 2.4 GHz when my N router is in b/g compatibility mode. My intuition was that they would instead discover that my router is N-capable and would pick, as a default, 5.0 GHz operation instead. But my intuition was wrong. At least under the conditions of my tests, my adapters seemed to default to 2.4 GHz operation as long the router's radio mode supports it.

For those who need 802.11g compatibility and don't have the wherewithal to back-to-back two routers in a dual-band configuration, I regret I can offer little further advice. It is not inconceivable that the problem is idiosyncratic to my Apple AirPort Extreme base station, and that other N routers would not present the same problem.

However, I think anyone who wants to run an N router in b/g-compatibility radio mode needs to be aware that it may be hard or impossible to get TiVo Wireless-N Network Adapters to operate at 5.0 GHz in that situation ... unless, that is, he or she is willing to spring for an extra adapter. With one adapter in "client" mode at each TiVo and one in "bridge" mode at the router, the radio mode of the router itself drops out of the picture.

With one TiVo Wireless-N Network Adapter acting as a bridge to one or more others, all the adapters will operate at 5.0 GHz, while the router can be in b/g-compatibility radio mode and can host N-capable and G-capable network devices independently of the TiVo adapters.

At this page at TiVo.com it says, under "What is the TiVo Wireless N Adapter Double Pack? Why would someone need a Double Pack?":


TiVo Premiere users who want to move their entertainment content across their home network at n speeds, can do so even if they only have a slower B- or G-speed router. How? By plugging one TiVo Wireless N Adapter into their Premiere and another into their legacy B- or G-speed router, they can create an N-speed bridge. This N-speed bridge enables users to download HD entertainment and move it through their home network at much faster speeds and with great efficiency.


I haven't tried a configuration using an N-speed bridge, but I have no reason to believe this capability of TiVo Wireless-N Adapters wouldn't work as advertised.

Monday, May 10, 2010

TiVo Wireless-N Adapter Arrives!

You can now get a wireless-N network adapter for your TiVo, $68.31 at the time of this writing at Amazon.com. I have one on order and will report back later as to how well it works.

Wireless-N connections are nominally much faster than the wireless-G adapters TiVos have supported up to now. I now have one Series3 TiVo and two TiVo HDs. Each TiVo currently uses a wireless-G adapter.

My main interest in speeding things up is that I like to archive HD movies from any of my TiVos to my Mac, via my home wireless network, and then, when the mood strikes, stream one of them out to a TiVo for viewing. My wireless-G connections are too slow to stream HD in real time.

So, too, may be the wireless-N connection. I have made some experiments using wired Ethernet between the Apple AirPort Extreme base station that sits next to my Mac and my Series3 TiVo. I found that even wired-Ethernet speed can be too slow for delivering HD in real time ... and Ethernet is much faster than wireless-N.

But I also found a seeming difference between the Mac-to-TiVo-on-Ethenet transfer speed when I initiated a transfer but chose not to start playing it as it was in progress, as compared with when I chose to watch the video being transferred at the same time as it was being transferred. The latter scenario was much faster, making it seem, pending further experimentation, that the TiVo won't maximize the transfer speed unless the transferred recording is also being played during the process of making the transfer.

Also, there are several ways to do a Mac-to-TiVo transfer. When I made the experiment I just mentioned, I had yet to begin using pyTivoX (incorporating StreamBaby and FFmpeg) as the Mac-to-TiVo software engine on my Mac. I was instead using plain old TiVo Desktop. The particular transfer engine I use on my Mac may make a difference.

Stream remuxing

Another X factor is that copying a recording from a TiVo to a computer causes "remuxing" to take place. The TiVo "remuxes" (i.e., re-multiplexes) the recorded "transport stream" stored on its hard drive into a single MPEG-2 "program stream" that can be stored on a PC or Mac and played there.

I learned here, at the TiVo Community Forum, that:

High-definition recordings are stored on the TiVo’s hard drive as transport streams in a proprietary format. When you download a recording from the TiVo with a web browser (or TiVo Desktop), the TiVo remuxes the recorded streams stored on the hard drive into a single MPG file that can be played on a PC or Mac. This on-the-fly remuxing does not have any effect on quality, but it does cut throughput by 50-70% compared to MRV between two TiVos

When transferring recordings between two TivoHD DVRs, throughput is about twice as fast (20-24Mbps typical), because recorded files are transferred just as they are stored on the hard drive.

In a book I have, Charles Poynton’s Digital Video and HDTV, the author indicates that an MPEG-2 “transport stream” (TS) is comprised of a bunch of relatively small packets and is designed for “transmission of multiple programs on relatively error-prone media.” (That seems to describe to a T the transmission of cable TV to a TiVo.) “Multiple programs” would encompass, I’d assume, the video portion and the audio portion of a single cablecast. In a TS there are multiple independent “program clock references” that synchronize the separate programs. This would seem to be how video and audio are kept in sync.

In an MPEG-2 “program stream” (PS), which is designed for storage on relatively error-free media such as a computer hard drive, there are also packets, but they can be large: up to 64 KB in length, where a TS packet is only 188 bytes in length. Furthermore, synchronization in a PS is achieved through a “system clock reference,” not through program clock references.

So my guess is that in going from a TiVo to a computer, the recorded stream is converted by the TiVo from TS to PS — this is what "remuxing" means, I expect — which incurs CPU overhead on the TiVo and slows things down a lot. In going from the computer back to the TiVo, I’d assume the computer, whose CPU is relatively fast, takes responsibility for converting the PS back to a TS, and so the slowdown, if any, would not be as great.

Weak TiVo CPU power

Yet another X factor is the fact (see the TiVo Community Forum thread mentioned earlier) that the CPU of a TiVo has little CPU power, compared to a Mac or PC. It was not designed to handle more than about 75 Mbps of total throughput. Each HD stream consumes up to 20 Mbps, so if you are tuned to two HD channels and also watching a third HD recording that is already on your TiVo, the CPU overhead of two buffered HD channels and one in-progress HD playback can consume 55-60 Mbps. That worst-case scenario leaves 15-20 Mbps for handling MRV and PC transfers. During such transfers the CPU is responsible for, among other things, any remuxing that has to be done, so in a worst-case scenario such as this one the slowness of the TiVo's CPU can override an otherwise fast wireless-N or wired-Ethernet transfer speed, I assume.

In other words, there are several possible factors that can "bottleneck" a transfer from a TiVo to a computer — or in the reverse direction — such that the speed of the network connection is not the limiting factor. If this is the case, then upgrading from wireless-G to wireless-N might make little or no practical difference.

The same is not necessarily true, though, for TiVo multi-room viewing, since the need for the sending TiVo to remux the TS recorded on it is absent in that scenario.

Sidestepping wireless-G bottlenecks

However, in order to take advantage of potential wireless-N increase in MRV speeds, one needs to use a wireless-N adapter for both TiVos. A network path is only as fast as its slowest link. If there is a wireless-G link anywhere in the path between the two TiVos — or between any two devices on the wireless network — the network speed will be limited to that of wireless-G.

This is why anyone who gets a wireless-N adapter for a TiVo needs to be aware that the wireless router being used is a possible bottleneck. Say you have a router that is limited to wireless-G operation (or wireless-B operation, which has the same top speed as wireless-G). TiVo #1 can still MRV recordings from itself to TiVo # 2, even if both TiVos have a wireless-N adapter ... but the wireless-G router that is in the signal path between the two TiVos will slow the process down to wireless-G speed!

TiVo Inc. says the way around that is to hook an extra TiVo wireless-N adapter into an Ethernet port on the wireless-G router. That extra adapter acts as a "bridge" between any two outboard wireless-N adapters, hooked to their respective TiVos, and keeps the slowness of the wireless-G router from interfering with overall wireless-N transfer speeds.

I have a wireless-N capable router, though — an Apple AirPort Extreme base station using wireless-N operating mode. However, I also have been employing AirPort Express units, three of them, as part of a "wireless distribution network" (WDS) in my home. My particular AirPort Express units are limited to wireless-G operation. (Newer AirPort Express models are N-capable.) My base station formerly treated my AirPort Express units as range-extending parts of itself, so anything such as a TiVo that uses my home network might (possibly) access the network through a slow link: a wireless-G AirPort Express.

For now, I have simply unplugged my AirPort Express units and reconfigured my base station to stand alone in my home network. Having no WDS to extend the network range ensures that there cannot be a wireless-G unit in the signal path between any two of my TiVos or any one of them and my Mac.

Wireless-N adapter connection and configuration

The TiVo wireless-N adapter is unlike the wireless-G adapter in that the former hooks up to the Ethernet port on the back of the TiVo, not a USB port. (If you have an older TiVo model that lacks an Ethernet port, you're out of luck. Also, for reasons I am not sure of, the wireless-N adapter will work only on TiVos that have two tuners. If your TiVo has just one tuner, again you're out of luck. Nor will the wireless-N adapter work with any "DIRECTV DVR with TiVo" models.)

The TiVo wireless-N adapter must be plugged into an electrical power source such as a wall outlet or power strip. The wireless-G adapter draws its power from the USB port it plugs into. I judge from several recent posts to online forums that many potential adopters resent the wireless-N adapter's need to be plugged into external power.

The TiVo wireless-N adapter cannot be configured from the TiVo itself, as the wireless-G adapter can. You have to connect it to an Ethernet port on your computer, and also to a power source, to tell it what wireless network to use (even if you have only one such network) and also to enter the security phrase or password allowing connection via that network. Once you do that initial configuration, you can simply hook the wireless-N adapter to any TiVo.

If you have a router with "Wi-fi Protected Setup," it's even easier. You connect the wireless-N adapter via its Ethernet cable to that router (plugging the adapter into a power source as well) and press a button (on the router, I assume) that will set up the wireless-N adapter automatically. Then you move the wireless-N adapter to the TiVo.

My AirPort Extreme does not have this capability, so I can't test "Wi-fi Protected Setup."

More later ...

After I receive my wireless-N adapter and try it out, I'll report back on how it did ...