Saturday, April 17, 2010

Viva pyTivo!

No sooner had I posted Stream, Baby, Stream about the StreamBaby computer app than I discovered pyTivo. pyTivo, like StreamBaby, is software you use to play videos on your TiVo when they reside on your computer.

pyTivo incorporates StreamBaby, which means your TiVo can stream a video to itself from a hard drive on your computer. Streaming the video lets you play it without making a copy on your TiVo's hard drive.

pyTivo can also send videos to your TiVo from your computer, meaning that you at your computer can initiate copying a video file to the TiVo's hard drive, after which it can be played just as if the TiVo had recorded it in the usual way.

pyTivo can use TiVo-playable videos in formats that plain old TiVo Desktop software can't deal with.

Just as with StreamBaby, pyTivo does not require you to alter the software or hardware of your TiVo in any way. In fact, your TiVo continues to run the same old software downloaded to it by TiVo, Inc.

pyTivo, like StreamBaby, runs on various computer platforms: Windows, Mac OS X, Linux, and others. I talk here mainly about running it on a Mac.

It is a good thing that there is a Mac version — called pyTivoX — for, as I detailed in Stream, Baby, Stream, installing StreamBaby on a Mac is a bit of a bear. For one thing, StreamBaby installation requires you to obtain and install FFmpeg, the "complete, cross-platform solution" that lets your computer record, format-convert, and stream videos. pyTivoX contains FFmpeg from the get-go.

Since pyTivo likewise contains StreamBaby, installing pyTivo obviates ever having to install and configure either StreamBaby or FFmpeg.

To install pyTivoX version 1.3, click here for a download. (But first go here to see if there's a later version.) pyTivoX downloads to a Mac as a disk image file with a .dmg extension, which, when opened, looks like this:


You just drag the pyTivoX icon to your Applications folder, and your pyTivoX/StreamBaby/FFmpeg installation is finished!


Now, open the pyTivoX application. Above is the pyTivoX window that you'll see. I simply clicked on the + sign and added my "TiVo Transfers" folder to be shared with my TiVos. (In geek parlance, such a folder or directory is called a "video share.")

I also clicked the Prefs button (the light switch) and enabled the use of StreamBaby within pyTivoX:


And I also checked to make sure pyTivo itself was enabled. It was:


In the General Prefs pane I needed to enter my TiVo.com username and password:


That was important because the "push" functionality I talk more about later won't work if you don't supply those two pieces of information to pyTivoX.

Notice that nowhere is there any way for you to enter your TiVo's media access key, or MAK; I assume pyTivoX learns that from your account at TiVo.com. Nor do you have to enter the IP addresses of your computer or your TiVo. pyTivoX figures those out for itself.

After dismissing the Prefs window, I clicked the green Apply checkmark in the main window (which is pyTivoX's only window). At that point I went over to one of my TiVos and found something like this in my Now Playing list:


This is not mine, actually; it's "Rob's PC," which is the "share name" Rob (a Windows user?) gave in his pyTivo Shared Directories list to the folder or directory on his computer that contains his videos. Selecting it in the Now Playing list would bring up a list of that folder's files ... and its subfolders, if any, which themselves contain videos. Navigating down in that list on his TV screen, Rob can tell pyTivo to transfer any one of his videos to his TiVo.

That's pyTivoX as it affects the Now Playing list. Additionally, towards the bottom of the TiVo's Music, Photos, & Showcases menu — which you get to from the TiVo Central menu— you'll see something like pyTivoX - iMac.local, indicating that pyTivoX is running on a computer whose local hostname is iMac.local. If you run pyTivoX and your computer's hostname happens to be (say) Powerhouse.local — you set your Mac's hostname in Sharing Preferences, by the way — you'll see pyTivoX - Powerhouse.local instead.

The Music, Photos, & Showcases menu is pyTivoX's StreamBaby interface per se. It's the way you stream your videos from your computer for instant watching on the TiVo. It's a little bit easier to stream videos from this interface than to download them in the Now Playing list and then start watching them as they are downloading. Plus, using the StreamBaby interface keeps the TiVo from having to make room for a copy of the video on its own hard drive.

Here's the kind of thing you'll see after you select a video in pyTivoX's StreamBaby interface on your TiVo:


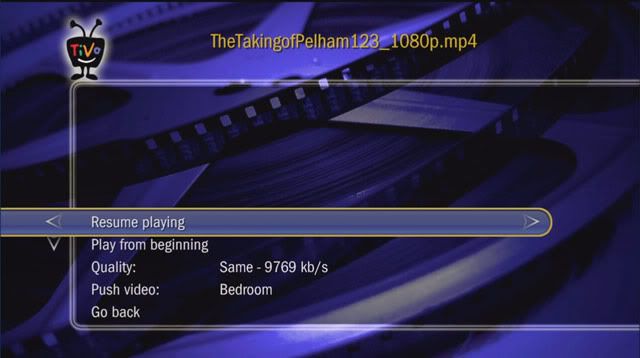
This particular video has already started to play, so the top menu item says "Resume playing"; otherwise, it would simply say "Play." The second menu item from the top lets you snap right back to the beginning of the movie if you've already started playing it. If you haven't started playing the video, this item is not present in the menu at all.

"Quality" refers to the average bitrate of the video: the average amount of data per second that will be streamed to the TiVo. Here, "Same - 9769 kb/s" indicates that the size of the video file divided by its running time — its average bitrate — comes to 9,760 kilobytes per second. That's the average bitrate, not the peak, and the fact that the average bitrate is pretty high (anything over, say, 5,000 kb/s is quite high) suggests that occasional bitrate peaks might overload your local network's data delivery speed, causing playback to pause — and, unfortunately, to do so repeatedly. Whenever the playback pauses, you'll have to hit Play on the TiVo remote to get it to start again. You should wait and hit Play after you think there has been enough newly received data buffered on the TiVo to avoid another playback pause any time soon.

If you get tired of hitting Play after endlessly repeated pauses, you can change the StreamBaby Quality to any of several lower bitrates. StreamBaby will, via its self-contained copy of FFmpeg, do things like (I am guessing) drop every third video frame to reduce the peak bitrate to an acceptable level. That will ideally keep you from having to hit Play over and over and over on your TiVo remote, but it can cause playback to present more "strobing" to your eyes than they might appreciate. Strobing can make the playback seem blurry in fast-motion scenes.

The next menu item is interesting. "Push video:" tells StreamBaby to cause the Bedroom TiVo — in this example; you can select among all the TiVos in your house — to summon the entire video file. It will be transferred in its entirely to the Bedroom TiVo's hard drive, and it will then appear the Bedroom TiVo's Now Playing list, allowing it to be played like any other video recording. The benefits:

  1. You can push videos in the MPEG-4 h.264 (or AVC) format that plain old TiVo Transfer on your computer wouldn't let you transfer. These files as computer files usually have an .m4v or .mp4 extension, not the .TiVo or .mpg extensions associated with MPEG-2 files that TiVo Transfer can handle. (The movies and TV Shows in your iTunes library usually have an .m4v extension, by the way.) There's a catch, though. Videos you purchase from the iTunes Store are encrypted and need to be independently decrypted before the TiVo can play them at all. It's beyond the scope of my article to say how to do that.
  2. You can also push and watch unencrypted videos in the familiar (if now outmoded) WMV format.
  3. Pushing a video allows you to (after a sufficient amount of the file has been received and stored) play the video from your TiVo's Now Playing list without encountering irritating pauses or having to throttle down the bitrate to avoid them.

What's the difference between "pushing" and "streaming," again? With "pushing" you wind up with a copy of the original file in your TiVo's Now Playing list. With "streaming," you simply play the video without making a copy on the TiVo.

Both of these options come from the StreamBaby interface on the TiVo, while a third option, "pulling" a copy of the video to the TiVo, comes from the pyTivoX interface proper. The pyTivoX interface is initiated directly from your TiVo's Now Playing list.

"Pulling" the video over to the TiVo has the advantage of having pyTivoX "transcode" the video into a different format en route to the TiVo, and that may be necessary to do if for some reason the video file as it resides on your computer cannot be played "natively" on the TiVo.

So if you try "streaming" the video and it looks terrible or won't play at all, try "pulling" it instead. Go to the Now Playing list on the TiVo and scroll down until you see the name of any of your "share" folders. For example, in the earlier screenshot image "Rob's PC" is the name of a share folder. When selected on the TiVo, it opens up to show all of the video files it contains ... and also any subfolders. You can drill down through the subfolders to find the video you want. Select that video and then select "Transfer this recording." In a matter of seconds it will start to transfer. The blue LED will come on on the front of the TiVo, and you will be asked whether you want to start watching the video while the transfer is ongoing.

If you do start to watch, you may quickly find that playback pauses because the rate of transfer cannot keep up with the rate of playback. After a while, you hit the play button, see some more of the video ... and get another"hard pause." Let the transfer proceed for a while. Then resume play. You may find  at that point that enough of the video has been transferred to keep playback from pausing henceforth.

Or you may not. If not, just do something else for a while. When you come back to the video, you'll most likely find it at the top of your Now Playing list, and if the transfer is not yet complete, you'll see the "blue button" icon next to it. You can initiate playback now just as you would any other recording in the Now Playing list.


So, those are the basics of the pyTivoX/StreamBaby/FFmpeg package for the Mac. Using it, you can watch any video file that sits on your computer — well, any video file that is in a format pyTivoX/StreamBaby/FFmpeg understands — on your TV, via your TiVo. Enjoy!

Monday, April 05, 2010

Stream, Baby, Stream

Run StreamBaby and it will stream video recordings from your computer to your TiVo. You fire StreamBaby up on your computer and let it sit there "listening" for the TiVo to command it to play a video. You go to your TiVo and from there select which video recording to play. Almost instantly, StreamBaby starts to stream the video through your TiVo into your TV.

It is a bit like TiVo multi-room viewing, which allows one TiVo in your house to feed a video to a different TiVo in a different room. With MRV you can begin watching the video in the other room as soon as the stream has started to transfer; in that way StreamBaby is basically like MRV with, as a source device, a PC or Mac, not another TiVo.

But StreamBaby is better than MRV. With MRV, if the bitrate of the program exceeds the speed of your network, you get a "hard pause" — one that will not automatically go back to playing the video after more of it has been streamed. You wait a bit, hit play, and pretty soon there's another hard pause. You manually go through the play-pause-play dance over and over and over again. Not wonderful.

StreamBaby will do the manual play-pause-play dance if you want it to, but it also gives you the option of throttling the bitrate down so that the video will play all the way through without interruption. That is wonderful.

And StreamBaby plays videos in a number of formats that the TiVo ordinarily can't deal with. For example, if on your computer you have a video in the MPEG-4/h.264/AVC format with the file extension .m4v, the TiVo ordinarily won't play it. StreamBaby plays it. StreamBaby plays .wmv, .avi, and .mkv videos too.

StreamBaby will swiftly seek to anywhere in the video, and play the video from that point in time. MRV won't. And StreamBaby will also fast forward/rewind to any point in the video, with low-quality static images appearing on the screen as a preview. (Unfortunately, videos in the .mpg, or MPEG-2, format don't present those static "thumbnail" images readily the first time they are played, until the static thumbnails are all cached for later use. That takes about five minutes for a two-hour movie. The cache is saved for the next time the video is played, however.)

StreamBaby lets you punch in, from the number pad on your TiVo remote, a sequence of digits, and then it will seek to that minute in the video. For example, if you punch in 1-8, minute 18 of the video will come up on your TV screen. Again, that's not something MRV can do.

StreamBaby responds to other key presses on the TiVo remote. For instance, if you use the FF or REW button and then the skip-forward or skip-back button, StreamBaby will jump forward or back in 15-minute increments.

StreamBaby remembers your position in a video when you stop watching and automatically starts at that position next time you watch. If you have more than one TiVo, it will do that even if you are using a different TiVo when you return to watching the video. Nice.

And the thing that really sells this hard-of-hearing guy on StreamBaby is that it puts subtitles on the screen along with the video. You have to go to a bit of trouble to turn the closed captions embedded in the video itself into subtitles, or to otherwise obtain the subtitles file, but once you do that, StreamBaby shows them.


StreamBaby First Use

After I wrote this, I learned about a much easier way to begin using StreamBaby — see Viva pyTivo!


StreamBaby runs under Windows, under Mac OS X, and also on Linux-based platforms. I'm using it on a Mac. According to the StreamBaby project website, getting started with StreamBaby is relatively easy under Windows. However, on a Mac there are complications. I'll detail some of them here.

(1) First, download the StreamBaby ZIP file from the website. At the time of this writing, it's the 0.29 version of StreamBaby, available here. But check the website to make sure that there isn't a later version for you to download.

(2) Unzip the ZIP file to get a folder called streambaby-0.29 (or whatever). You can put the folder wherever you want; I keep mine on my Desktop. In that folder, you're looking for the Unix executable named, appropriately, streambaby; it will run in Terminal. You're also looking for a crucial initialization file, streambaby.ini. Save a copy of the latter in its original form if you like, because you're going to  modify the original to (among other things) point to the folders that contain the videos you want to stream.

(3) Edit the original streambaby.ini file in TextEdit (drag the streambaby.ini icon to TextEdit on the Dock) to include the path to the top level of your video folder hierarchy. Here's mine:

dir.1=/Volumes/New 2TB Drive/TiVo Transfers
dir.1.name=TiVo Transfers

Notice that I also told StreamBaby by what name it should call my top-level folder. That's optional. If you don't specify your own dir.1.name, the default one that comes in the .ini file is "My Videos." The dir.1.name, whatever it is, will show up on your TV screen later on.

Notice also that there are embedded spaces in the dir.1 path name to my "TiVo Transfers" folder, and also in the dir.1.name. They're fine. You don't have to put an "escape" character ('\', a backslash) in front of the spaces. In fact, the streambaby.ini file won't work right if you do.

If you have no videos to stream using StreamBaby, then for the time being you will need to create (anywhere you like) an empty folder for this step.

But how do you ascertain the full path name to your videos folder? Download Copy Path.workflow.zip to your Desktop as a file named Copy Path (its extension, .workflow, is hidden), and then move or copy that file to become /Users/[username]/Library/Workflows/Applications/Finder/Copy Path.workflow. Substitute your own username for [username]. It then becomes a Finder plugin. To use it, select any folder or file in Finder, right-click on its icon, and choose More -> Automator -> Copy Path. Wait a few seconds for the plugin to do its work. The full path name is now on your Clipboard and, in TextEdit, you can paste it into streambaby.ini as dir.1!

In the streambaby.ini file, any line that begins with a '#" character is a comment. It has no effect. There are several of these in the original file to give you and idea of the kinds of things you can put in the file. (To find out all the things that can go in the file, click here.)

The active streambaby.ini file has to be in the same folder as the streambaby Unix executable.

(4) Your mileage may vary on this one. I found I had to put


ip=10.0.1.201


in my streambaby.ini file to get StreamBaby to work for me. 10.0.1.201 is the IP address of my iMac, set in Network Preferences. In that Preferences panel I've set my Built-in Ethernet connection (I'm using that connection and not AirPort) to "Configure: Using DHCP with manual address" and have entered 10.0.1.201 as my IP address. My iMac connects via an Ethernet cable to my AirPort Extreme base station (which is basically a wireless access point/router/Ethernet hub) and I run another Ethernet cable from the base station to my TiVo Series3. StreamBaby works for me only if I include the above line in my streambaby.ini file. If you try StreamBaby (see below) and find its "Stream, Baby, Stream" menu item won't show up on your TiVo, you might try looking at Network Preferences to find out your Mac's current IP address and entering it as a line like the one above in your streambaby.ini.

Don't forget to save your modified streambaby.ini file before you try to use StreamBaby. If you have already started StreamBaby on your Mac, you should quit it, modify streambaby.ini as desired, save the modified streambaby.ini, and restart StreamBaby from the Terminal window again. See below for more on how to do all that.

(5) This next part is a bit complicated. Bear with me. To get certain parts of StreamBaby's functionality to work, you have to install FFmpeg on your Mac. That's not easy, but doable.

First, download this ffmpeg.zip file to your Desktop. Then unzip it to put a folder called ffmpeg on the Desktop.

You are going to copy the ffmpeg.bin file within that folder to the /usr/bin/ directory, and then you will copy all five of the other files (the ones with the .dylib extension) to /usr/lib/. To do those things, you need to open a window in Terminal and enter

defaults write com.apple.finder AppleShowAllFiles TRUE; killall Finder;

followed by hitting return. Copy and paste the above to avoid typing errors.

That will cause hidden files and directories to show up in Finder. Next, navigate to /usr/bin/. /usr/ is at the top folder level on your main hard drive. /bin/ is one of the items at the top folder level within /usr/. Holding down the option key to make a copy, not move the original file, you need to drag ffmpeg.bin from the ffmpeg folder to /usr/bin/.

Then go back out to the /usr/ directory and open its /lib/ subfolder.  Option-drag all five of the .dylib files from the ffmpeg folder into that subfolder.

Now go back to the Terminal window and enter (via copy and paste):

defaults write com.apple.finder AppleShowAllFiles FALSE; killall Finder;

That will restore all hidden files to being hidden in Finder. Congratulations, you have just installed FFmpeg along with its five dynamic libraries!

(6) You're almost ready to try StreamBaby, but before you do, you'll need a video to try it out with. In Pt. 2 of this series I'll tell you how to create your own videos from recordings on your TiVo — you'll use your computer as an archive for them, plus decrypt them so they will stream in StreamBaby.

For now, you'll just download NxNW Clip.zip and unzip it to your Desktop. Then you'll edit


dir.2=/Users/[username]/Desktop/NxNW Clip
dir.2.name=NxNW Clip

into the streambaby.ini file, replacing [username] with your username. (Use the "Copy Path" Finder plugin mentioned earlier to simplify the whole thing.) Notice that this time, dir.2 and dir.2.name are used; this is your second StreamBaby folder. You specified the first one earlier, even if you had to create an empty folder somewhere to do it.

(7) Now that you have something to stream, it's time to fire up StreamBaby:
  • Open a Finder window for your streambaby-0.29 (or whatever) folder
  • Launch the Terminal application (it's a good idea to keep Terminal in your Dock); open a new window in Terminal, if none opens automatically
  • Drag the streambaby Unix executable file to the Terminal window and hit return
  • Expect to see something like 04/05/10 16:56:22 Listener: added factory and then 04/05/10 16:56:22 Main: streambaby ready & listening in the Terminal window, while ...
  • com.unwiredappeal.tivo.streambaby.StreamBabyMain opens as a separate application on your Mac; it's a Java app, and if it can't open properly, check that Java 1.5 or above is installed on your Mac; retry the above after you have obtained the latest release of Java for the Mac
StreamBaby is now running, so it's time for the acid test.

Go to your TiVo and from the TiVo Central menu choose Music, Photos, & Showcases. That will (after a couple of seconds of hesitation) bring up a list of items you can play, near the bottom of which (scroll down if necessary) is Stream, Baby, Stream.


If you don't see it, check near the bottom of the list for Enable Home Network Applications ... . If you see that, select it and comply with the instructions: hit the Thumbs Up button on your remote three times, then hit Enter. After you navigate back to the bottom of the Music, Photos, & Showcases menu, you should now see Disable Home Network Applications ... , just as in the picture above.

Or, if you see the "Disable" option already, you have a more serious problem. One possibility is that StreamBaby is using an IP address that the TiVo is blind to (see above for how you specify an IP address in streambaby.ini). You do have your TiVo on a wired or wireless network with you Mac, correct?

If so, then sorry, but solving problems like that is beyond the scope of this article. To get further advice, visit this thread at the TiVo Community Forum.

Once you do see Stream, Baby, Stream on your TiVo, select it. You should see a NxNW Clip screen with one item in its menu: NxNW Clip. Select that, and you should see NxNW 1 min.mpg. Select that, and you'll see a Play button, along with some others. Select Play. You will probably see a "Please Wait ..." icon and also some subtitles that begin playing even though there's no picture yet. After a few seconds, the picture and audio should snap in, and the subtitles will sync up with it.

The subtitles come from the NxNW 1 min.srt file in the same folder as NxNW 1 min.mpg, by the way. They were extracted from the closed captions in the original TiVo recording. In a later post, I'll tell you how I did it ...

Meanwhile, congratulations! You are just about ready to Stream, Baby, Stream ...