Monday, May 19, 2008

Using a Browser for TiVoToGo

This post is part of my TiVoToGo series on the ins and outs of moving TV recordings from a TiVo DVR to a Mac, for use eventually with iTunes, Front Row, and Apple TV. In previous posts I assumed the use of TiVo Desktop to copy recordings from the TiVo to the Mac. But there is an alternative. As long as you have the TiVo Desktop software installed, you can simply transfer recordings via your browser.

This is true whether you use a Mac browser or a Windows browser in Parallels Desktop for Mac.

I use Firefox as my main browser, but any browser will do. Just enter the URL https://<IP_address>/nowplaying/index.html. (Notice the "s" in https.)

The <IP_address> is that of your TiVo, which you can learn from TiVo Central -> Messages & Settings -> Settings -> Phone & Network on your TiVo. Mine is currently 10.0.1.4, though it changes from time to time. (Your TiVo has an IP address only if it's connected to a network. You need to network your TiVo if you want to use TiVoToGo.)

Next come the formalities. You may be presented by your browser with a warning about an unknown security certificate. Just click OK or Continue to go on. You will then be asked to enter a user name and password. The user name is tivo. The password is the media access key of your TiVo, a ten-digit number you can discover by navigating to TiVo Central -> Messages & Settings -> Account & System Information -> Media Access Key on your TiVo. You enter these and click the option to have the browser remember them for future use.

(Later on when you download files, you may have to enter the user name and password a second time. Do the same as before: enter user name tivo, type in your media access key as password, and tell the browser to remember this information for future use.)

Once you are done with the administrivia, you see something like:


All the shows recorded on your TiVo are presented, grouped by program title into folders as necessary. You can click to open a folder and see the shows within.

(If you don't see folders, you may be in classic view rather than groups view. Scroll to the bottom of the page and click on groups.)

For individual shows, in folders or otherwise, you can click on Download MPEG-PS to download the show to your computer as a .TiVo file.

When you do that, the browser will do whatever it usually does when you download something. Default behavior for Firefox is to create the downloaded file on the Desktop, but you can alter Firefox's Options/Preferences to always ask where to save a downloaded file. That's what I do, since I want to direct all TiVo downloads to a folder on my AirPort disk.

An AirPort disk is a USB 2.0 hard drive connected to an Apple AirPort Extreme Base Station ... a router, for all you non-Mac people. I like to use the browser method, rather than the official TiVo Desktop software, to copy recordings from my TiVo to my Mac, because I can't get the latter to direct downloads to my AirPort disk.

To find a show you want to download, you'll probably have to scroll down the Now Playing list:


When you click on Download MPEG-PS, then after you tell the browser where to put the downloaded file, you'll see:


It will take a fair amount of time for the download to complete. You won't see a time estimate, since the TiVo doesn't let the download process know how big the file is. You can bank on it taking upwards of an hour for an hour show on a wireless home network. These files are big.

Once the download is done, you'll be able to play the file in Toast Video Player under Mac OS X. You can also play it in Windows Media Player under Windows XP in Parallels ... maybe. I find that Windows Media Player balks, complaining about a missing codec, unless I upgrade TiVo Desktop to TiVo Desktop Plus. (This tells me the TiVo Desktop Plus package contains more than just the application itself.)

You can also convert the .TiVo file for use with iTunes, Front Row, and Apple TV ... the subject of Using VideoReDo on TiVo Files and Using VisualHub on TiVo Files.

Using VideoReDo TVSuite on a Mac

VideoReDo TVSuite is $74.99 software from VideoReDo that can edit MPEG-2 videos. That makes it an excellent choice for those like me who want to transfer TV recordings from their TiVo DVR to their Apple TV, cutting out commercials along the way.

Using TiVoToGo functionality found on all current TiVo models, you can transfer recordings of TV shows to your PC or to your Mac. VideoReDo demands a Windows PC. I have only Macs. I get around that problem by running Windows in the $79.99 Parallels Desktop for Mac package.

Parallels basically lets me set up, on my Intel-based MacBook Pro laptop, a "virtual machine," complete with imaginary hardware devices such as network adapters and hard drives. Into that virtual machine I install Windows XP. Windows shows up as (you guessed it) the contents of an ordinary Mac OS X window:


If you like, you can also run Windows/Parallels in full-screen mode, hiding all Mac-like things entirely. Or you can run it in "Coherence" mode, such that each open window in Windows becomes a separate open Window in the ordinary Mac environment.

You can learn more about running Windows in Parallels in Using Parallels Desktop for TiVo-to-Apple-TV Transfers.

After I bring up Windows in Parallels, I then copy one or more TiVo recordings from my TiVo box to my virtual Windows computer via TiVoToGo — specifically, by use of the free TiVo Desktop software I downloaded from here and installed in Windows:


I actually sprang for the $24.95 TiVo Desktop Plus upgrade, available here, an enhanced version of TiVo Desktop. I did this for two reasons.

One,
Plus allows TiVo Desktop to export .TiVo files directly in an h.264 codec suitable for an iPod, without resorting to third-party software. This "one-stop shopping" approach I found to be of sadly limited use for Apple TV, though, since output resolution is restricted to 320 x 240 pixels, and since no provision is made for editing the programs.

Two, the Plus upgrade allows .TiVo files to play in Windows Media Player in Windows XP, which I find to be nice but not essential.

Yes, I probably could have saved my $24.95.

You can learn more about this TiVo Desktop software in Using TiVo Desktop in Windows.

Alternatively, you can use a Web browser to copy TiVo recordings without using the TiVo Desktop application (though you do need to have TiVo Desktop or TiVo Desktop Plus installed). See Using a Browser for TiVoToGo for more about that.

Once one or more TiVo recordings have been copied to the Windows virtual machine, I theoretically might need to decrypt them, since they arrive on the Windows VM in encrypted form. However — and this differs from my experience with TiVo Desktop on the Mac — I don't actually seem to have to perform a separate decryption step, before VideoReDo (see below) can use the files. I'm not sure exactly why this is, but it's a definite speedup.


The next thing I do, after transferring one or more TiVo files to my virtual Windows machine, is open one of them for editing in VideoReDo:


Once I am done with the editing process per se, I tell VideoReDo to save my (edited) result in an .mpg container file, the internal contents of which are officially considered an "MPEG-2 program stream." The .TiVo input file itself is in a similar MPEG-2 internal format, except that it's encrypted. So when I save the edited video to an .mpg file, basically all VideoReDo does is a "fast frame copy" of all the video and audio frames in the input file (minus, of course, the stuff I've edited out). This happens fairly rapidly, with no transcoding and accordingly no loss of quality.

I find it convenient to save to an AirPort disk the rather large .mpg files created by VideoReDo. Windows (into which I have installed the free download AirPort for Windows software) lets me access the 500 GB USB 2.0 hard drive I have attached to my AirPort Extreme base station (that's Apple's fancy name for a WiFi router).

The next step (see below) is to use the .mpg files I store on the AirPort disk as input to Mac software, VisualHub, which will convert them for Apple TV use. VisualHub, like all Mac software, can also utilize the AirPort disk.

You can learn more about the VideoReDo editing/exporting process in Using VideoReDo on TiVo Files.


I need to convert the edited .mpg videos from the MPEG-2 format in which they are recorded by VideoReDo to a format playable by Apple TV.

Specifically, I need to convert them to the h.264 version of the MPEG-4 codec. h.264 is a compact, high-quality way to encode video programs, much more space-efficient at any given level of video quality than MPEG-2. Not only does Apple TV use h.264, so do video iPods and iPhones.

I find the software of choice to do the MPEG-2 to h.264 transcoding is VisualHub, which sells for $23.32:


The basic idea is that you drag the .mpg file you want to convert into the VisualHub window, choose To: iTunes, and select Optimize for: Apple TV with H.264 Encoding checkmarked. Use the Edit... button to tell VisualHub where to put your output file. Then click Start (replaced by Cancel in the screen shot above) to initiate the conversion.

If you want to get more control over the details of the conversion, then before you click Start, click Advanced... and see the Advanced Settings pane:


In this particular example, I forced FFmpeg Decoding (rather than QuickTime Decoding or VLC Decoding). Since I have managed to gain some familiarity with FFmpeg as a transcoding engine (see Transcoding to h.264 Using FFmpeg), that seemed reasonable.

I also forced the size-in-pixels of the video frame to 960x540, and the video framerate to 30 frames per second. The input was actually 1280x720 — 720p high-definition TV — at 60 fps. Apple TV can't handle that frame size/rate combination, so I lowered both the size and the rate to the top numbers Apple TV will tolerate.

You can learn more about using VisualHub to create Apple TV-compatible videos out of TiVo recordings in Using VisualHub on TiVo Files.


The "bucket brigade" of TiVo Desktop Plus and VideoReDo TVSuite in Windows (running in Parallels Desktop for Mac), followed by VisualHub on the Mac side, seems to be a winner for me.

TiVo Desktop Plus grabs my recordings and copies them to my computer.

VideoReDo TVSuite edits out the commercials and unwanted material. It also can work magic with input files that are in need of some kind of repair, such as making sure the audio and video are properly in sync. For especially damaged files, its Quick Stream Fix option can save the day.

VisualHub is a versatile engine for converting between (among other combinations) the original file's MPEG-2 video codec and the MPEG-4/h.264 codec required by Apple TV.

What's not to like?

Using VisualHub on TiVo Files

In this TiVoToGo series of posts I've been talking about ways to usher recorded TV shows from your TiVo DVR to your Mac and then play them on your Apple TV.

One good way involves using a software "bucket brigade":

  1. TiVo Desktop to copy recordings from the TiVo to the Mac — see Using TiVo Desktop in Windows.
  2. VideoReDo TVSuite to edit out commercials, and also decrypt the original file — see Using VideoReDo TVSuite on a Mac.
  3. VisualHub to convert the decrypted-and-edited file to a format compatible with Apple TV. (Edit: Unfortunately, since this post originally appeared, Techspansion, the creator of VisualHub, has closed its doors.)

The first two run in Windows XP, which runs in Parallels Desktop for Mac — see Using Parallels Desktop for TiVo-to-Apple-TV Transfers. The third, VisualHub, is the topic of this post. It runs under Mac OS X.

VisualHub (whose logo appears to the right) is "the universal video converter for Macintosh," which means it can convert virtually any video file (with or without audio) into any of several formats. One of the input formats VisualHub can convert is MPEG-2, signified by an .mpg filename extension. (VisualHub cannot read an encrypted MPEG-2 file with a .TiVo extension, such as one created by TiVo Desktop. This is one reason why I use VideoReDo, which reads in a .TiVo file and exports an .mpg.)

VisualHub in turn reads in an .mpg file and converts it to an .mp4 file — an extension signifying MPEG-4 as opposed to MPEG-2. MPEG-4 encoding is more space- and bitrate-efficient than the MPEG-2 format used on DVDs.

Yet more efficient is the h.264 version of MPEG-4, which is what VisualHub produces when told (1) to export to iTunes ... (2) a file optimized for Apple TV ... (3) using h.264 encoding:


Setting up the VisualHub conversion illustrated above was simple. I simply dragged an .mpg file icon to the VisualHub icon in the Dock. (I could also have dragged it into the VisualHub main window shown above, after manually having opened the VisualHub application.)

I then clicked on the iTunes tab at the left end of the To: row. I checkmarked H.264 Encoding. I used the pop-up menu to select optimizing for Apple TV ... instead of, say, iPod Touch or iPod Nano.

One thing that did was make sure my output file uses "B frames," handy ways of encoding individual video frames or pictures. B frames hold the output file size and bitrate down. If B frames aren't used, the output consists of just I frames and P frames, which use more bits than B frames. However, since B frames impose a heavy load on the decoder of the file, iPods don't support them. Apple TVs do.

I didn't have to move the Quality slider to Standard, because that was the default position. The different slider positions make for different levels of video quality in the output file by increasing or decreasing the video bitrate (and consequently the file size). I find that standard quality is fine for TiVo standard definition files, resulting in video that plays without artifacts. The file size is, meanwhile, quite compact.

I clicked on the Edit... button to tell VisualHub where to put the output file. By default, VisualHub puts the output file in the same folder as the input file. If you want it to go in a different place, use the Edit... button. (One thing lacking in VisualHub is the ability to give the output file any name you like. Instead, the output file always has the same name as the input file, with a different extension.)

I checkmarked Add to iTunes since I wanted my output file to play through iTunes on an Apple TV. The Add to iTunes option avoids having to add the output file manually.

Finally, I clicked on the Start button (which was replaced by the Cancel button seen in the screen shot above). VisualHub began the conversion of the input file to the output file, a process which lasted over two hours. The result was a file playable by iTunes and likewise by Front Row and Apple TV.

You can gain additional control over how the output file is rendered by using the VisualHub Advanced Options window. More on that in Using VisualHub Advanced Options.

Using VisualHub Advanced Options

This is another post in my TiVoToGo series on the ins and outs of moving TV recordings from a TiVo DVR to a Mac, for use eventually with iTunes, Front Row, and Apple TV.

One good way to do it involves this software "bucket brigade":

  1. TiVo Desktop to copy recordings from the TiVo to the Mac — see Using TiVo Desktop in Windows. (You can also do this with a Web browser — see Using a Browser for TiVoToGo.)
  2. VideoReDo TVSuite to edit out commercials, and also decrypt the copied file — see Using VideoReDo TVSuite on a Mac.
  3. VisualHub to convert the decrypted-and-edited file to a format compatible with Apple TV.

The first two run in Windows XP, which runs in Parallels Desktop for Mac — see Using Parallels Desktop for TiVo-to-Apple-TV Transfers. The third, VisualHub, is the topic of this post. It runs under Mac OS X.

In Using VisualHub on TiVo Files I discussed the basics of using VisualHub. In this post I'll deal with some of VisualHub's Advanced Settings.

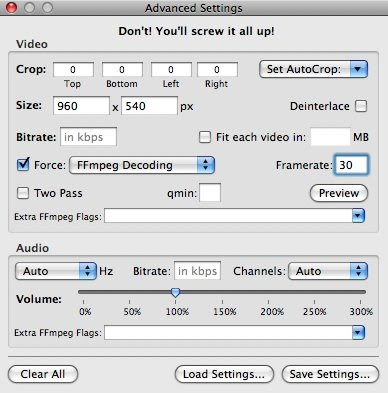
The Advanced Settings window looks like this:


In the above screen shot I'm about to convert a file that I identified in the VisualHub Main Window:


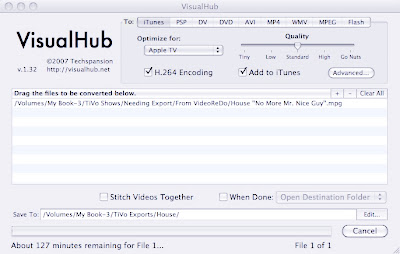
This conversion is to be of a file in the MPEG-2 video compression format, as indicated by the .mpg extension. That input file is the result of copying a TiVo recording of an episode of House that was cablecast in 720p, the high-definition format in which there are 60 frames of video per second, each frame having a resolution of 1,280 x 720 pixels. After copying the recording using TiVo Desktop, I edited out commercials using VideoReDo. Now I have to convert it to a format compatible with Apple TV.

That format is the h.264 version of the MPEG-4 codec ... which is exactly what has been selected in VisualHub's Main Window. But there are restrictions that apply to files that are going to be playable by Apple TV, which is why I have to use Advanced Settings.

Apple TV files have certain combinations of resolutions and frame rates that need to be adhered to. It turns out that the top resolution for video with the 16:9 aspect ratio — the aspect ratio that is standard for HDTV — is 960 pixels by 540 pixels, at a maximum frame rate of 30 frames per second. Hence, in the Advanced Settings window above I indicate Size: 960 x 540 px and Framerate: 30.

I have also told VisualHub to Force: FFmpeg decoding. The input file will accordingly be decoded by FFmpeg, a decoding-encoding module included with VisualHub. I don't want to use the second choice in the Force: pop-up menu, Quicktime decoding, since for murky reasons QuickTime, even when enhanced with Apple's $19.99 QuickTime MPEG-2 Playback Component, will neither play nor decode most .mpg files derived from TiVo recordings.

Nor do I want to use the third, remaining choice in the Force: pop-up menu, VLC decoding. The main reason for that is ... well, actually, I just haven't tried that option.

If I don't put the check mark next to Force:, my experience is that VisualHub will default to FFmpeg decoding anyway. I put the check mark there just for illustrative purposes.


That's about it with respect to HDTV recordings. I also like to save old movies from the Turner Classic Movies channel, which is standard-def. Many of these are shown in a letterbox: the movie is shown in its original aspect ratio with black bars at the top and bottom of the screen.

When a letterboxed movie is converted by VisualHub and then shown on a widescreen TV via Apple TV, it will have black bars not only at the top and bottom, but at the sides as well:


You can use the cropping features of VisualHub to reduce or eliminate the black bars at the top and bottom. In so doing, you will also eliminate the bars at the side:


Here are the necessary Advanced Settings:


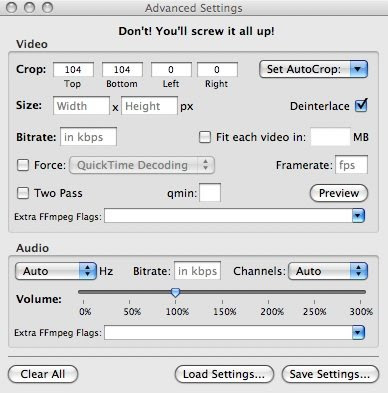
I set up the conversion to crop 104 pixels (actually, lines of pixels) off the top and 104 off the bottom of the nominally 640 x 480 input image, resulting in a 640 x 272 output image.

(To be quite precise, the actual frame size of the input image happens to be 704 x 480, not 640 x 480. 704 non-square pixels are shoehorned into each input line where 640 square pixels will appear in the output of the conversion. Since VisualHub cannot output non-square pixels, I'm ignoring this detail.)


How I determined exactly how many lines to crop at top and bottom was not at all straightforward, though. There are several ways to do this. One is to use the Set Autocrop: pop-up menu, selecting from it its By This File option.

When you do that, VisualHub examines the first few seconds of the input file to try to see how many lines of pixels at the top and bottom of the screen are all black. Those are presumably the letterboxing bars, and they can go away.

Trouble is, TiVo files generally have a line of pixels at or near the top of the screen in which the pixels are not all black. This line contains changing information that translates into Closed Captioning text. It fools VisualHub into using zero for the number of lines to autocrop at top.

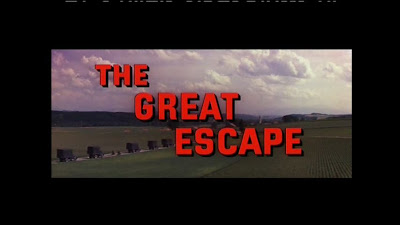
VisualHub has a better chance of getting the bottom autocrop figure right. In my conversion of The Great Escape, it wanted the crop-at-bottom number to be 108 lines.

At first I thought I would just use the same number for crop-at-top. I recognized, however, that the results of the video compression VisualHub would be doing as it converted the MPEG-2 input to the MPEG-4/h.264 output would be better in quality if the number of horizontal lines in the resulting image were divisible by 16.

Doing a little back-of-the-envelope math, I saw that the crop-at-top and crop-at-bottom numbers should each be divisible by 8 — given that the number of lines in the input image, 480, is divisible by 16. 8 times 2 is 16. Hence, the crop-at-top and crop-at-bottom numbers can be divisible by 8 ... not necessarily by 16.

108 is not divisible by 8, while 104 is. Hence, I used 104 as both the crop-at-top and the crop-at-bottom number.

Another way to get the right cropping numbers is by trial and error ... in which case, you would be well advised to create a short snippet of the movie to run your experiments on. You can do that in VideoReDo as a separate step from outputting the entire movie. If you go the snippet route, your best bet is to output a swatch of, say, one minute in length from somewhere in the middle of the movie. Use that snippet for your cropping experiments.

(Why a snippet from the middle of the movie? Often, material at the very beginning gives a false bottom-autocrop reading. For instance, old MGM flicks typically start with a Leo the Lion logo on a black background. VisualHub interprets everything below the logo as croppable.)

Finally, a quick and dirty way to set the cropping numbers for any letterboxed film is to try 60 for both the top and the bottom figures. The result will be a 640 x 360 frame, for a 16:9 aspect ratio. That's the aspect ratio of a widescreen HDTV. There may still be (shorter) letterboxing bars on the HDTV screen, but even if you cropped off every single line of black in the input, by the time Apple TV got done displaying the output image on your HDTV, the (shorter) bars would show up there anyway.

Of course, 60 is not divisible by 8, so the purist may prefer to crop 56 pixels, or 64, at top and bottom and sacrifice the exact 16:9 aspect ratio. Or, try 56 at top and 64 at bottom.

One caveat: Not all letterbox bars are greater than, say, 60 pixels in height, and using a predetermined number such as 60 for quick-and-dirty frame cropping could bite into the actual image. One way to avoid that is to click VisualHub's Preview button in Advanced Settings. Up will pop a window giving you an advance look at a single frame from the video:


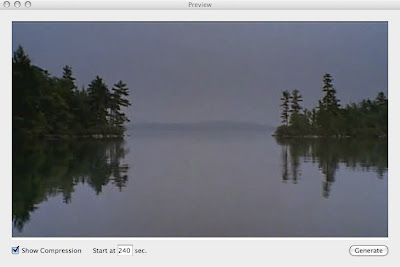
Once the Preview window is visible, you can change the number of seconds into the video the preview frame comes from by setting Start at ___ sec. That lets you find a still frame that is truly representative — if, say, early frames from the very beginning of the video aren't letterboxed.

With the Preview window visible, you can go back to the Advanced Settings window and tweak the cropping parameters. Then either click Preview again in the Advanced Settings window or click Generate in the Preview window. The still frame will be redisplayed with the new cropping. In that way you can zero in on just the cropping numbers you want.

(Another great thing about the Preview window is that you can check mark Show Compression, then change the Quality setting in the VisualHub main window and click Generate. The preview will be regenerated with the new compression parameter, and you can see immediately how your change will affect the output quality.)

Please pardon the above extended dissertation on image cropping, by the way. Cropping is helpful in making best use of your TV screen's real estate ... and it makes for smaller output files from VisualHub!


If you go back and look at the prior Advanced Settings screen shot, you can see that I also check-marked VisualHub's Deinterlace option. Understanding the value of this option, alas, demands another dissertation.

Standard-def TV is interlaced, which means every still frame in the moving image is actually two pictures. One picture occupies the odd-numbered lines of the 480 lines of pixels in the image; the second, which represents the scene 1/60 second later, occupies the even-numbered lines.

Normally, that creates no problems. There are simply 30 frames per second, each composed of two fields, for a field rate of 60 per second.

When the source of the program is film, though, there are problems. Film is shot at 24 frames per second, not video's 30 frames per second. When film is shown on television, the 24 frames can be sliced and diced into 48 fields easily enough ... but there need to be an additional 12 fields to pad out to 60 per second.

That is done simply be repeating some of the 48 fields. (TV is known for its repeats, right?)

For technical reasons, this trick is referred to as "3:2 pulldown," aka "2:3 pulldown."

When the resulting TV signal is captured by a TiVo and digitized, and then converted to MPEG-4/h.264, the conversion creates frames that are not interlaced. They do not consist of two pictures 1/60 second apart. They consist of a single picture per video frame which is the composite of the two fields of the original.

When two fields are composited in this way, they can produce an image that comes from two separate frames of film. Objects that are in motion can have their normally straight edges take on a serrated appearance:


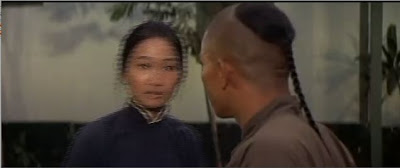
Watching such serrated-edge images stream by can give the impression that the images are fuzzy or unstable.

The best antidote is to do "3:2 pulldown compensation": simply remove the 12 fields per second that were inserted to pad out to 60. The result, done right, is that each of the (now) 24 frames per second of video represents exactly one frame of the original film. No more serrated edges.

Sadly, VisualHub has no way of doing 3:2 pulldown compensation. Instead, it uses deinterlacing. In the type of deinterlacing VisualHub uses, one field of each frame is simply discarded ... or, actually, it has the other field of the same frame substituted for it.

Now, all the information in each frame of video output comes from just one film frame ... and there can be no serrated edges. The image looks rock steady:


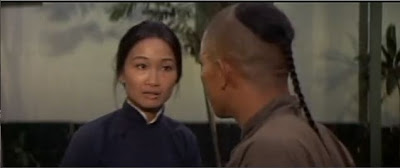
The downside is that vertical resolution is halved. Where there were originally 480 lines of vertical resolution, now there are just 240. (And cropping the image at top and bottom can result in even fewer lines of vertical resolution.)

So the use of VisualHub's Deinterlace option is a matter of personal taste. I myself find that deinterlacing produces a more pleasing result than allowing edge serration to creep in. Your mileage may vary.

Saturday, May 03, 2008

Transcoding to h.264 Using FFmpeg

(Geek alert: this article is not for the technically faint of heart!)

One of the basic tasks to be done in transforming a TiVo recording into a video that plays on an Apple TV is the transcoding of the MPEG-2 of the original TiVo recording (after it has been duly decrypted) into a file that uses the MPEG-4 codec. Specifically, the h.264 variety of that codec is what Apple TV must have. Apple TV can't use MPEG-2.

If you, like me, use VisualHub for this transcoding purpose, you may (again, like me) run into situations where you need more control over what VisualHub is doing ... more control, that is, than the "ordinary" Advanced Settings in VisualHub seem to give you.

You can gain extra control by checkmarking "Force: FFmpeg Decoding" and entering appropriate FFmpeg options and arguments into the "Extra FFmpeg flags" field.

So, what is FFmpeg? FFmpeg is a standalone software tool that VisualHub "contains" in the form of a Unix executable file named vh131ffmpeg, located in the user folder ~/Library/Application Support/Techspansion/. The exact name of the executable could change in future releases of VisualHub; that's the name as of version 1.3.1 of VisualHub.

That Unix executable can be directly invoked in Terminal, if you want to play around with it without using VisualHub as an intermediary. Here's how I get to it, under username dalekhound:

$ cd /Users/dalekhound/Library/Application\ Support/Techspansion
$ ./vh131ffmpeg

The $ is the prompt character in Terminal, which is always, in my case, expanded to:

eric-stewarts-computer:Techspansion dalekhound$

I'll leave that boilerplate out in what follows, and just use $.

Notice that I have to precede the name of the executable with ./ so as to get $ ./vh131ffmpeg. If I don't do that, the Mac tries to find vh131ffmpeg somewhere other than the current directory, the one which I set using cd.

Just entering ./vh131ffmpeg with no options or arguments causes it to produce a voluminous list of the options you can choose ... as if you had entered ./vh131ffmpeg -help.

Another way to learn about FFmpeg's options is to visit http://ffmpeg.mplayerhq.hu/ffmpeg-doc.html.

You can also find a well-written overview of FFmpeg's usage at http://howto-pages.org/ffmpeg/.

The basic function of VisualHub's "Extra FFmpeg flags" field is to allow you to input various options and arguments to FFmpeg, just as you would if you were using the command-line interface in Terminal. Here's a very brief primer on the options and arguments.

If I enter, in Terminal:

$ ./vh131ffmpeg -i ...

and fill in the placeholder meaningfully with the path to an input file, FFmpeg will transcode the input file and produce an output file in according to the options that I replace ... with.

For purposes of this tutorial I'm using an input file whose full path can be given as:

/Volumes/My\ Book-3/TiVo/TiVo\ Shows/Needing\ Export/From\ VideoReDo/Hello,\ Dolly\!.mpg

Notice two things. First, the levels of the folder hierarchy are separated from each other by a forward slash /. Second, every character in the pathname (including space characters) that is not a letter, a number, or a period is preceded by an "escape" character: a backward slash \.

Alternatively, the whole pathname, or any part thereof that would otherwise have to contain internal escape characters, can be enclosed in single quotes ('). For example:

'/Volumes/My Book-3/TiVo/TiVo Shows/Needing Export/From VideoReDo/Hello, Dolly!'.mpg

The output file's full path name can be exactly the same as that for the input file, except that .mp4 is substituted for .mpg. This is appropriate for two reasons. One, you don't want to overwrite the input file. Two, the output file (in this case) will be in a format appropriate to the MPEG-4/h.264 codec, and as such should have the qualifier .mpg.

Rather than laboriously type in the whole path name, try typing just ./vh131ffmpeg -i , with a trailing space character, after which you can simply drag the Finder icon for the input file into the Terminal window. The properly specified path name will magically appear, with all the required escape characters. Then type in the options you want to replace the ellipsis ( ... ) with, in the above template. Finally, again drag the Finder icon for the input file into Terminal, but this time go on to manually edit the output file name (if desired) and definitely change the extension to .mp4. Once you have done all that, hit the return key, and the command will execute.

Another trick you can use is to build the command line in a TextEdit document and copy it in its entirety to Terminal. You can use the drag-the-Finder-option shortcut too. But now, the pathname you get in TextEdit won't have the necessary escape characters, so you have to manually enclose the pathname in single quotes.

If I use TextEdit to build:

/vh131ffmpeg -i '/Volumes/My Book-3/TiVo/TiVo Shows/Needing Export/From VideoReDo/Hello, Dolly!'.mpg

and copy that into Terminal (hitting return), I see:

FFmpeg version SVN-r9226, Copyright (c) 2000-2007 Fabrice Bellard, et al. libavutil: 49.4.0 libavcodec: 51.40.4 libavformat: 51.12.1 built: Feb 12 2008 19:58:15, gcc: 4.0.1 (Apple Computer, Inc. build 5367), i386

Input #0, mpeg, from '/Volumes/My Book-3/TiVo/TiVo Shows/Needing Export/From VideoReDo/Hello, Dolly!.mpg':

Duration-8906 start-0.200000 bitrate-2312

0.0,,dvd1e0,,,Video,mpeg2video,yuv420p,704,480,29.97

0.1,,dvd80,,,Audio,ac3,48000,2,192

The first part is information about this particular version of FFmpeg, followed by important information about the input file. (Notice that as yet there are no further FFmpeg options in the command line, and no output file is specified.)

The duration of the input file is 8,906 seconds, or about 148.43 minutes ... or about 2.47 hours. It's actual start time is for some reason offset from the nominal beginning by 0.2 seconds. The bitrate of the file, including both its audio and video streams, is 2,312 kilobits per second.

There are two streams, a video stream, designated 0.0, and an audio stream, 0.1. These designations use "0" before the "." to represent the first (and in this case only) input file to FFmpeg, and the "0" and "1" after the "." to represent, respectively, the first and second streams in that single input file. The first (or "0.0") stream is video; the second (or "0.1") stream is audio.

I'm not sure what some of the other stuff means, but:

  • mpeg2video is the video codec that will be used by FFmpeg to decode the video stream
  • yuv420p tells how the video's pixels are "put together": how the color is specified as two components (uv) and how the luminance (black and white component) is specified (y); I think "420p" has to do with the way in which the color information is "subsampled" (reduced in quantity) with respect to the luminance
  • The video frame has 704 pixels horizontally and 480 pixels vertically
  • There are 29.97 video frames per second
  • The audio is encoded using the ac3 (i.e., Dolby Digital) codec, with 48.000 audio samples per second for each channel; there are 2 channels (i.e., it is stereo); the audio bitrate is 192 Kb/sec
Notice that what is not mentioned, but is actually the case, is that this input file plays back in (say) the VLC media player with an aspect ratio of 4:3. That "display aspect ratio" is usual with standard definition NTSC fare such as this recording.

Also notice that the "nominal aspect ratio" is 704:480 — that is, there are 704 pixels horizontally in the frame and 480 pixels vertically. For a 4:3 frame with 480 "lines," the number of pixels in each line "ought to be" 640, not 704. 640:480 is the same as 4:3. (To see this, divide the X in X:Y by the Y. For both 640:480 and 4:3, the result is 1.33333 .... .)

But 704:480 is 1.4666666 ... , not 1.33333 ... .

So the pixels in my input file are not the usual "square" pixels whose height and width are equal. Instead, the width is only 640/704 of the height. 640/704 equals 0.909090909 ... . These pixels are roughly 90% as wide as they "ought to be."

That's not a bad thing: cramming 704 pixels into a line that "ought to" contain only 640 pixels allows greater horizontal resolution.

Actually, though, I believe the non-square pixels are but an artifact of how the TiVo captures standard-definition analog TV, which has a display aspect ratio of 4:3. Instead of encoding it as 480 lines of 640 square pixels per line, it uses non-square pixels in a 704x480 grid.

This is akin to how 4:3 video is recorded in MPEG-2 on a non-anamorphic DVD. By emulating a DVD format, a TiVo makes it relatively easy to use TiVoToGo to transfer a recording to a computer and then burn it (after decrypting) to a DVD.

But FFmpeg, at least when its output file is h.264, uses only square pixels. If you transcode a 704x480 file in FFmpeg (or in VisualHub with FFmpeg as its decoder), the result will have a 640x480 grid. Whatever extra horizontal resolution (above 640 pixels per line) that may have been in the input file will be lost. Fortunately, I don't believe actual standard-def 4:3 channels have even 640 pixels per line of discernible detail, so nothing is really lost here.

[More to come ...]

Friday, May 02, 2008

Using TiVo Desktop in Windows

This is another in my TiVoToGo series of posts in which I've been talking about ways to usher recorded TV shows from your TiVo DVR to your Mac and then play them in iTunes or Front Row on the Mac, or on your Apple TV.

One good way I've found to do this involves using this chain of apps:

  1. TiVo Desktop to copy recordings from the TiVo to the Mac — the subject of this post.
  2. VideoReDo TVSuite to edit out commercials, and also decrypt the original file — see Using VideoReDo TVSuite on a Mac.
  3. VisualHub to convert the decrypted-and-edited file to a format compatible with Apple TV see Using VisualHub on TiVo Files.

The first two apps run in Windows XP, which runs in Parallels Desktop for Mac — see Using Parallels Desktop for TiVo-to-Apple-TV Transfers. The third, VisualHub runs under Mac OS X.

TiVo Desktop is software from TiVo, Inc. It enables TiVoToGo, the capability to take recordings off your TiVo DVR and use them elsewhere, to work. "Elsewhere" can mean a second TiVo in your house. It can also mean a Windows PC, a Mac, or any of several types of portable devices such as an iPod or iPhone. One of the TiVoToGo possibilities is an Apple TV.

Recordings on a TiVo are digital, even if the channel they were recorded from was analog. They, moreover, are digitally compressed using the MPEG-2 codec for video compression that is also used for DVDs. (The audio is likewise digitally compressed.)

The first thing that TiVoToGo has to do is transfer the encrypted MPEG-2 recordings to (say) your Mac or PC. That's where TiVo Desktop comes in.

On a Mac, TiVo Desktop is but a System Preferences panel, and the user interface is implemented in software from Roxio called Toast 9 Titanium. One of the Toast modules is TiVo Transfer. You use it to transfer recordings from your TiVo to you Mac.

In Windows, you use TiVo Desktop itself, which is an application, not a preferences panel. Here's what it looks like when you launch it:


The first time you use TiVo Desktop you'll need to choose Set Media Access Key from the File menu. You see a dialog box:


(This one indicates that my MAK has already been set. The dialog you see the first time does not say "Media Access Key has been set.")

You find your MAK on your TiVo by by navigating to TiVo Central -> Messages & Settings -> Account & System Information -> Media Access Key. You enter the ten-digit number you see there in this dialog and click OK. This MAK is what allows TiVo Desktop to function with your TiVo.

Now you click on Pick Recordings to Transfer and wait briefly while TiVo Desktop fetches the list of all the recordings on your TiVo:


TiVo Desktop gets its information from your TiVo via your home network, typically a wireless network. If your TiVo doesn't have a wireless 802.11 WiFi (or, optionally, a wired Ethernet) connection to a network that your Mac is on, you'll need to network it before TiVoToGo and TiVo Desktop will work.

Next, from the list of recordings you pick any one and click Start Transfer. You see:


You wait perhaps an hour or more until the transfer is complete ... and you have a new file with extension .TiVo in your TiVo Recordings folder. This file becomes your input to VideoReDo. Simple as that.

You can use TiVo Desktop's File -> Preferences panel to select a different folder to put .TiVo files in ... with a great many restrictions, it seems. For example, I find I can't direct these files to my AirPort disk, the capacious hard drive attached to my AirPort Extreme wireless router and made available in Windows by AirPort for Windows. Though other Windows apps can output to my AirPort disk, TiVo Desktop can't.

That's why I don't really use TiVo Desktop, the Windows application, all that much. Instead I use my Firefox Web browser in Windows to download .TiVo files and put them exactly where I want them. The browser method works only if TiVo Desktop, the behind-the-scenes software package that contains the application, is installed. See Using a Browser for TiVoToGo for more about that.

I'm not really using the free version of TiVo Desktop for Windows, either. I actually sprang for the $24.95 TiVo Desktop Plus upgrade, available here, an enhanced version of TiVo Desktop. I did this for two reasons.

  1. Plus allows TiVo Desktop to export .TiVo files directly in an h.264 codec suitable for an iPod, without resorting to third-party software. This "one-stop shopping" approach I found to be of sadly limited use for my Apple TV, though, since output resolution is restricted to 320 x 240 pixels, and since no provision is made for editing the programs.
  2. The Plus upgrade allows .TiVo files to play in Windows Media Player in Windows XP, which I find to be nice but not essential. Without the Plus upgrade, I found the Windows Media Player always complained about missing codecs as it refused to play .TiVo files. No amount of downloading and installing "codec packs" that promised to cure the problem actually cured it. The Plus upgrade to TiVo Desktop fixed that particular woe. Alas, I find that I don't really need to play .TiVo files in Windows Media Player all that often.
Yes, I probably could have saved my $24.95.

Using Parallels Desktop for TiVo-to-Apple-TV Transfers

In Using VideoReDo TVSuite on a Mac I talked about a good work flow you can use to capture, on your Mac, TV shows recorded on your TiVo DVR, then edit out their commercials. You can then, using software like VisualHub, convert them and store them on your Mac for use by iTunes, by Front Row, and by your Apple TV.

One of the essential pieces of the puzzle was the $79.99 Parallels Desktop for Mac package.

Parallels is a must because Macs don't usually run Windows, and the VideoReDo TVSuite software which is so good at editing commercials out of programs needs Windows. Parallels lets you run Windows XP on any Intel-based Mac, without rebooting the Mac. That means you can have Windows running in its own window while you continue to use your Mac as you would normally do.

You install Parallels Desktop 3.0 for Mac on your Intel-based Mac as an ordinary application. Then, upon launching it for the first time, you enter a valid activation key and optionally register the product. Those messy details taken care of, you will perform what is called an Express Installation of Windows XP. (You can do something similar if you want to use Windows Vista.)

For your express (i.e., fast) Windows XP installation you will, of course, need to have in hand a complete, fully licensed copy of Windows XP. You may use either an installation CD per se or an ISO image of the installation CD.

A good way to find out exactly what you need to do to install Windows in a brand-new Parallels setup is, after you have launched Parallels but before you have tried to do your Windows installation, select Quick Start Guide in the Parallels Desktop Help menu.

Because you have a virgin Parallels environment at this early point, what you should see when you start Parallels is a dialog designed to let you select which "virtual machine" Parallels is to use. A virtual machine, or VM, is a Windows-type computer emulated in software, with all of the hardware, software, and networking features of you Mac "mapped into," respectively, the hardware, software, and networking features of the VM.


In the above screen shot, I already have a VM which I can choose to use, Clone of winxp. In your case, the list of VMs will be empty, and you will click New... to bring up:


(If you see an Introduction panel instead, just click Next >.) This is where you are going to specify that you are doing a Windows Express installation.

In the next pane you will choose between Windows XP and Windows Vista:


Unless you have Vista, select Windows XP.

Next you have to specify a valid product key for Windows XP, along with a user name for your first Windows user account:


In the next pane you name your Windows XP virtual machine and select options for how it will run Windows XP:


Here I show what the pane looks like if you want to share your Mac account's Home folder, share your Mac Desktop, and share your various Mac user folders in Windows. (If you don't select these options now, you can always do so later on by editing your virtual machine's configuration in the Configuration Editor. This is something you can do in Parallels after you have launched the VM but before you have started Windows in that VM.)

I have also elected to create an icon on the Desktop by means of which to launch the VM. I am here intending to share this VM with other Mac users — which means that the Mac file containing the VM is automatically placed in the /Users/Shared/Parallels folder on the Mac — so that option is checked as well.

In the next pane you indicate whether you want to set things up for the best possible performance of your virtual Windows machine, or else you prefer that the performance of Mac OS X applications be optimized at the expense of Windows applications:


I suggest you optimize for Windows by selecting Virtual machine.

Finally, you arrive at a pane asking you to insert your Windows XP CD into your Mac's optical drive:


When you click Finish, over the course of about an hour your virtual machine is going to be created with Windows XP installed in it, ready to use.

As the Windows install process proceeds, you will see it unfolding inside the Parallels window just as it would unfold on the monitor of a real Windows PC.

As things proceed, you may see a Windows security alert, during the install process, which tells you that there is an attempt under way to install "driver software" that Windows cannot identify. You need to choose the Install this driver software anyway option.

After the Windows operating system has been fully installed, something called Parallels Tools is also installed in your newly created virtual machine. (You'll need to confirm Parallels Tools installation, when prompted.) Parallels Tools consists of a set of resources that act as aids to the smoothest possible integration of Windows with your Mac. For example, one of the resources in Parallels Tools allows seamless synchronization between the clipboard in Windows and that of the Mac.

You should not even consider running Windows in Parallels without having Parallels Tools installed. If for some reason you don't install Parallels Tools at this point, you can always do so later while Parallels is actually running Windows.

The Parallels Desktop for Mac Quick Start Guide gives further details about how to wind up the initial installation process.

From then on, whenever you launch the Parallels application you'll see something like this:


(This is what the Parallels window looks like for my Clone of winxp VM when that virtual machine is stopped. Yours might be called something like My Windows XP instead.) If you click on the rightward-pointing green triangle, the VM starts and Windows starts up as well. You'll see something like this when Windows is ready to have you log on as a Windows user:


You just click on the user name icon with your (white arrow, not black) mouse pointer, and (after entering a password, if applicable) voilĂ :


Actually, to get it all just the way you want it, you'll probably need to visit the Configuration Editor, available from the Edit menu in Parallels whenever the VM is not running. If you want to edit the configuration while the VM is running Windows, you'll have to log out of Windows and stop the VM. See the Parallels Quick Start Guide for more on how to do those things.

Here, I'm using the Configuration Editor to set the resolution of my virtual "monitor" (under the Video resource) to 1280x800:


Among the other resources you may want to edit the configuration of are Shared Folders (what folders/disks on your Mac can be accessed fron Windows) and Memory (how big the memory size of your virtual machine is).

Once you are running Windows in your VM, you can pretend you have a real Windows PC. That means you can do things like find, buy, and download software for it:

  • a web browser such as Firefox, to locate other software you need (use the default browser that comes with Windows for this)
  • TiVo Desktop, to capture TV recordings from your TiVo
  • VideoReDo TVSuite, to edit out commercials and save the edited recordings

The software downloads are stored as files on your VM, usually on the Windows Desktop. They typically have to be double-clicked on to unzip them, once downloading them has completed, after which you can fire up the installer file contained therein. The process is much like installing downloaded software on a Mac ... except that, this time, the software is being installed on your brand-new (virtual) Windows machine!

Using VideoReDo on TiVo Files

In Using VideoReDo TVSuite on a Mac I talked about VideoReDo TVSuite, $74.99 software from VideoReDo that can edit MPEG-2 videos. I called VideoReDo an excellent choice for those like me who want to transfer TV recordings from their TiVo DVR to their Apple TV, cutting out commercials along the way.

There is also a less pricey product that has many of the same editing features: VideoReDo Plus for $49.99. You can compare the two products here.

VideoReDo in either of its forms runs under Windows, so if you have an Intel Mac you'll have to provide a "virtual machine" to run Windows in. One option is Apple's Boot Camp. The one I use is the $79.99 Parallels Desktop for Mac. (If your Mac is not Intel-based, you're out of luck.)

VideoReDo starts up with an Open Video window:


Once you click on the prominent Open Video button, you can select any MPEG-2 file to edit, including one that has been transfered to your computer from your TiVo box, via your home network, by means of using the TiVo Desktop software you can get here. TiVo-transfered files have the extension .TiVo, and, yes, they are encrypted, but VideoReDo can read them.

When you open such a file in VideoReDo, you'll see something like this:


Depending on the preferences you set, you may also see a strip of small images of video frames just below the main image. These are the current frame itself, plus the few frames immediately preceding and following that frame in the video stream. When the strip of adjacent frames is on display, you can use it to zero in on a particular frame near the current one. I don't personally find that too useful, so I have the subsidiary strip of frames disabled in my view.

Just below the video frame you can see a bar with a slider. The slider lets you quickly position playback to any spot in the video stream. The bar is solid red in the screen shot above. That indicates that, pending editing, the entire video is unselected. My job is to add just the parts of it I want to include in the output file.

The brackets at either end of the bar show what is currently selected for editing purposes: here, the entire video. If I were to click on the Add Selection button at this point, the entire bar would turn green, and the whole running time of the video would appear as a single scene in the scene list at upper right.

I could alternatively drag the selection brackets to designate any part of the video I want to become a scene in my output file, and click Add Selection for just that part.

But what I really want to do is use VideoReDo's Ad Detective. Here is a screen shot of what that looks like:


The Ad Detective scans through the video, moving rightward from the initial position of the slider on, and puts little red markers wherever it detects that the video frame has gone to solid black. That's what happens when a commercial break begins, when it ends, and sometimes at points in between.

Notice also that I have the selection brackets positioned to surround a small portion of the video right at the beginning, a snippet of extra material which is prior to the actual start of the show. I (though you can't necessarily tell it) have already used Ad Detective to locate the video black frame between it and the show proper. I then used keyboard shortcuts to position the selection brackets, the first at the very start of the video, and the second at the video black frame. Finally, I clicked the Add Unselect button. That caused the entire rest of the video to become a single scene in the Scene List, and to show up in green in the editing bar.

After that, I started running Ad Detective in earnest, and you can see that it has found three video black frame sequences and marked them in red. At this point I paused the Ad Detective scan and, again using keyboard shortcuts, put my selection brackets at the first and third of the markers. I clicked the Invert Scene Selection button, which turned green to red and red to green on the editing bar. Then I clicked on Add Selection. This turned just the commercial break to a green segment in the midst of red. When I clicked Invert Scene Selection a second time, it became a red segment in the midst of green, meaning that it was going to be edited out of my output file.

Once I had repeated that procedure for all the commercial breaks, I had this:


You can se that there are several commercial breaks that show up in red on the editing bar.

At the end of the show, I had to do some manual editing to make sure that the final credits were included in the output file, since they were seen by Ad Detective as just another commercial.

Notice also that the video frame being shown here is black. This is because I have the slider positioned at one of the video frames identified by Ad Detective as a transitional frame between the actual show and commercial filler.

Finally, notice that most of the commercial breaks have multiple red markers, indicating multiple transitions to/through video black. VideoReDo allows you to parameterize Ad Detective to minimize the number of such "extra" markers and just mark the very beginning and end of each chunk of commercials. I have played around with the parameters, but have yet to find ones that get this right without fail.

Other parameters you can set tell Ad Detective what to consider "video black" and what to consider "actual picture material." A neat trick is that you can manually pick out where a video black transition occurs, set a marker there, and "train" Ad Detective to use the associated video levels for setting the parameters in question automatically. This works well ... though I find it is necessary to re-train Ad Detective when changing from high-definition material to standard-def, and vice versa.

Once you have turned all the ads red, so to speak, you simply tell VideoReDo to save your edited video as a *.mpg file:


After which you see:


And eventually: