 This is another post in my TiVoToGo series on the ins and outs of moving TV recordings from a TiVo DVR to a Mac, for use eventually with iTunes, Front Row, and Apple TV.
One good way to do it involves this software "bucket brigade":
- TiVo Desktop to copy recordings from the TiVo to the Mac — see Using TiVo Desktop in Windows. (You can also do this with a Web browser — see Using a Browser for TiVoToGo.)
- VideoReDo TVSuite to edit out commercials, and also decrypt the copied file — see Using VideoReDo TVSuite on a Mac.
- VisualHub to convert the decrypted-and-edited file to a format compatible with Apple TV.
The first two run in Windows XP, which runs in Parallels Desktop for Mac — see Using Parallels Desktop for TiVo-to-Apple-TV Transfers. The third, VisualHub, is the topic of this post. It runs under Mac OS X.
In Using VisualHub on TiVo Files I discussed the basics of using VisualHub. In this post I'll deal with some of VisualHub's Advanced Settings.
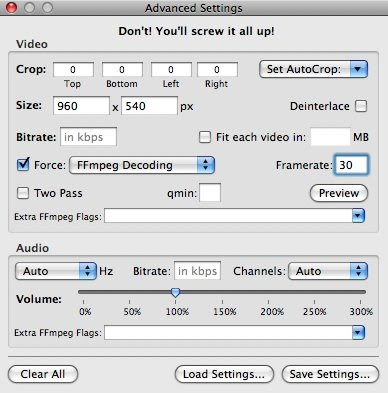
The Advanced Settings window looks like this:
In the above screen shot I'm about to convert a file that I identified in the VisualHub Main Window:
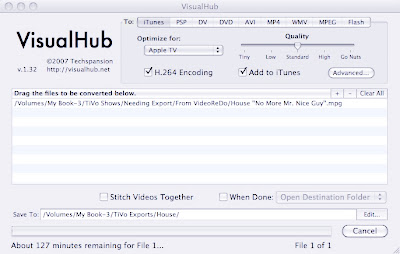
This conversion is to be of a file in the MPEG-2 video compression format, as indicated by the .mpg extension. That input file is the result of copying a TiVo recording of an episode of House that was cablecast in 720p, the high-definition format in which there are 60 frames of video per second, each frame having a resolution of 1,280 x 720 pixels. After copying the recording using TiVo Desktop, I edited out commercials using VideoReDo. Now I have to convert it to a format compatible with Apple TV.
That format is the h.264 version of the MPEG-4 codec ... which is exactly what has been selected in VisualHub's Main Window. But there are restrictions that apply to files that are going to be playable by Apple TV, which is why I have to use Advanced Settings.
Apple TV files have certain combinations of resolutions and frame rates that need to be adhered to. It turns out that the top resolution for video with the 16:9 aspect ratio — the aspect ratio that is standard for HDTV — is 960 pixels by 540 pixels, at a maximum frame rate of 30 frames per second. Hence, in the Advanced Settings window above I indicate Size: 960 x 540 px and Framerate: 30.
I have also told VisualHub to Force: FFmpeg decoding. The input file will accordingly be decoded by FFmpeg, a decoding-encoding module included with VisualHub. I don't want to use the second choice in the Force: pop-up menu, Quicktime decoding, since for murky reasons QuickTime, even when enhanced with Apple's $19.99 QuickTime MPEG-2 Playback Component, will neither play nor decode most .mpg files derived from TiVo recordings.
Nor do I want to use the third, remaining choice in the Force: pop-up menu, VLC decoding. The main reason for that is ... well, actually, I just haven't tried that option.
If I don't put the check mark next to Force:, my experience is that VisualHub will default to FFmpeg decoding anyway. I put the check mark there just for illustrative purposes.
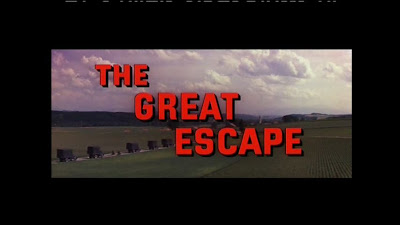
That's about it with respect to HDTV recordings. I also like to save old movies from the Turner Classic Movies channel, which is standard-def. Many of these are shown in a letterbox: the movie is shown in its original aspect ratio with black bars at the top and bottom of the screen.
When a letterboxed movie is converted by VisualHub and then shown on a widescreen TV via Apple TV, it will have black bars not only at the top and bottom, but at the sides as well:
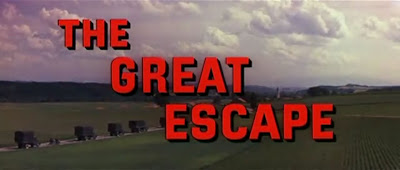
You can use the cropping features of VisualHub to reduce or eliminate the black bars at the top and bottom. In so doing, you will also eliminate the bars at the side:
Here are the necessary Advanced Settings:
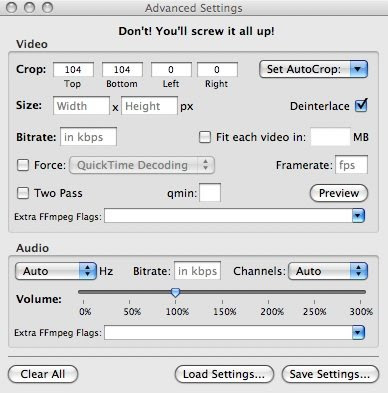
I set up the conversion to crop 104 pixels (actually, lines of pixels) off the top and 104 off the bottom of the nominally 640 x 480 input image, resulting in a 640 x 272 output image.
(To be quite precise, the actual frame size of the input image happens to be 704 x 480, not 640 x 480. 704 non-square pixels are shoehorned into each input line where 640 square pixels will appear in the output of the conversion. Since VisualHub cannot output non-square pixels, I'm ignoring this detail.)
How I determined exactly how many lines to crop at top and bottom was not at all straightforward, though. There are several ways to do this. One is to use the Set Autocrop: pop-up menu, selecting from it its By This File option.
When you do that, VisualHub examines the first few seconds of the input file to try to see how many lines of pixels at the top and bottom of the screen are all black. Those are presumably the letterboxing bars, and they can go away.
Trouble is, TiVo files generally have a line of pixels at or near the top of the screen in which the pixels are not all black. This line contains changing information that translates into Closed Captioning text. It fools VisualHub into using zero for the number of lines to autocrop at top.
VisualHub has a better chance of getting the bottom autocrop figure right. In my conversion of The Great Escape, it wanted the crop-at-bottom number to be 108 lines.
At first I thought I would just use the same number for crop-at-top. I recognized, however, that the results of the video compression VisualHub would be doing as it converted the MPEG-2 input to the MPEG-4/h.264 output would be better in quality if the number of horizontal lines in the resulting image were divisible by 16.
Doing a little back-of-the-envelope math, I saw that the crop-at-top and crop-at-bottom numbers should each be divisible by 8 — given that the number of lines in the input image, 480, is divisible by 16. 8 times 2 is 16. Hence, the crop-at-top and crop-at-bottom numbers can be divisible by 8 ... not necessarily by 16.
108 is not divisible by 8, while 104 is. Hence, I used 104 as both the crop-at-top and the crop-at-bottom number.
Another way to get the right cropping numbers is by trial and error ... in which case, you would be well advised to create a short snippet of the movie to run your experiments on. You can do that in VideoReDo as a separate step from outputting the entire movie. If you go the snippet route, your best bet is to output a swatch of, say, one minute in length from somewhere in the middle of the movie. Use that snippet for your cropping experiments.
(Why a snippet from the middle of the movie? Often, material at the very beginning gives a false bottom-autocrop reading. For instance, old MGM flicks typically start with a Leo the Lion logo on a black background. VisualHub interprets everything below the logo as croppable.)
Finally, a quick and dirty way to set the cropping numbers for any letterboxed film is to try 60 for both the top and the bottom figures. The result will be a 640 x 360 frame, for a 16:9 aspect ratio. That's the aspect ratio of a widescreen HDTV. There may still be (shorter) letterboxing bars on the HDTV screen, but even if you cropped off every single line of black in the input, by the time Apple TV got done displaying the output image on your HDTV, the (shorter) bars would show up there anyway.
Of course, 60 is not divisible by 8, so the purist may prefer to crop 56 pixels, or 64, at top and bottom and sacrifice the exact 16:9 aspect ratio. Or, try 56 at top and 64 at bottom.
One caveat: Not all letterbox bars are greater than, say, 60 pixels in height, and using a predetermined number such as 60 for quick-and-dirty frame cropping could bite into the actual image. One way to avoid that is to click VisualHub's Preview button in Advanced Settings. Up will pop a window giving you an advance look at a single frame from the video:
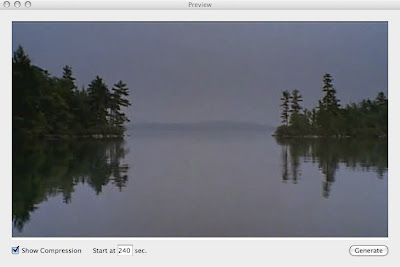
Once the Preview window is visible, you can change the number of seconds into the video the preview frame comes from by setting Start at ___ sec. That lets you find a still frame that is truly representative — if, say, early frames from the very beginning of the video aren't letterboxed.
With the Preview window visible, you can go back to the Advanced Settings window and tweak the cropping parameters. Then either click Preview again in the Advanced Settings window or click Generate in the Preview window. The still frame will be redisplayed with the new cropping. In that way you can zero in on just the cropping numbers you want.
(Another great thing about the Preview window is that you can check mark Show Compression, then change the Quality setting in the VisualHub main window and click Generate. The preview will be regenerated with the new compression parameter, and you can see immediately how your change will affect the output quality.)
Please pardon the above extended dissertation on image cropping, by the way. Cropping is helpful in making best use of your TV screen's real estate ... and it makes for smaller output files from VisualHub!
If you go back and look at the prior Advanced Settings screen shot, you can see that I also check-marked VisualHub's Deinterlace option. Understanding the value of this option, alas, demands another dissertation.
Standard-def TV is interlaced, which means every still frame in the moving image is actually two pictures. One picture occupies the odd-numbered lines of the 480 lines of pixels in the image; the second, which represents the scene 1/60 second later, occupies the even-numbered lines.
Normally, that creates no problems. There are simply 30 frames per second, each composed of two fields, for a field rate of 60 per second.
When the source of the program is film, though, there are problems. Film is shot at 24 frames per second, not video's 30 frames per second. When film is shown on television, the 24 frames can be sliced and diced into 48 fields easily enough ... but there need to be an additional 12 fields to pad out to 60 per second.
That is done simply be repeating some of the 48 fields. (TV is known for its repeats, right?)
For technical reasons, this trick is referred to as "3:2 pulldown," aka "2:3 pulldown."
When the resulting TV signal is captured by a TiVo and digitized, and then converted to MPEG-4/h.264, the conversion creates frames that are not interlaced. They do not consist of two pictures 1/60 second apart. They consist of a single picture per video frame which is the composite of the two fields of the original.
When two fields are composited in this way, they can produce an image that comes from two separate frames of film. Objects that are in motion can have their normally straight edges take on a serrated appearance:
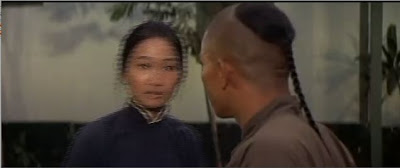
Watching such serrated-edge images stream by can give the impression that the images are fuzzy or unstable.
The best antidote is to do "3:2 pulldown compensation": simply remove the 12 fields per second that were inserted to pad out to 60. The result, done right, is that each of the (now) 24 frames per second of video represents exactly one frame of the original film. No more serrated edges.
Sadly, VisualHub has no way of doing 3:2 pulldown compensation. Instead, it uses deinterlacing. In the type of deinterlacing VisualHub uses, one field of each frame is simply discarded ... or, actually, it has the other field of the same frame substituted for it.
Now, all the information in each frame of video output comes from just one film frame ... and there can be no serrated edges. The image looks rock steady:
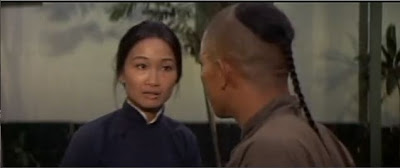
The downside is that vertical resolution is halved. Where there were originally 480 lines of vertical resolution, now there are just 240. (And cropping the image at top and bottom can result in even fewer lines of vertical resolution.)
So the use of VisualHub's Deinterlace option is a matter of personal taste. I myself find that deinterlacing produces a more pleasing result than allowing edge serration to creep in. Your mileage may vary.
2 comments:
You may be interested in my experiments with VisualHub to extend past Apple's specs for the AppleTV; specifically using 720p at 30fps:
http://www.isquint.org/cgi-bin/ikonboard.cgi?act=ST;f=10;t=6126
MichaelLAX,
Yes, very interested!
The thread you mentioned suggests that Apple TV can (surprisingly) play 1280x704p video at 30 frames per second as it also plays AC3 (Dolby Digital) 5.1 or 2.0-channel audio. Your total bitrate was 9 Mbps.
I thought the limits were something like 960x540p, 30 fps, 5 Mbps.
I'll respond further in the thread itself.
Thanks very much for your helpful comment.
Post a Comment