Showing posts with label Ripping DVDs. Show all posts

Thursday, August 07, 2008

Videos for iPod Touch, Part 2

In Videos for iPod Touch, I talked about my sleek-looking new iPod Touch 8G:

No, I said, it's not an iPhone, but iPhones are wait-listed right now.

The iPod Touch shares with the iPhone the ability to sync with iTunes and play video movies and TV shows, music, podcasts, etc. But not all videos that iTunes (or my Apple TV) will play can go onto the iPod — even though the offending videos are nominally in the MPEG-4/h.264 format that the iPod expects. I expect other iPod owners have the same kinds of problem. This post is about ways around the problems.


There are actually two kinds of problem here:

  1. If a video has been encoded with a video bitrate of over 1500 kbps, the iPod won't sync to it or play it.
  2. The iPod can't sync to or play videos that have been encoded with B-frames, space saving representations of individual video frames that record differences between themselves and following frames (and from preceding frames, but that's not a problem).

The iPod simply doesn't have enough memory or processing power to cope with high-bitrate videos or with deriving current frames from following frames in the video stream.

One solution to either incompatibility problem is to re-rip the video from an original DVD. I use HandBrake to port videos from DVD to iTunes. HandBrake 0.9.2 (the current version) has several presets for iPod-compatible rips. The one which I use a slightly modified version of is "iPod High-Rez." Any of the iPod-related presets will work, in that they carefully avoid giving you B-frames and video bitrates in excess of 1500 kbps. (They also insert the mysterious "iPod atom," making the output compatible with pre-Touch video iPods.)

However, I recommend that you modify the preset, as I did, to turn on Anamorphic: Strict under Picture Settings. This allows your output file to use "anamorphic encoding" if the DVD itself does. For more on what that means, see below.


The second workaround for getting a non-iPod-playable video to play on an iPod is to do a conversion of an existing rip into a form that works with iPod.

The simplest way to do a conversion is to select the movie or TV show in iTunes and select "Convert Selection for iPod/iPhone" in the Advanced menu. iTunes will verify that the video is not already iPod-playable, and if not it will start to convert it to an iPod-usable format — a lengthy process. The output file automatically goes into ~/Music/iTunes/iTunes Music/Movies (or ~/Music/iTunes/iTunes Music/TV Shows). The file name is the same as that of the original file, modified as necessary to ensure uniqueness. The original file is left untouched.

Using iTunes to do the conversion has several drawbacks:

  • The process is super-slow. It takes iTunes much longer to convert a file than it would take HandBrake to re-rip it.
  • You can't direct the output to any folder or hard drive you want. You have to be content with iTunes' default folder.
  • You can't name the converted output file anything other than iTunes' automatic choice of file name.
  • You can't control parameters like the resolution in pixels of the video frame. In my admittedly limited experience, iTunes seemingly insists on giving the output video file a frame width of 640 pixels, with a corresponding pixel height designed to reproduce the original's aspect ratio.
The second way to do a conversion is to use QuickTime Player. That allows you more control over such things as the destination drive and folder, the output file name, the video resolution, and other useful parameters. But, like iTunes itself, QuickTime is slow, slow, slow.

I'm currently investigating a third alternative: using a third-party video converter.

I'm presently trying the $29 ImTOO iPod Video Converter for Mac:
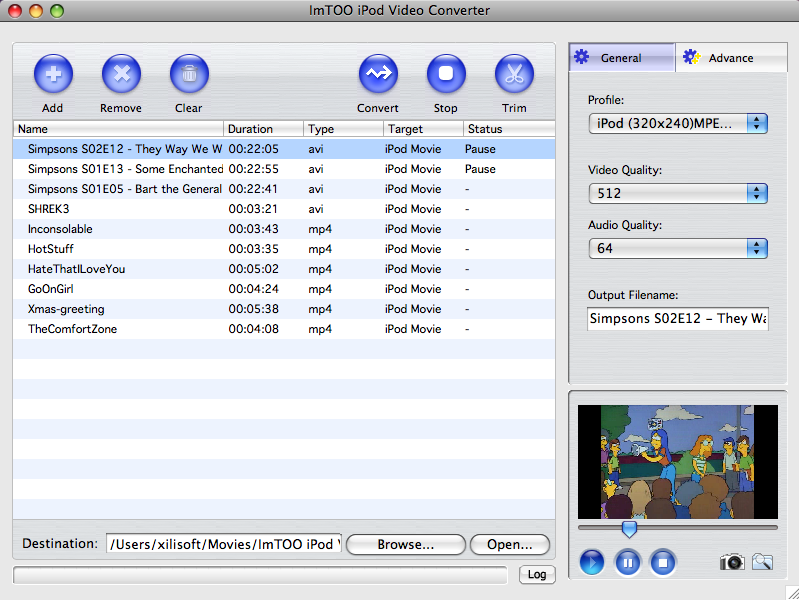


ImTOO's website says it "can convert video and audio files such as AVI, MPEG, WMV, DivX, MP4, MOV, XviD, VOB (the video format used in DVD), MP3, AAC, AC3, etc., to iPod supported formats, including MP4, MOV, MP3, and M4A."

I have just begun to experiment with ImTOO, and I find it pretty much works as advertised. And it's fast ... as long as it isn't butting heads with a HandBrake DVD rip, in which case it slows down to a crawl in favor of HandBrake.

Still, I have found at least two of my HandBrake rips that ImTOO's conversion attempts stall out on. At least using the settings I have tried, ImTOO gets to a certain point in the conversion and then just sits there ... forever.

One drawback with ImTOO is that MPEG-4/h.264 conversions for iPod are automatically given the .mp4 file extension, which means they automatically open in QuickTime Player, when double-clicked in the Finder. The .m4v extension, allowing automatic opening in iTunes, would be better.

A second drawback with ImTOO is that if your original file was created by HandBrake with chapter stops/names, ImTOO won't carry them over to the converted file. Bummer.

Another ImTOO drawback, one that applies to other third-party converters I've tried as well, is pretty technical, so bear with me as I try to describe it. I'm going to present this somewhat technical discussion in blue, in case you want to skip it. I'll also indent it.

I have an existing rip of Harry Potter and the Prisoner of Azkaban that HandBrake made some time ago. Its video frame dimensions (per iTunes' Get Info Summary) are 853x360 pixels. This means that if I play the video in iTunes or in QuickTime Player, I'll see it in a frame that is 853 pixels wide by 360 pixels high. 853:360 corresponds to the aspect ratio of the Potter movie on DVD.

Yet if I play the video in QuickTime Player, the player's Inspector window says (under "Format") that the video frame is only 720x360! What accounts for the discrepancy between 853 and 720? And why is the default-size QuickTime viewer window actually 853 pixels wide, not 720?

The solution to this mystery is that the HandBrake output simply reproduces the 720 pixels that are physically present in each row of each video frame on the DVD. But HandBrake also detects that the widescreen DVD was "anamorphically encoded" — formatted especially for widescreen TVs — such that the DVD player stretches the 720 pixels provided per row into the space of 853 pixels, thereby widening the frame as it is being viewed.

Handbrake also detects that the nominal 480 rows of pixels in each video frame on the DVD is actually only 360 useful rows. The remaining rows at top and bottom of the screen are not even coded; they are played as black letterboxing bars. Since they're not coded on the DVD, they don't need explicit coding in HandBrake's output, either. So HandBrake outputs an MPEG-4/h.264 file that has video frames of 720x360 pixels. These 720x360-pixel frames are intended to be displayed as if each frame had 853x360 as its true dimensions.

(For a clear discussion of anamorphic encoding in general and how HandBrake deals with it, see "Guide to Anamorphic Encoding in HandBrake.")

In other words, the HandBrake output is anamorphically encoded, just like the input from the DVD. Anamorphic encoding simply means that (in this particular case) a 720x360 pixel grid is stretched at time of playback to fill an 853x360 frame.

Yet when ImTOO converts the anamorphically encoded HandBrake-ripped video, it doesn't retain the anamorphic encoding. Instead, when ImTOO is set up to use an output video size of 853x360, it internally expands the 720x360 pixels in each input frame to fit into an 853x360 box and then uses that box to derive a non-anamorphic 853x360 output file.

(Actually, the ImTOO conversion fails unless the output video size is trimmed by a single pixel to 852x360! Apparently the two numbers surrounding the "x" have to be even.)

I have found that the only way to keep the original aspect ratio and also retain all the input file's video detail is to enter iTunes' video dimensions for the input file into ImTOO's Video Size field in the "Advance" settings. In the example of Harry Potter and the Prisoner of Azkaban, that's 853x360 — trimmed to 852x360 — not the unstretched 720x360 shown in QuickTime's Inspector window. Setting the ImTOO video size to 852x360 seems to be the only way to preserve the aspect ratio of the original video frame, for this particular movie.

When ImTOO is set up to retain all the detail in the original video file and preserve the same aspect ratio, it uses more pixels in the video frame, hence contains more bits in the output file, than it really needs to. This is because ImTOO can't produce an anamorphically encoded output file even when the input file is anamorphic. So its output, in this example, has video frames whose dimensions in pixels are 852 horizontally by 360 vertically.

Unfortunately, all that careful manipulation of ImTOO's conversion parameters results in an output file from ImTOO that iTunes won't sync to the iPod Touch! The output file plays in iTunes, on Apple TV, and in QuickTime Player ... but won't work with the iTouch. My guess is that the 852x360 video frame contains too many pixels to be iPod-acceptable.

A workaround to that problem might be to use, say, 720x304 as the output frame size in ImTOO. 720:304 is basically the same aspect ratio as 852:360. When ImTOO uses a video size of 720x304 for this movie's conversion, the output file syncs to the iPod just fine.

Trouble is, there are now only 304 pixels of vertical resolution in the picture, not 360 pixels vertically. The difference is not noticeable on the iPod, whose screen resolution is only 480x320 anyway. But the video looks much softer on my Apple TV-fed HDTV.

Yet I have found that this strategy of reducing the vertical resolution to preserve the aspect ratio is what at least one other converter I've tried, TechSpansion's
VisualHub, does by default when converting videos for the iPod Touch. It is a sensible choice, given that VisualHub, like ImTOO, cannot retain anamorphic encoding.

In fact — please note this well — the only reason I have any objection at all to this conversion strategy used by ImTOO and VisualHub is that I prefer to end up with a single video file that has all the resolution of the original DVD and plays on Apple TV as well as on iPod.

Yet the only way I have found to do this is to use anamorphic encoding that is honored by iTunes, Apple TV, and iPod ... and none of the converters I've tried so far can do that. HandBrake alone seems to be able to produce anamorphically encoded output that works with all my software and all my devices. That is why I plan to re-rip all my existing iPod-incompatible DVD rips with HandBrake, rather than converting the existing rips with ImTOO or VisualHub.

Note: ImTOO has in its advanced options, in addition to the Video Size parameter, an Aspect parameter. If I set the former to 720x360 for the Potter movie and the latter to 2.37 (852 ÷ 360), I get output that mimics the input when played in QuickTime Player. That is, it shows as 720x360 under Format in the Inspector window, while actually playing as 852x360. Thus, it would seem to be anamorphically encoded. However, neither iTunes nor the iPod will play it at 852x360, only at 720x360, which gives the wrong aspect ratio and distorted image geometry. I have no idea why iTunes/iPod honor the anamorphic nature of the HandBrake-ripped file but not of the ImTOO-converted file.


OK, that's the end of the admittedly technical discussion about various iPod video converters' lack of support for "anamorphic encoding" that works in all my software and in all my devices. There is, however, an important lesson to be learned from that discussion, one that all iPod Touch owners need to hear. It is this: contrary to what you may have heard elsewhere, the iPod Touch (and presumably the iPhone) can play videos that have more pixels in the video frame than the nominal 480x320 screen resolution of the playback device, the iTouch or iPhone, can display!

iPod Touch videos can have more than 640 pixels in their video frame width, which I previously thought to be the maximum number of bits allowed! I don't know what the true upper limit is as yet, but it's at least 720 pixels of horizontal resolution! (There may also be an upper limit, at present unknown, on the product of the horizontal resolution in pixels and the vertical resolution in pixels.)

Of course, you'll see at best only 480x320 resolution on the iPod itself. But the same file can be played on, say, Apple TV with full resolution. Cool!

Monday, August 04, 2008

Videos for iPod Touch

My new iPod Touch 8G (for 8 gigabytes of storage) is a $299 marvel. Sleek-looking, too:

No, it's not an iPhone, but iPhones are wait-listed right now.

The iPod Touch shares with the similar iPhone the ability to sync with iTunes and play videos, music, podcasts, etc. The videos can be movies or TV shows downloaded from the iTunes store. Or they can be videos you yourself have created, including those you have ripped from your collection of DVDs (see earlier posts in my Ripping DVDs series for more on that).

I have an extensive library of movies (and TV shows) that I have ripped from DVDs, usually using HandBrake. They were converted by HandBrake from the MPEG-2 format used on DVDs into the MPEG-4/h.264 format, the increasingly common format used in Apple products: iTunes, Apple TV, and the iPhone and video iPods, including the iPod Touch.

Only problem is, some of my MPEG-4/h.264 videos which play fine in iTunes and on my Apple TV can't be copied to my iPod Touch. When I try to sync them, I get an error dialog such as this one:

Some of the videos in your iTunes library, including the video "Notorious", were not copied to the iPod "Eric's iPod Touch 8G" because they cannot be played on this iPod.


Expanding the dialog box reveals:

"Notorious" was not copied because the video format is not supported by the iPod "Eric's iPod Touch 8G".


I have learned that there are three usual suspects:

  1. The video file does not contain an "iPod atom."
  2. The video file was encoded with "B-frames."
  3. The video file has too high a video bitrate, over 1500 Kbps.

Of course, if any of the videos are not shown in iTunes' Get Info Summary panel as being of kind: (Protected, or not) MPEG-4 video file using video codec: H.264 with profile: Low Complexity, then that would be yet another problem entirely. Other formats/codecs/profiles are not iPod-playable.

Whether or not an MPEG-4 video file is "Protected" — copy protected, that is, per the iTunes Store's Digital Rights Management protocols — makes no actual difference to iPod playability. The files your get from the iTunes store will be protected, of course, but they'll work fine on an iPod Touch. The files you rip from DVDs will not be copy protected at all. But to also work fine on iPod Touch, a video file you make yourself must be MPEG-4/h.264/Low Complexity, and it must adhere to certain extra rules.

HandBrake knows about all these rules, and if you use one of HandBrake's built-in iPod presets — I recommend "iPod High-Rez" — you'll always get an output file that is iTouch-compatible.

But several of my "legacy" rips aren't iTouch-compatible, as it turns out. Some of them were ripped by an earlier version of HandBrake (the current version is 0.9.2) that didn't always make iPod-compatible output files. At that time, I had no idea about any restrictions on iPod compatibility, and didn't really care. I was primarily interested in getting the best possible results for my Apple TV. Now, I wish I had had more foresight.

Anyway, here is more about the three usual suspects:

1. What is the mysterious "iPod atom"? It is apparently nothing more than a sequence of bytes that starts with the four hexadecimal characters 'uuid' followed by the parameter '1200', also in hex. This goes into the so-called "MPEG-4 file container" as "metadata." It magically allows iTunes to sync the video to certain picky early video iPod models (but not the iPod Touch or iPhone, which ignores the "iPod atom").

For early video iPod owners: if a video file's only flaw is the lack of an iPod atom, I am given to understand that AtomicParsley can help. According to this discussion, one can download and install a certain special version of AtomicParsley and then use the following command line in Terminal to insert an iPod atom in any MPEG-4 video file:

AtomicParsley OUTPUT.mp4 --DeepScan --iPod-uuid 1200 --overWrite

where OUTPUT.mp4 represents the name of the video file. You need to change OUTPUT.mp4 to the name of the MPEG-4 file you wish to modify. It's best to copy the original file and work only with the copy. (I assume the extension .m4v, where applicable, works also.)

I tried this with the 0.9.0 version of AtomicParsley, which is the only one I could actually find on the Internet. It simply did not work at all as an inserter of iPod atoms. Then I read the discussion referenced above a bit more closely and learned that I really need a certain "subversion" of AtomicParsley that does support this procedure. Unfortunately, I could not locate that subversion.

However, I am also led to believe that the "iPod atom" is needed only for the so-called 5th-generation and 6th-generation video iPods, the ones with the truly tiny video screens, that came along prior to the iPod Touch and the iPhone. The iTouch and iPhone don't care about the presence or absence of the "iPod atom," one way or the other.

2. MPEG-4 videos can optionally use so-called "B-frames." When they do, no iPod model to date can play them.

B-frames are "bidirectional," in that they are streamlined video frames that represent only the video information that has changed in that particular frame, compared to a prior video frame or a following video frame. B-frames make for smaller MPEG-4 files, because the ability to key off a later frame, not just an earlier one, can result in there being far fewer bits in the file.

Forcing the MPEG decoder to scan ahead to look at following frames, though, is not supported for iPods. It requires too much memory and too much processing overhead. However, iTunes can do it; so can the Apple TV.

If you rip a DVD especially for Apple TV in HandBrake, HandBrake will use B-frames ... and the resulting output file won't play on an iPod, no matter what you do.

3. Every MPEG-4 file has a certain "total bitrate." If you look at iTunes' Get Info Summary for the file, you'll see both a bitrate (such as 159 kbps) and a total bitrate (such as 1657 kbps). The first is how many bits (or thousands of bits) per second are used for the audio. The latter is how many are used for the video and audio, together. If you subtract the former from the latter you'll get the video bitrate, in this case, 1498 kbps. It has to be 1500 or less to work on an iPod.

(Actually, I seem to have some files where the crucial figure is just a little over 1500 kbps, but the videos play OK on my iPod. I can't explain why this is.)


So those are the three "usual suspects" that can keep an otherwise good MPEG-4/h.264 video file from working on an iPod Touch or iPhone. The first doesn't actually affect the iPod Touch or iPhone, only earlier video iPod models.

The second and third affect all video iPods. If you have a file which uses either B-frames or too many bits per second for the video (or both) you'll need to do one of two things to get the movie, TV show, or whatever to work on an iPod. Neither choice is easy.

The first choice is to re-rip your video from scratch. It's the choice I recommend, where feasible, for reasons that will be made clear as I discuss the second choice in my follow-on post, Videos for iPod Touch, Part 2.

If you do elect to re-rip your video, you need to make sure you do it in such a way as to produce an iPod-playable output file. You need to include an iPod atom, assuming you are using an earlier-model video iPod (even if you aren't, including the iPod atom doesn't hurt anything). You need to make sure no B-frames are used in the output. And you must make sure the video bitrate is 1500 kbps or less.

If you are using HandBrake 0.9.2 to do the ripping, the easiest way to avoid going wrong is to use one of the included presets for the iPod or iPhone. These include:

  • iPhone / iPod Touch
  • iPod High-Rez
  • iPod Low-Rez

I find "iPod High-Rez" ideal for my purposes, as it automatically includes the iPod atom in case it's needed, spurns B-frames, and sets 1500 kbps as the maximum video bitrate.

I actually have created my own modified version of this preset, as I (owing to poor hearing) like to include English-language subtitles on all my rips. I strongly recommend that you modify the preset, as I did, to turn on Anamorphic: Strict under Picture Settings. This allows your output file to use "anamorphic encoding" if the DVD itself does. More on what that means can be found in Videos for iPod Touch, Part 2.


The second workaround for getting a non-iPod-playable video to play on your iPod is to use special software to do a conversion. I'll cover that option in Videos for iPod Touch, Part 2.

Sunday, August 19, 2007

Apple TV: Getting Content

In Apple TV is a Winner! I wrote about my new Apple TV, which plays iTunes media files on my HDTV via my wireless home network. Playing movies is one of its strengths. But where do the movies come from?

Apple would like you to buy movies and TV episodes at the iTunes store and download them into iTunes. But the selection isn't great yet.

Another option is to rip DVDs you own into iTunes-playable format using HandBrake. I covered that in my previous post as well as in some of the earlier posts in my Ripping DVDs category.

Yet another option is to download DVDs someone else has ripped and made available on the Internet. This can be more time-efficient, since you can only rip one DVD at a time but you can download several pre-ripped ones at once.

Of course, the download process can take a very, very long time ... but so does ripping DVDs yourself. With downloading, though, you can initiate several downloads and (if you like) go away and do something else. Hours later, you come back to your computer and (hope to) see that all your downloads have completed.


There are legal issues here. If you download a title that you own a copy of simply to avoid having to go through the dicey and tedious ripping process yourself, you will wind up with effectively the same media file you could have ripped yourself. You probably think that you would not be breaking the law. Well ... maybe yes, maybe no.

Making an archival copy of something you own is almost certainly legal — though there are laws against defeating digital content protection, which HandBrake does when it rips a DVD.

On the other hand, even if defeating the CSS copy protection on a copyrighted DVD for the purposes of making a personal archival copy is legal, taking the easy way out and simply downloading the same title, ripped by someone else from a different DVD, remains of dubious legality. Technically, you are not copying your own copy of the intellectual property represented by the DVD. You are copying someone else's copy of a copy which you do not own.

And if you download a copyrighted title you own no copy of, period, you certainly are breaking the law.


It's pretty easy to download movies for free, legally or not. One way is to use BitTorrent.

To use it, you don't really have to know that it is a peer-to-peer file sharing (P2P) protocol for distributing large amounts of data widely across cyberspace in a decentralized way. The general idea is that every file — movie or otherwise — is divided up into many, many, many tiny pieces, every one of which can be redundantly stored in different computers on the Internet. The pieces can be downloaded all at a time, in no particular sequence, from any of these locations. The BitTorrent client software that you run on your computer finds a source computer for each piece, downloads all the pieces one by one, and assembles them in their proper order to make a single file on your hard drive which is exactly like the original file.

The thing which describes all the pieces of the big file so that a BitTorrent client can access them is a small, information-containing pointer file called a "torrent." If you want to download, say, the movie Ocean's 12, you first need to find a website that publishes a torrent for that movie. Once you have gone to that site and clicked on the torrent, you click download, and your web browser downloads just the tiny torrent file.

You then open your BitTorrent client, if it's not already open and your browser doesn't automatically open it, and you point it at the downloaded torrent file, which is probably sitting on your desktop. After asking you where on your hard drive to put the big output file it is about to create, the BitTorrent client begins downloading the movie itself.


That can take a very, very long time. This is where the ability of a BitTorrent client to download multiple files pays off, for you can fire off multiple torrents almost as easily as one. They all download side by side. The BitTorrent client keeps you apprised of how much progress is being made for each file you are downloading.

Meanwhile — and this is interesting — once you have started obtaining pieces of a file, your computer becomes a BitTorrent "peer" for disseminating that same file. Other people who are trying to download the same target file can start obtaining (some of) their pieces from you.


The original BitTorrent client can be downloaded for free here, which is at the BitTorrent web site. It has Windows, Mac, and Linux versions.

I find a better choice for Mac users is BitRocket, which is likewise free. It is Open Source software: as many people as want to do so collaborate on its development, just for the fun of it. BitRocket has a much more usable interface than the original BitTorrent client, and it can also help you create your own torrent files.

I learned about BitTorrent and BitRocket from a useful post called BitTorrent 101 for Mac Users at MyMacBuzz.


Where do you find the torrents to download in the first place? First of all, there is the official BitTorrent site, where you can find a smattering of content that is guaranteed legal. Some is free, while some costs money to rent or to buy.

There are several other torrent sites I have found, much of whose content is presumably illegal:


The Ocean's 12 file you obtain from a torrent site is, sadly, not likely to be one that will play right away in iTunes or on Apple TV. It typically needs to be converted from an .avi file to an .mp4 file.

One way to do that is in QuickTime Pro on a Mac. If you open one of the .avi files you have downloaded in QuickTime Player, you can do a "Movie to MPEG-4" export, which will (slowly) convert the original movie to a new file in a format usable by iTunes/Apple TV. The old .avi file will remain untouched, while the new file, with .mp4 as its filename extension, can be imported into and played in iTunes ... which makes it available to Apple TV.

For all that to be possible, QuickTime must have access to the DivX codec, downloadable here. Or, some movies require QuickTime to use the XviD codec, available for the Mac from here. The XviD codec piggybacks on the DivX codec, so you need both.

Notice that the file format is not the same thing as the codec, also known as the encoder/decoder. The file format is .avi. The codec is DivX, or XviD, or whatever. (If it's "whatever," QuickTime may or may not be able to deal with it.)


When you want QuickTime Player to export a movie to MPEG-4, you select Export... from the File menu with that movie's window active in the player. In the Save As dialog, you choose Movie to MPEG-4 from the Export pop-up. You control exactly how the export is done by clicking on the Options... button.

From the Video Format pop-up in the MPEG-4 Export Settings pane, you will probably be best off choosing H.264, which results in the most advanced video compression available in the MPEG-4 family.

I'm currently entering a Data Rate of 1372 kbits/sec for H.264. I choose Current in the Image Size pop-up and also in the Frame Rate pop-up. I select Automatic for Key Frame, rather than telling QuickTime to shove in a so-called "key frame" every specified number of frames. (A "key frame" is an anchor point in a digitally compressed video stream: a single image that is entire unto itself and does not depend in any way on its neighboring images. The more often a key frame comes up in the digital stream, the better the video quality — at the expense of making the file less compact.)

In the MPEG-4 Export Settings pane, clicking Video Options produces a drop down sheet in which I am currently selecting "Restrict Profile(s) to: Main" and "Encoding Mode: Faster encode (Single-pass)".

Once you set all these MPEG-4 Export Settings up the first time, you can simply "Use: Most Recent Settings" from then on out ... unless you want to change something.

The typical movie export takes the better part of an hour to wrap up. Once it is done, you can add the resulting file to your iTunes library, and you're good to go.

Wednesday, August 08, 2007

Apple TV is a Winner!

An Apple TV (Appletv) now graces my bedroom TV entertainment center.
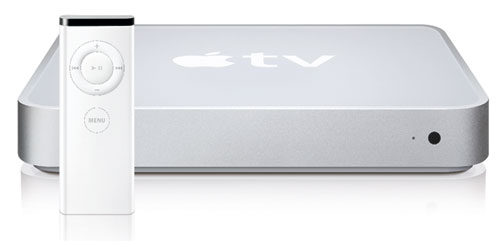


What is it? Wikipedia calls it a "digital media receiver." I think of it as an iTunes client. You hook it to an HDTV — either with an HDMI cable or with a component video or YPbPr cable supplemented with a left and right stereo audio cable. (You have to supply whatever cables you use. None come in the box with the Apple TV.) Apple TV pulls video and audio content out of iTunes over the network and plays it into your TV.

You can read a c|net review of Apple TV here.

Before hooking up the Apple TV, you fire up iTunes on one of your computers (which can be a Mac or a PC).

After hooking up the Apple TV, you then interact, via the included remote, with the user interface that appears on your TV screen. You are asked to idenfity your wireless home computer network (or optionally a wired Ethernet network). You enter the necessary network password on a popup keyboard on the TV screen.

The Apple TV puts a randomly chosen 5-digit code on the TV screen, which you duly type into iTunes on your chosen computer. Your iTunes library starts syncing to the Apple TV.

Sitting at your computer, you can interrupt that process to give yourself greater control over what syncs and what doesn't. You can sync music, movies, TV shows, podcasts ... and also photos from iPhoto. In each category you can either suppress syncing entirely or select from various subsets of eligible items. For example, under Movies you can choose to sync, say, just the five most recently added unwatched movies.

Movies and other media files that are synced to Apple TV are physically copied, via the network, to the Apple TV's internal hard drive, which in my $299 unit holds 40 GB. There is also a 160 GB Apple TV for $399. (Click this link for the tour of Apple TV at the Apple web site.)

Syncing to Apple TV is thus like what you do with an iPod. But with an iPod, you have to finish the syncing before you can access any media files. With Apple TV you don't have to wait, because Apple TV streams as well as syncs.

That means you can instantly navigate the new Apple TV to, say, the Lord of War movie file you just downloaded from the iTunes store, and start playing it right away ... regardless of whether or not the movie has synced (or will ever be synced) to the Apple TV.

I found movie streaming (which is more challenging to a network than, say, music streaming) operated smoothly and responsively on my existing wireless network. Doing things like pausing and resuming, stepping forward and backward to the next chapter or by a set amount in a movie without chapter stops, and fast forwarding and rewinding, I found myself grinning. No, it's not quite as responsive as a DVD player when you do these things while streaming a movie to Apple TV, but its quite good. Surprisingly good.


This is on my 802.11g wireless network. Apple TV also supports the much faster 802.11n standard, if you have one of Apple's latest AirPort Extreme base stations. I don't.

Most wireless networks use a "base station" or "WiFi access point," which also serves as an "router" of IP (Internet Protocol) addresses, so any computer on the home network can get on the Internet. "Base station" is what Apple calls it. In the world of Windows PCs, it's an "access point" or "router." I'll call it by Apple's name.

The base station is the main thing that determines whether your home network uses the slower 802.11g or the faster 802.11n technology (or both). But if a device on the network doesn't support 802.11n, speeds are limited to 802.11g for any transmission involving that device. The Apple TV does support 802.11n, so if you have the new type of AirPort Extreme 802.11n-capable base station and a computer that likewise supports 802.11n, you can stream or sync media files from that computer to Apple TV at the new, higher transmission rates.

Many of Apple's latest Mac models, including my MacBook Pro and other MacBooks and iMacs with Intel Core 2 Duo processors, need to have Apple's AirPort Extreme 802.11n Enabler software applied before they can use 802.11n. The enabler comes with the latest AirPort Extreme base station, or you can download it for $1.99.

In my experience, you don't need 802.11n. 802.11g is fine for both syncing and streaming.

At some point, you may want to sync/stream truly high-definition videos, none of which seem to be available today at the iTunes Store or in any video format that the iTunes software can accept. When HD videos become available, 802.11n speeds may become necessary. Time will tell.


The Apple TV user interface that appears on your TV screen is elegant and intuitive to use. You navigate it with the Apple Remote which comes with the unit.

The tiny remote looks a bit like a wrapped stick of chewing gum on steroids. It's the same remote that comes with a MacBook Pro or various other Mac models today. It has just six buttons, all of which do double duty, depending on the context. For example, the play/pause button in the middle of the circle doubles as an "OK" button, while "Menu" is also "Back" (to the previous menu, that is).

Apple TV is very easy to learn to use. Apple has spent a lot of time refining the interface so that it does what you want it to do without a lot of false moves and puzzlements. Of course, different people have different intuitions about these things, but I personally found the Apple TV interface most gratifying. In fact, I have never even looked at the user guide which comes with the unit.

True, if you have never used iTunes or an iPod and never played a media file online, you may face something of a learning curve ... but not an insurmountable one.


Picture quality on Apple TV is, in my humble opinion, more than acceptable. The movies I have tried thus far are copies of DVDs that I made on my MacBook Pro using (mainly) HandBrake. See my earlier posts in the category Ripping DVDs for more on how to turn your DVDs into video files which iTunes can play.

These files are not fully up to standard DVD quality, admittedly. Nor are they high-def. You do get a few "digital artifacts" (mostly "macroblocking") in some scenes, but most scenes look just fine. Resolution is good enough that you don't feel you are looking at an overly "soft" picture. A ripped file for a full length movie will typically be about 1 GB in size — a fraction of a regular DVD. The time it takes to rip the DVD depends on how fast your computer is. My MacBook Pro can do a movie in well under an hour.

So it's eminently possible to computerize your entire DVD library of, say, 200 titles into that many gigabytes of hard drive space. If your computer doesn't have that much space, you can get an external drive for (very roughly) $100-$150 per 250 GB. If you get one of Apple's new base stations, you can hook a USB-interface external drive to it and share it among all the computers on your network.

Because Apple TV streams so well, it doesn't really matter that you can't sync all those movies on the network hard drive to it, be aware.


Of course, if you don't want to rip DVDs, you can purchase movies and TV shows in downloadable form at the iTunes Store. The selection is pretty good and getting better. The day is coming (but isn't quite here) when you will be able to buy any movie at the iTunes Store that comes out on DVD.

Unfortunately, you can't necessarily get movie downloads at any other site that can be imported into, and will work with, iTunes. It depends on the format and codec used to encode the video.

iTunes prefers videos encoded in


These are the formats that will work on Apple TV without conversion. They will also work on a video iPod. (However, to work on an iPod they have to have certain characteristics which may not conform to Apple TV's needs. The main difference is that an iPod has lower resolution than an HDTV fed by Apple TV.)

There are other video formats which iTunes can also import and play, but which will not play on Apple TV (or iPod) unless they are converted. iTunes has "Convert Selection for Apple TV" and "Convert Selection for iPod" choices it its Advanced menu for this purpose. I have not tried these.

Generally speaking, any video format which is supported by Apple's QuickTime Player — as opposed to a QuickTime plugin — can be converted to an Apple TV-ready format in iTunes in this way. Among these formats are QuickTime' own movie (.mov) format, AVI, and several others. However, if a video is copy-protected, it cannot be converted.

Certain popular video formats are not supported. These include the well-known Windows Media Video 9 codec, now named VC-1. Another unsupported codec, as far as I can tell, is DivX. (I am taking this information about what video formats are not supported from various Web sources. I have not confirmed it.)

The latest Apple TV software, which can be downloaded and installed on Apple TV via the on-screen user interface, does support YouTube videos (even though they're not in iTunes). Cool!

As for music files, if they're in iTunes you can sync/stream them to Apple TV. They turn your TV into a giant iPod, they're easy to locate via such standard categories as title, album, playlist, etc., and they sound great. Unlike most other iTunes-aware digital music receivers, Apple TV lets you play all those "protected AAC" music tracks you've downloaded from the iTunes store. Major kudos for that!

Tuesday, November 28, 2006

Ripping: The ARccOS Problem

In To Rip, Perchance to Burn and its prior posts in this series I talked about the various pieces of Mac software that can help you make an archival copy of a commercial DVD you own. Among these was MacTheRipper, an actual DVD extractor. It generally works OK, I find, but it so happens that the third or fourth DVD I tried to rip with it, Inside Man, gave it a bellyache.

About midway through the rip, MacThe Ripper complained that bad sectors had deliberately been coded into a VOB (Video OBject) on the DVD and asked me whether to delete or pad them. I chose pad. But MTR immediately got stuck, and no more progress was made. I had to quit MTR and start it again.

Before I did, I Googled "DVD VOB deliberate bad sectors MacTheRipper" and found some forum posts about the problem. One poster recommended to turn on "ARccOS" in MTR. That, I found, is done in the Mode panel (as opposed to the Disc panel) of the MTR window. You simply switch from "Full Disc Extraction" to "Full Disc (ARccOS) Extraction," and you turn on ARccOS.

What is ARccOS? This Wikipedia article says it's an extra dollop of copy protection some DVDs have. Which DVDs? See this list. (Yes, Inside Man is on the list.)


Unfortunately, although that strategy allowed MTR to finish the rip, at the end MTR still complained of bad sectors and suggested the resulting rip might be unplayable. And so it was. I'm trying the rip again, but I have little hope that MTR can cope with this DVD alone.

It's all about an arms race between the studios and the rest of the world. The rest of the world insist they have the right to make an archival copy of a DVD they legitimately possess, in case the original becomes unplayable. The studios say that opens the door to piracy and add ever new layers of copy protection. The purveyors of software like MacTheRipper try to overcome the new protection. In this case, with this DVD, it looks like MTR — at least, the version I have — hasn't quite succeeded.

The MTR version I have is the latest "official" release, 2.6.6 ... but it dates back to early 2005. The guru behind MTR is currently doing a version 3.0, which is in beta testing. Apparently the only way to obtain it is to donate money ... which I might do at some point. But not yet. I can wait.


Meanwhile, as a workaround I followed one forum poster's advice and input the output data of MTR into DVD2OneX. The latter is software that, mainly, further compresses a DVD so it will fit on a single-layer recordable disc. DVD2OneX also has the ability to create a dual-layer version of the original, but that is an option I haven't tried yet.

I told DVD2OneX to create a file set rather than a disc image — much less actually burn a disc — and it gave me a folder with VIDEO_TS and AUDIO_TS subfolders, just like on an actual DVD. At the end it warned me that it had detected 15,765 "mastering errors" in the input data, errors which it had "corrected" in the output — but that the result might still not "work properly."

I pointed Apple's DVD Player app at the VIDEO_TS produced by DVD2OneX and found that it can begin playing the movie seemingly without a problem.


What happened next was that I decided to copy the file set DVD2OneX had produced to a DVD-R and try playing that. Burning to DVD was a mistake, since the file set did not constitute a playable DVD.

The file set included two folders, VIDEO_TS and AUDIO_TS, but they alone don't seem to be enough to make a DVD playable as such. True, I could point Apple's DVD Player app at the disc's VIDEO_TS folder as "DVD Media" and the app would "play" the media files. Otherwise, though, I had a data-only DVD that would not play in a real DVD player.


So, next I tried using DVD2OneX to make a "disc image" on my hard drive. I chose the option to make a disc image for a dual-layer DVD, just to see what would happen. This resulted in an icon on the desktop that, when double-clicked, places a virtual disk volume on the desktop. That volume plays successfully in DVD Player as if it were an actual DVD in the optical drive.

The disk image icon apparently contains 6.85GB. So does the volume it mounts on the desktop when it is double-clicked. Strangely, this is the size of the VIDEO_TS folder alone. The AUDIO_TS folder appears to be empty! I can't explain that.

If I had a SuperDrive that would burn a dual-layer disc — which I don't — I could theoretically now use Disk Utility to burn my disc image into an actual disc. But of course if I had such a drive, I could have burned the disc directly from DVD2OneX.


As far as the playability of the result of using MacTheRipper and then DVD2OneX on Inside Man, there do seem to be minor issues. I'm only part way through watching the movie, but so far there seem to be at least two glitches in the playback. They're minor, as I say ... it's as if some frames were missing. I do find, though, that the scan forward and backward functions of the Apple DVD Player software don't work right with this disc image.

Accordingly, I have to conclude that the result of the rip is pretty good, but not perfect. Perhaps if I were to get the latest beta version of MacTheRipper, I could do better with Inside Man.

Friday, November 24, 2006

To Rip, Perchance to Burn

As of The Ripping Saga Continues, posted yesterday, I was still looking for a way to burn ripped DVDs onto recordable media.

The problem was that I could use MacTheRipper to rip a perfect, non-copy protected copy of a commercial DVD onto the hard drive of my new MacBook Pro. I could then play it in the DVD Player software Apple bundles in Mac OS X. Or I could simplify telling DVD Player what to do by using Matinee as a front end. But I had no way to transfer the VIDEO_TS folder and the other files and folders from the original DVD to a blank DVD-R.

Oh, in the extremely rare case of a commercial DVD with but a single layer's worth of data, 4.7GB or less, I could burn the ripped material into a single-layer DVD-R or DVD-RW directly from Finder. But most storebought DVDs are dual-layer jobs with more material than can be put on a single-layer DVD.

And unfortunately, my new (actually, refurbished) MacBook Pro is not the latest and greatest. It lacks a SuperDrive with dual-layer DVD+R burning capability.

Today I happened upon the Mac Rumors website and noticed that it boasts a tutorial on Backing up DVDs. That pointed me at the website of DVD2OneX, software (unfortunately not free software) that "shrinks" the data on a dual -ayer DVD so that it can fit on a single-layer disc.

Another such application, which I have not yet tried, is DVDRemaster from Metakine.

DVD2OneX is the Mac OS X version of the DVD2One software that runs on Windows. You can download and try it for a month for free, with few restrictions. I took advantage of the free trial and was so happy with the results I got that I immediately forked over the 39.99 euro asking price (a little over $53).

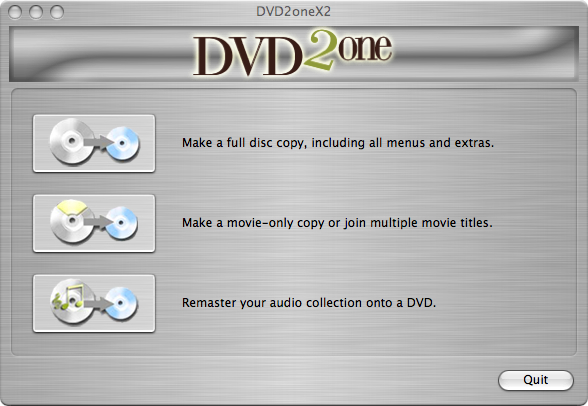
The initial DVD2OneX window looks like this (click to see a bigger image):


If you click the top graphic, you are invited to navigate to a VIDEO_TS folder that already exists on your hard drive. It will typically be in a containing folder whose other contents include an AUDIO_TS folder. The contents of the containing folder will have been previously ripped from the original DVD by MacTheRipper or a similar application.

That brings up this window:


Clicking the green button at lower right, you will be permitted to choose to burn a DVD. (The other choices are to create either a disc image for later burning or just a set of files from which such a disc image can be constructed.) If you choose to burn, you'll be prompted to put a recordable DVD in your drive. You can give it any name you want. You will then observe DVD2One's progress in preparing for the burn (takes maybe 20 minutes on my Mac) and then actually doing the burn (goes slightly quicker).

At the end of the process, you'll have a new DVD whose main difference from the original is that its contents have been magically slimmed down to fit in 4.7GB. Exactly how DVD2One does this, I'm not quite sure. The burned disc has all the functionality — menus, special features, audio tracks, subtitles, etc. — of the original. It plays like a "real" DVD. Presumably, the video and audio have been further digitally compressed, which ought to produce lower picture quality. However, the PQ of the Meet the Parents test disc I made looked pretty darn good when played into my 61" HDTV.

And, yes, a DVD-R made in this way does seem to play back just fine in all of my DVD players and on both of my current Macs. No issues with disc readability that I ran into.

This means that Mac owners with the right version of the Mac OS X operating system (I'm using "Tiger" version 10.4.8) and a SuperDrive than can burn single-layer DVDs can arrange to make inexpensive archival copies of their DVDs that have very decent video quality indeed!

Thursday, November 23, 2006

The Ripping Saga Continues

In the last episode ("More on Ripping DVDs") I talked about making bit-by-bit, file-by-file copies of commercial DVDs, sans copy protection, using Matinee and MacTheRipper.

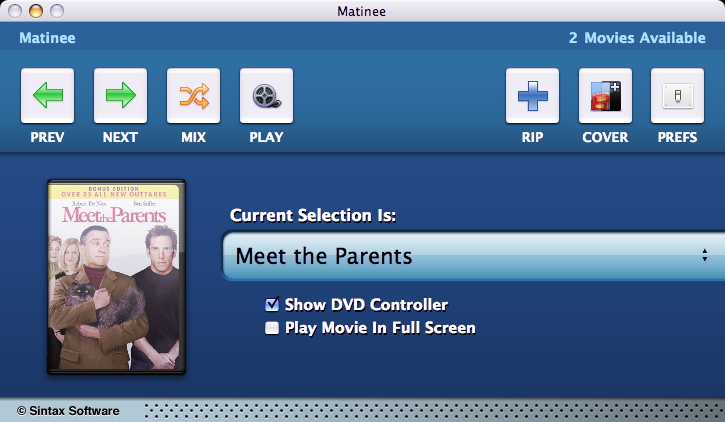
Matinee is a so-called "VIDEO_TS launcher." It allows you with just a click or two of the mouse to launch the DVD Player app and play any DVD that you've previously ripped to your hard drive. VIDEO_TS is the name of the folder on a DVD that contains video information. A companion folder, AUDIO_TS, holds all the audio information. When a "DVD extractor" such as MacTheRipper "extracts" the video and audio information from the shiny disc in your optical drive, it makes duplicate VIDEO_TS and AUDIO_TS folders on your hard drive. You tell Matinee (by setting its Preferences) where to find their containing folder, and from that time on Matinee (via DVD Player) will play them at your beck and call.

Here's Matinee's simple user interface:


In theory you can go on to burn a homebrew DVD with the contents which MacTheRipper has "extracted" from the original DVD. The DVD you'd burn would lack the usual copy protection, regional coding, and other roadblocks to playing or otherwise manipulating its content. This is not something Matinee or MacTheRipper do themselves. Rather, you do it in Finder.

But, as I said in my earlier post, most commercial DVDs contain more than the capacity of a single-layer DVD, which is 4.7 gigabytes. They're accordingly dual-layer: 8.5GB. So you need to burn them to a dual-layer DVD. Therein lies a potential hangup.


At the time I wrote the last post (yesterday) I didn't know for sure whether dual-layer (DL) recordable DVDs even exist. Turns out they do. They're a variation of the DVD+R format, where the "+R" differentiates this format from DVD-R (which doesn't yet offer dual-layer recordability).

I also didn't know if my new MacBook Pro (15" screen, 2.16GHz CPU) could record them. Turns out it can't. This comes as a surprise. When I bought the MacBook Pro — I was picking from the refurbished models available at the Apple Store at bargain prices — I thought I was buying the "Apple MacBook Pro Core 2 Duo 2.16MHz 15-Inch" model. I didn't realize this was actually a "Core Duo" and not the newer 2.16MHz "Core 2 Duo" model (note the extra digit "2"). The latter can write DVD+R DL discs; the former can't.

You can find specs on these and other Mac models at EveryMac.com. It's easier to find such information there than at the Apple website.

Quite frankly, I find that name-change subtlties such as "Core Duo" and "Core 2 Duo" are a bit much to keep track of these days. Still, I find it hard to blame Apple for the name game; it's only trying to keep up with fast-paced changes in what's it's possible to offer its customers. I should have been paying closer attention, that's all.

Nor do I blame Apple's "special deals on refurbished Macs" outlet site. It truly does offer great prices on like-new gear. Which gear it has seems to change from day to day, which makes good sense. If the site doesn't happen to have a particular model available today, it's not listed on the page. Check it out.


Still and all, I ended up with less than the state-of-the-art Mac that I thought I was getting, simply because I failed to pay close attention to the difference between "Core Duo" and "Core 2 Duo" — which, technically, seems to have to do not so much with processor speed as with processor efficiency. The Core 2 Duo has a more efficient design than the mere Core Duo did, which means that CPU throughput is greater even when nominal processor speed is identical (in my case, 2.16MHz).

In my experiments yesterday I used Apple's Activity Monitor utility and discovered that HandBrake uses a percentage of the CPU of something like 175% (!). I imagine this is what having a Core Duo CPU (of any design) buys you: the ability to approach 200% CPU utilization. There are in effect two processors inside the Core Duo, both running in parallel. If an application is constructed to take advantage of that duality — as HandBrake seems to be — it can approach 200% on the software "speedometer." Cool.

The MacBook Pro I have, while not the latest-and-greatest, does seem to be lightning fast compared with the other four or five Macs I have previously owned. Apple made a wise decision, abandoning the old PowerPC processor family. It takes only about an hour to rip a movie on DVD.

The new Core Duos with "Intel Inside" can do Windows! All you need is a legal copy of Windows XP — or Windows 2000 or 3.1, or any of several versions of Linux, for than matter — and Parallels Desktop for Mac ($79.99). This Macworld review says Parallels works fine! And, unlike Apple's own Boot Camp product (reviewed here), with Parallels you don't need to reboot to switch between Mac OS X and Windows. Double cool.

More later.

Wednesday, November 22, 2006

More on Ripping DVDs

In Ripping DVDs with HandBrake (Part 2) I said MacTheRipper was next on my list of experiments with ripping DVDs. MacTheRipper is software that imports files from a DVD into a folder on a Mac's hard drive.

A DVD is nothing more than a bunch of computer files and folders. If it weren't for copy protection, you could just copy them to your hard drive and play them from there, using Apple's DVD Player application. In fact, I'm told that simple method actually works with some DVDs.

MacTheRipper, on the other hand, copies all DVDs, without copying the copy protection. It also defeats the regional coding which keeps you from playing DVDs from foreign lands.

MODmini's "Saving DVDs as VIDEO_TS Files" page (part of its "How-To: Turn Your Mac mini into a DVD Jukebox" article) advises to use Matinee along with MacTheRipper. Matinee front-ends your folder(s) of ripped DVDs and makes playing any of the movies in Apple's DVD Player a one-click affair. Matinee simply fires up MacTheRipper when you tell it you want to rip a new DVD.

I downloaded both of these items of free software. Once I dealt with some minor perplexities, both worked straightforwardly. So far I've ripped both discs of Lord of the Rings: Fellowship of the Ring Extended Edition and also Meet the Parents Bonus Edition. All the ripped versions seem to play in DVD Player just as if they were on the original disc. You get the whole DVD menu system intact, allowing you to choose language/subtitle options, special features, etc., as well as the main film.

The next thing to try would seem to be burning the ripped files to a do-it-yourself DVD-R and seeing if that disc works in various standalone and computer DVD players. But I ran into a snag there: the files won't all fit on a 4.7GB single-layer DVD-R! Since the original DVDs are dual-layer, it would seem that I need to use dual-layer DVD-Rs. I don't at this point even know if they exist though, or whether my MacBook Pro's internal SuperDrive could burn them.


Until I find my way down that path, more now on using HandBrake to rip and compress a DVD all in one fell swoop.

I am continuing to experiment with Handbrake's various options for choosing:

  • codecs
  • encoders within codecs
  • target file sizes, average bitrates, or "constant quality" percentages

The object of the game is to make HandBrake's output file as small as possible, consistent with "good enough" picture quality (PQ). HandBrake decodes the video on a DVD and re-encodes it in a different codec. The codec used on a DVD is always a form of MPEG-2. That used by HandBrake's output files is a form of the newer, better MPEG-4.

The main idea here is that MPEG-2 compression is inefficient and results in big files with high bitrates. MPEG-4 compression can produce nearly as good PQ with smaller output files and lower bitrates. The AVC/H.264 codec (which is one of HandBrake's two choices, in addition to MPEG-4) is actually a high-class version of MPEG-4; it supposedly does even better.


Within either of these codecs in HandBrake you can choose a target file size or an average bitrate, resulting in a constant bit rate (CBR) in the output encoding. If you want a variable bit rate (VBR) so that more bits will be allocated to scenes that are harder to encode and fewer bits will be wasted on easy-to-encode scenes, choose a "constant quality" percentage — instead of a target size or bitrate, that is.

I've been trying 50% "constant quality" (CQ50) AVC encoding with pretty good results: tolerable picture quality, fairly compact (but widely variable, depending on the movie) file sizes.

I've also been trying using a bitrate of 1000 kbps with 1-pass MPEG-4 encoding. Comparing the results in QuickTime for Lord of the Rings: Fellowship of the Ring Extended Edition Part 2, I believe a CBR MPEG-4 encoding at about 990MB for the output file looks better (!) than a VBR AVC encoding that produces a 1.15GB file. At least in some scenes — those in which there is a somewhat uniform medium-to-dark gray backdrop, mainly — there is less of a tendency for solid blocks of a single color (visible "macroblocks") to show up and flicker on and off, thereby harming the naturalness of the scene.

There are many variables here. Using a bitrate of 1000 kbps with 1-pass MPEG-4 encoding, I have tried both the XviD encoder and the FFmpeg encoder in HandBrake. The results are very, very close both in PQ and file size ... but I think the XviD encoder does just a smidgen better with at least one critical scene.


One of the things that has gotten in my way in making these evaluations is that iTunes' Full Screen mode for viewing movies seems to exacerbate the inherent macroblocking in the recordings. A movie viewed in Fit to Screen mode may look pretty good in iTunes, but switch to Full Screen mode and the overall brightness scale is boosted in a way that brings out the macroblocks. This anomaly does not happen in the equivalent modes in QuickTime Player.

A good way to evaluate the various HandBrake encoding options is to view their respective outputs side-by-side in QuickTime Player Fit-to-Screen windows. When you come to a problematic scene in one window, pause it and cue up the same scene in the other window(s). Then compare.

More later.

Tuesday, November 21, 2006

Ripping DVDs with HandBrake (Part 2)

Here's the second installment in my Ripping DVDs series. The first was Ripping DVDs with HandBrake (Part 1). HandBrake is free software your Mac can use to rip DVDs into computer files for later play without the original DVD.

At the MODmini website I found this helpful how-to on HandBrake and like topics, in addition to the three tutorials cited in the earlier post. (The HandBrake stuff is on the "Converting DVDs for QuickTime Playback" page of the four-page article.)

The MODmini turorial talks about doing just what I want to do: turn the Mac mini I intend to purchase into a discless "DVD jukebox." The same site also offers "DVD Kiosk How-To," discussing the ins and outs of using the Mac mini as a simple DVD player, complete with a functional remote control, to play optical discs directly.


I am still fooling around with HandBrake in an effort to figure out just how I want to use it. One option would be to rip each DVD movie into as small a computer file as will yield tolerable picture quality (PQ) on playback. The enemy of picture quality is digital video compression. Too much compression causes picture artifacts: digital "noise," pixellation, macroblocking, etc. But as you reduce the degree of compression to minimize artifacts, the file size explodes.

Going for small file sizes results in PQ compromises. I experimented yesterday with the idea of using a target size that will fit on a writeable CD, and I found the strategy to be somewhat viable but problematic. My idea was that squeezing files down to CD size will allow me to store a lot more movies on my hard drive and will let me optionally archive them to CD.

A recordable CD (a CD-R or CD-RW) holds 650 or 700 megabytes, depending on the CD. When I set HandBrake to use a target size of 700 MB, it actually produced a file a bit larger than that — too large for my purposes. Re-ripping with a 650-MB target size gave me a file comfortably under 700 MB. However, the 700-MB CD-RWs I first tried to use to test burning my HandBrake files seemed to cause unrecoverable problems or have fatal defects in them, so I re-ripped yet again with a 600-MB target size, for a file under 650 MB that would fit onto a 650-MB CD-R.

I had in earlier experiments determined that, for any given target file size, HandBrake's AVC/H.264 video "codec" ("coder-decoder") gives better PQ results that its alternative, the MPEG-4 codec — at the expense of longer ripping times.

I don't really understand that lingo, but I believe the "AVC/H.264" codec implements Part 10 of the MPEG-4 standard for video encoding and compression. The "MPEG-4" codec implements Part 2 of the same standard. Any AVC/H.264 or Part 10 codec is supposedly "capable of providing good video quality at bit rates that are substantially lower (e.g., half or less) than what previous standards [including MPEG-4 Part 2] would need." So Part 10 is better than Part 2 at any give bitrate — though slower. From now on I'll refer to these two codecs in HandBrake as simply MPEG-4 (for Part 2) and AVC (for Part 10).

So my under-650-MB experimental file used AVC, not MPEG-4. The actual AVC "encoder" choice that I selected in HandBrake was "x264 (Main profile)," not "x264 (Base profile)." The ability to select among different encoders within a given codec is not one I fully understand the ramifications of yet. In earlier experiments I have found the Base Profile AVC encoder generates slightly larger files than the Main Profile encoder.

That ripped-DVD-file-copied-to-CD proved to work fine on my MacBook Pro, the fast new Intel-based computer on which I made it. But when I tried it in iTunes on my older, slower iMac, playback stuttered. Yet playback in QuickTime on the same iMac went fine. iTunes likewise stuttered when I copied the AVC file from the CD to its hard drive and played the copy. It also stuttered when, via my AirPort Extreme network, I played the original file that was on the MacBook's hard drive into iTunes on the iMac.

My conclusion: my iMac's 1-GHz PowerPC CPU just isn't fast enough to cope with AVC video in iTunes, though it unaccountably does fine with the same AVC video in QuickTime. The actual source of the AVC video file — the iMac's own hard drive, a CD, the network — doesn't matter.

On the other hand, the iTunes/iMac combintion does just fine with MPEG-4 video rips. Still and all, for now I'm sticking with the higher quality of AVC and expecting to play the results either on a fast Mac or in QuickTime on my slower Mac.


Even though the PQ is better with AVC than MPEG-4, for any given target file size, HandBrake offers you ways of improving it even more. One is to abandon the target file size in favor of a target average bitrate in kilobits per second. The two are joined at the hip. If you input a target size, the bitrate (though grayed in the HandBrake panel) changes accordingly, and vice versa. Both methods use a constant bitrate; they provide two different ways to determine what that bitrate will be. You can set the bitrate you want directly. Or you can set the file size and let HandBrake figure out what bitrate goes with it.

But as the "Converting DVDs for QuickTime Playback" page of the MODmini DVD Jukebox article says, a constant bitrate (CBR) limits the quality of scenes that need higher bitrates. With a variable bitrate (VBR), "the movie takes more space where more things are happening, and less space when not much is going on."

You are telling HandBrake to use VBR when you choose "constant quality" video instead of a target file size or bitrate. When you do that, you get to adjust a slider to set the quality you want. It's graduated in percentages, where 100% gives you the best possible PQ, using the most hard drive space. The default setting is 50%. MODmini says each additional 10% above that roughly doubles the file size.

Right at this minute, I'm experimenting with constant-quality AVC and MPEG-4 rips. My attempts to encode full-length movies at CQ100 (i.e., a constant quality of 100%) have thus far caused mysterious HandBrake failures toward the end of the ripping process, generating huge unopenable files. Possibly the file sizes became too big for Mac OS X to deal with.

When I switched to experimenting with ripping just a single chapter of a DVD, CQ100 worked fine, at least with MPEG-4 video. The result looks pretty good, too ... but so does CQ90 or even CQ80 with AVC video. I'm currently experimenting with CQ80 AVC. Specifically, I'm ripping Lord of the Rings: Fellowship of the Rings, Pt. 1, from the Special Extended DVD Edition of that already-classic film. It's the first 1 hour, 45 minutes, 30 seconds of the movie on the disc.


Well, that didn't work! HandBrake went through its connipitions and combobulations for an hour or two, got to where its progress bar reached 100%, and vanished without a trace, leaving me with another unusable output file, this one of some 5.5 GB. Again, I think these may be file sizes too large for Mac OS to handle. Or maybe HandBrake can't handle them when it tries to finish up — during the delay after the progress bar reaches 100% before HandBrake is done with the rip.

It occurs to me, though: do I really care whether HandBrake can produce files that aren't much smaller than the content of the original DVD? The dual-layer Fellowship DVD contains 6.9 GB of material. That includes several soundtracks, several separate video and audio files for the individual chapters of the movie, multiple menus, multiple subtitles, a lot of control information for the DVD player to figure out how to use the disc, etc. When I rip it in HandBrake, I filter out a lot of that information.

For example, when I choose a subtitle or captioning option — since I'm hard of hearing — the captions get "burned into" the movie. In playing the ripped copy, I can't turn them off. As such, they don't represent "extra" information, as they do on the DVD.

Likewise, all information about chapter stops is lost in the ripped copy of the DVD.

So a rip that exceeds 5 GB while giving me lower picture quality and less playback flexibility isn't all that wonderful. If I want to give up 5 GB of hard drive space, I might as well give up 6.9 GB and have all the picture quality and flexibility of a DVD.

One simple way to do that that sometimes works (see the MODmini "Introduction" page) is to open the DVD in Finder as if it were an ordinary hard drive or folder and drag its VIDEO_TS and AUDIO_TS folders to the Desktop, or to one of your own folders. Copies of the original DVD's folders will be made on your hard drive; it takes several minutes. Then, fire up DVD Player and, per MODmini, "select Open VIDEO_TS Folder in DVD Player's File menu. Navigate to the copied VIDEO_TS folder and your movie will play just as if from the DVD. Easy, free, and no additional software is needed."

Alas, with some DVDs it may be that simple, but "the Finder-copy method may not work on all DVDs, or on all computers. We’ve successfully tested many, many DVDs, but we’ve also seen Finder fail to copy some and DVD Player refuse to play others." With Fellowship, I can copy the necessary folders, but DVD Player won't play them, due to copy protection.

That's where MODmini's "Saving DVDs as VIDEO_TS Files" page comes in. It's method, more general if more complex, relies on Matinee and MacTheRipper software.

"MacTheRipper streamlines the process of saving your DVDs to your hard drive. Not only does it slice and dice exactly which of the DVD’s contents should be saved, but it can also reset region encoding, remove Macrovision copy-protection, and perform a number of other advanced tasks."

Then it's Matinee's turn. "Matinee provides a convenient, TV-suitable interface for selecting the movies on your hard drive, and watching them via DVD Player. It comfortably fills the gap between the Finder and DVD Player, and is easily controlled with a remote."

I've downloaded MacTheRipper (great name!) but haven't played with it yet. That's next on my agenda. Stay tuned!

Sunday, November 19, 2006

Ripping DVDs with HandBrake (Part 1)

HandBrake is free software you can use on your Mac to "rip" DVDs into computer files for viewing as:

  • Front Row movies
  • QuickTime movies
  • iTunes movies
  • iPod movies (video iPod required)

If you hook your Mac to an HDTV, the ripped DVD files can be viewed on its large screen. With networked Macs the ripped files can be viewed on a different Mac than the one where the files reside.

HandBrake is not hard to download and launch. It's user interface is fairly simple, basically a single panel containing a variety of options (click image to enlarge).


But figuring out which way to use those options to rip your DVDs with HandBrake isn't easy.

I've been making some experiments with HandBrake, about which I'll report soon, and I've found some helpful tutorials to help me through my perplexity. One of these is at iLounge.com. Another is from MethodShop.com. A third is from FreeSMUG.org. Check 'em out.

More later.