 Good news! You can now get media files such as movies, music, and photos to stream from your computer to your iPhone/iPod Touch using a software package called iPhone Remote. I have a new iPod Touch, or iTouch for short, so I'll talk specifically about it, but what I say below applies equally to the iPhone.
If you have one of these units, you know that iTunes syncs media files in your iTunes library to it. Every media file that you sync to your unit gets copied to its internal memory. Mine has 8 gigabytes, which gets used up pretty fast. About 500 songs plus 2 movies plus 3 TV shows will fill up the entire 8 gigs.
Meanwhile, I have about 120 movies in my library. I've quickly gotten tired of syncing the 1 or 2 movies I want to watch next. Isn't there a way, I wondered, to stream movies to the iTouch?
This YouTube movie clued me in:
If you watch it carefully a couple of times, you may glean all the information you need to get iPhone Remote working for you. But if you want more detail, read on.
The first 6 steps in the movie are pretty much optional. They concern making it possible for iPhone Remote to stream media to your iTouch when you're out of range of your own home wireless network, by setting up a dynamic host name on the Web that will always, when used as part or a Web address or URL, access your Mac remotely.
Step 1 creates a free user account at dyndns.com. During that step, you set up a user name and password to protect the account. Step 2 then sets up a dynamic DNS host name within that account. The purpose of these two steps has to do with giving a permanent Web-accessible host name to your wireless router's IP address.
For example, I am using dalekhound.webhop.biz as my host name. You can't click on it or type it into a browser to link to it directly, since I don't have it set up for that. What it does is serve as a proxy for the IP address of my home router, which is (slightly scrambled) 69.251.77.501.
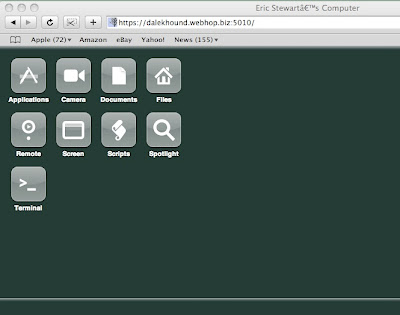
So when I go into Safari (this works best with Safari, not with my usual browser, Firefox) and go to the URL https://dalekhound.webhop.biz:5010/, what I see (after authenticating my identity) is:

This is the browser interface put up by iPhone Remote. It is intended for the iPhone or iPod Touch, but I can look at it in Safari on my Mac.
(To actually get this far, I need to go through an authentication phase in which I first choose to continue despite an "invalid" security certificate for my pseudo-website, and then I log in with my username and password. This is the username and password I created when I installed iPhone Remote.)
DNS, by the way, stands for Domain Name System, the system by which a domain name such as .biz can be qualified to become .webhop.biz and further qualified to become the host name dalekhound.webhop.biz. When DNS is dynamic, the Internet Protocol address of the router associated with my host name can change. My Internet provider periodically changes the IP address of my router: 69.251.77.501 becomes, say, 69.251.77.502. With dynamic DNS, the change is transparent when I use host name dalekhound.webhop.biz.
Steps 3 and 4 in the movie also have to do with dynamic DNS setup. Something has to tell dyndns.com that my router's IP address has changed, whenever that happens behind my back. The DynDNS Updater, a piece of free software you can download from dyndns.com, sets up a "daemon" that sits in my Mac system and monitors my router's IP address. When that IP address changes, the DynDNS Updater daemon automatically updates my account at dyndns.com.
Step 3 in the movie has you download and install the DynDNS Updater. Once that is done, Step 4 configures it. You tell it your dyndns.com user name and password at this stage ... which may or may not be different from the user name and password you're going to use with iPhone Remote later on. DynDNS Updater then retrieves your account information and host name from dyndns.com. (I'm not quite sure why the movie shows the host name being manually entered in DynDNS Updater, since mine appeared automatically under User when I first fired up DynDNS Updater.)
You also want to make sure the preference is set in DynDNS Updater Preferences to automatically fire the daemon up each time you reboot your Mac.
Things get a bit trickier in Step 5: you need to forward your router's ports 5010 and 5012 to your Mac.
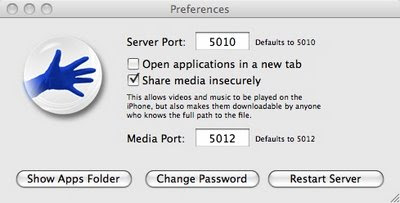
DynDNS Updater uses two software "ports" in your router. One becomes its "server port" and the other is its "media port." You can see this in the iPhone Remote Preferences window, once you have downloaded and installed iPhone Remote in Step 7 below:

Notice that you have to turn on the "Share media insecurely" option in order to allow your videos and music files to be played on an iPhone or iPod touch. Anyone who knows the full path name to a media file of yours (and also can authenticate with your username and password) can play your videos and music on his iPhone or iTouch.
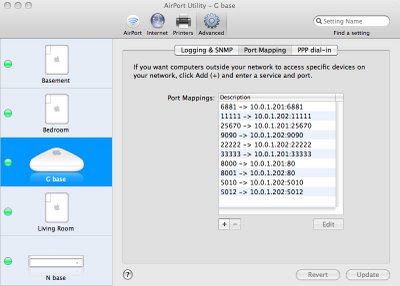
Back to the idea of "ports": your router has to be set up to "forward" ports 5010 and 5012 to the Mac which hosts the media files you want to play on your iPhone/iTouch. In my case the Mac in question has been given the statically assigned IP address 10.0.1.202, so I have to go into AirPort Utility and do some Port Mapping on my AirPort Base Station:

The two entries in question are the two at the bottom: 5010 -> 10.0.1.202:5010 and 5012 -> 10.0.1.202:5012. You have to add those to get iPhone Remote to work.
In the movie, a Step 5 procedure for a different type of router is shown. If you have an AirPort Base Station, you should ignore it.
Also ignore Step 6, which wants you to enable dynamic DNS on your router. I'm not quite sure what this step does, but it's not applicable on an AirPort Base Station. I suspect it is yet another way to notify dyndns.com when the router's IP address changes.
Step 7, the next step in the movie, is a crucial one. You need to download iPhone Remote at http://code.google.com/p/telekinesis/ and install it on your Mac. (Note that nothing at all gets installed on the iPhone or iPod Touch. You are not using unauthorized software or "jailbreaking" your unit.)
This is the time that you actually configure iPhone Remote's preferences, including setting up or changing the user name and password you'll be using on your iPhone/iTouch when you want to play a movie or a music file. To do this, you click on "Change Password" in the Preferences window:

Then you simply enter a Web Username and Web Password. Then you dismiss the dialog by clicking Save and in the window above click Restart Server.
This is also the time you make sure your server and media ports have the right numbers, 5010 and 5012, respectively, and that you checkmark the "Share media insecurely" option.
Once you've done that, you can close the Preferences window.
That's basically it! You're ready to start using iPhone Remote from Safari on your iPhone or iPod Touch.
Make sure that iPhone Remote is still running. You can leave the Preferences window open if it makes you feel better ... but as long as iPhone Remote is running, you're fine. Now enter your dyndns.com host name, followed by :5010, into Safari's address line on your iPhone/iTouch. In my case, I enter dalekhound.webhop.biz:5010.
If you get a message about an unknown security certificate at this point, touch Continue. Enter your iPhone Remote user name and password when prompted. You'll see a miniature version of:

and when you touch the Files button, you'll see a list of files and folders at your user folder level on your Mac. From there you can navigate either down the folder hierarchy or (by touching the active hot links in the blue bar toward the top of the the screen) back upward to your hard drive level or to the level of your computer as a whole. Hence, you can navigate to any movie or music file on your computer that will play on your iPhone/iTouch and, by touching its name, play it in QuickTime on the iPhone/iTouch!
No comments:
Post a Comment