Saturday, November 17, 2007

Screen Size Calculator

In 1080p, 1080i, and 720p I went into the abstract theory of HDTV resolution. Now for a more practical approach.

If you are in the market for a high-definition TV, you need to figure out what screen size to get. The screen size of a high-definition TV is its screen's diagonal measure in inches. For example, if an HDTV is advertised as having a 42" screen, then there are (nearly) 42 inches separating each pair of diagonally opposite corners of the screen.

Suppose you know that your new HDTV will be 10 feet from your eyeballs as you watch it from your accustomed seating position, and suppose the TVs you are looking at are 720p models featuring a horizontal resolution of 1280 pixels. If, in the table below, you enter 1280 (no commas, please!) as the horizontal pixel count and 10 as the seating distance, and click on "Calculate Now," the optimal screen size will be shown as 51 inches.

HDTV OPTIMAL SCREEN SIZE CALCULATOR
Enter horizontal pixel count:pixels
Enter seating distance in feet:feet
Optimal screen size:inches

This means a 51" 1280 x 720p HDTV would be, at a viewing distance of 10 feet, just about ideal. Any 1280 x 720p HDTV with a screen size near 51"— say, 49" to 53" — should do quite well.

By "1280 x 720p" I mean that the screen has 1280 pixels in each pixel row and 720 pixel rows up and down the screen. I specify the first number, 1280, because some HDTVs use a different number of pixels in each pixel row than their nominal format — in this case, 720p — supports. In my example, I am using the actual 1280 pixels per row specified for 720p digital television transmissions.

Since the final letter in 720p is "p," the pixel rows are lit up all at once in "p"-for-progressive fashion, rather than in "i"-for-interlaced mode, in which the even-numbered pixel rows are omitted in the first of two sequential screen refresh operations, then the odd-numbered rows are omitted in the next. (Of course, if the incoming digital TV signal is also interlaced, the TV does not actually omit any of its pixel rows.) The screen refresh mode, whether progressive or interlaced, actually has nothing to do with the horizontal resolution of the picture, stated as the number of pixels in each pixel row. It affects only temporal resolution: how often each pixel gets updated.

At that very same distance of 10 feet your eyes would not be able to pick up all the detail present on the screen of a noticeably smaller — say, 47" — 1280 x 720p HDTV. On the other hand, a noticeably larger, 56" 1280 x 720p model would present too little detail to satisfy your eyes at a viewing distance of 10 feet. The picture would look less crisp. Moving back just slightly to 11 feet away from this HDTV would remedy that situation.


The calculator shows that a "Full HD" 1920 x 1080i/p HDTV at 10 feet away would have to measure fully 77" diagonally to show you all its detail — try it in the table above! At 5 feet from your eyes, though, a set with that maximum-possible screen resolution of 1920 pixels per row could be a mere 38-incher. (The lesson here is that "Full HD" HDTVs have to be either very large or very close to your eyes to yield up all their glorious detail to your retinas.)

Some flat panel HDTVs offer 1366 pixels worth of horizontal resolution, whatever their 720p or 1080p nominal screen format might otherwise suggest. Often, the official resolution stated by the manufacturer is 1366 x 768. At a 12-foot seating distance, the optimal diagonal size of such a panel is 66". Other flat panels are limited to just 1024 pixels of resolution horizontally. At 12 feet, their optimal screen size is only 49".

With standard DVD fare, the upper limit on the horizontal resolution — that of the DVD itself, 720 pixels — will prove the limiting factor, no matter what the actual resolution of the HDTV. At 10 feet away from you, 720 pixels of horizontal resolution in the signal source demand just a 29" TV. But at 15 feet, that same standard DVD needs a 43" screen to show to best advantage.

If you watch nothing but standard-definition TV channels on your HDTV, the limiting factor becomes these channels' maximum available resolution. Stated in pixels across the width of screen, it's about 480 pixels per pixel row. At 10 feet away, a TV with a paltry 19-inch diagonal measurement would do! At 17 feet, you'd be forced to size up to a not-so-humongous 33".

Now, go ahead and play with the screen size calculator above to figure out what size HDTV you need!

This calculator assumes that the picture on an HDTV screen has an aspect ratio of 16 units wide per 9 units of height. It also assumes your eyes get all the picture detail they can handle when each pixel on the screen subtends an angle of 1/60° at your retinas. If it subtends a angle less than 1/60°, some of the fine detail in the picture effectively disappears — until you move closer to the set, thereby returning your retinas to the "sweet spot" where each pixel subtends 1/60°. If each pixel subtends an angle greater than 1/60°, on the other hand, your eye does not receive as much picture detail as it might wish, and the picture looks too "soft."

Friday, November 16, 2007

1080p, 1080i, and 720p

(This is an update of an earlier post, now deleted.)

Trying to figure out the actual resolution of a picture you see on an HDTV's screen is a complex affair.

The story of HDTV resolution begins with the terms 1080p, 1080i, and 720p. These terms give a number of rows of pixels on the screen (1,080 or 720, for high-definition TV) and a letter "p" or "i" that tells whether or not every pixel row is lit each time the image on the screen is refreshed.

If the designation is "p," for "progressive," all pixel rows are lit each time. Simple as that.

If "i," for "interlaced," first only the odd-numbered rows of pixels are lit. That's the first screen "refresh" operation in each pair of two such sequential operations. Then, 1/60 second later, only the even-numbered pixel rows are lit. That's the second screen refresh in the pair. After that, it's back to the odd-numbered rows for the next refresh, the first of two screen refresh operations in a new pair. And so on. (Why "interlaced"? Think of how your fingers look when you fold your two hands together: they're "interlaced.")

A pixel? It's a "picture element": a dot on the screen that is independent of every other dot, in terms of what color it is and how light or dark it is.

A "pixel row"? It's a horizontal array of pixels which corresponds to a "scan line" on an old tube-type TV. If you peer at one of those old picture tube TVs up close, you can see the scan lines.

1080p? That's jargon for a high-def picture made of 1,080 rows of pixels with 1,920 pixels in each row. All the rows of pixels are lit up on each and every screen refresh operation. Every pixel on the screen is refreshed each 1/60 second.

1080i? It likewise has 1,080 rows of pixels with 1,920 pixels in each row. Just the odd-numbered rows are lit up on the first screen refresh; then, on the second, just the even-numbered rows. It takes two 1/60-second refreshes to illuminate all the pixels with 1080i. Accordingly, all the pixels are refreshed each 1/30 — not 1/60 — second. 1080p gives you better moving images than 1080i by updating every pixel each time the screen is refreshed.

Both 1080p and 1080i use pixel rows containing 1,920 pixels each. Accordingly, both put over 2 million pixels on the screen. 1080p simply updates them twice as often as 1080i, for smoother moving images.

And 720p? That's like 1080p except that each "frame" of the displayed image is made up of 720 pixel rows, not 1,080. Each row of pixels in the 720p format contains 1,280 pixels, not the 1,920 pixels of 1080i or 1080p.

So 720p puts over 900,000 pixels on the screen. They're all updated as often as with 1080p, every 1/60 second. The whole screen is refreshed twice as often as with 1080i, but there aren't nearly as many pixels on the screen, so the image has much less static detail. However, if your screen is relatively small compared with how far you sit from it, you may not be able to tell the difference.

Keep in mind that 720p, 1080i, and 1080p HDTVs all use screen dimensions in which the ratio of the width to the height is 16:9. For standard-definition TV, the screen's "aspect ratio" is a squarish 4:3.


Terms like 720p, 1080i, and 1080p are ambiguous. They apply to the screen resolution of the HDTV itself. They apply separately to the signals you input into the HDTV.

As these terms apply to input TV signals, 1080p always refers to signals whose individual "frames" contain exactly 1,080 horizontal rows of exactly 1,920 pixels each, intended to be displayed progressively.

1080i signals have image frames with exactly 1,080 horizontal rows of exactly 1,920 pixels each, intended for interlaced display. With 1080i signals, the rows of each image frame are divided into two successive "fields," using odd-even interlace. The first in each pair of fields contains just the odd-numbered pixel rows, and the second field in each pair contains just the even-numbered rows. It takes two fields, 1/60 second apart, to make one frame.

720p signals' image frames always have exactly 720 horizontal rows of exactly 1,280 pixels each, displayed progressively.


As the terms 1080p, 1080i, and 720p apply to high-definition TV sets, they refer to the "native" screen resolution of the TV. As they refer to high-definition TV signals, they refer to the formats the signals are in.

The native resolution of an HDTV is the resolution at which all input signals, whatever their format, will eventually be displayed by the HDTV. Every HDTV converts 720p, 1080i, and 1080p input formats to its native screen resolution. Signal processing done to match the resolution of the input signal to the native resolution of the HDTV is often called "scaling" or "format conversion."

(1) Format conversion for 1080p HDTVs:

First, let's say the native screen resolution of the HDTV is 1080p. If it gets a 1080p input signal, fine; no conversion is needed.

If the input signal to a 1080p HDTV is 720p, that format gets upconverted to 1080p. The TV computes how each individual pixel in the 720p input signal ought to be spread out into adjacent pixels in the same 1080p row — and also into nearby pixels in the adjoining rows — of the output image to be displayed on the screen.

Finally, if a 1080p HDTV's input signal is 1080i, the pixels that are missing in each field of the input signal are filled in by a kind of computational guesswork, taking into account the contents of pixels in the neighboring pixel rows which are actually present in the input field. Also taken into account are the actual contents of the same pixel in the previous field and in the next field in the input stream.

(2) Format conversion for 720p HDTVs:

720p input signals, first of all, are displayed without any scaling or format conversion.

1080p and 1080i input signals are both downconverted to 720p such that each output pixel combines information from more than one 1080p/i input pixel, thereby sacrificing some of the detail present in the original image.

If the input is 1080i, not 1080p, then before the downconversion to 720p takes place, the missing pixel rows in each input field are filled in by computational guesswork, just as when 1080i input is being converted to 1080p.

(3) Format conversion for 1080i HDTVs:

1080i native HDTV resolution is rare. It can be used by HDTVs that produce their images using old-fashioned "picture tubes" or CRTs — either direct-view or rear projection. It can also be used by plasma flat panels made by Hitachi or Fujitsu. Most HDTVs made today do not use CRTs and do not have 1080i native screen resolution. Instead, most HDTVs made today have 1080p or 720p native resolution. (However, all HDTVs accept 1080i input signals.)

On a 1080i-native HDTV, a 1080i input signal will be rendered just as it is, without conversion.

A 1080p input signal will be downconverted to 1080i by having half of its pixel updates thrown away every 1/60 second. That is, in the first 1/60 second all the even-numbered pixel rows of the input signal's frame will be ignored. Then, in the second 1/60 second, the odd-numbered rows of the next frame will be ignored. The result will be equivalent to having received a 1080i signal, not a 1080p signal, in the first place. (1080p input signals are not widely available, since over-the-air HDTV broadcasts are either 1080i or 720p. Blu-ray and HD DVD players do output 1080p signals, however.)

A 720p input signal will be upconverted for display at 1080i. Each of its input pixels will be spread out over more than a single screen pixel. That effectively converts the 720p input to 1080p. Then, half of the derived pixel rows will be discarded, just as when converting 1080p to 1080i.


Most digital HDTVs available today have a native screen resolution listed as either 720p or 1080p. The image is typically progressively displayed, not interlaced, and it has either 720 pixel rows (720p) or 1,080 rows (1080p). Flat-panel HDTVs (LCD, plasma) and rear-projection "microdisplays" (LCD, DLP, LCoS, SXRD) typically fall into this category of HDTVs whose displays are natively progressive.

Actually, some so-called "720p" flat panels actually give you a screen resolution using, say, 768 pixel rows. All digital HDTVs are constructed with X-number of pixels in each row appearing on the screen, and Y-number of rows. For plasma and LCD flat panels, the number Y is sometimes (for whatever reason) 768.

If you input a 720p signal to a flat panel whose native resolution uses 768 rows, you'll see only 720 rows worth of definition, since the internal upconversion to 768 displayed rows doesn't add any extra picture detail. If you input a 1080i or 1080p signal to this 768-row flat panel, the internal downconversion will give you a 768 visible rows of detail, but not the full 1,080 rows present in the input signal.

As for X — how many pixels per row there are in a "720p" or "1080i/p" flat-panel plasma or LCD HDTV — you are apt to find numbers like 1,366 or 1,024, instead of 1,280. 1,366 is a number typically found in flat panels of the LCD variety, whatever their diagonal size. It is also typical of the larger plasma HDTVs, 50 inches and up. Smaller plasmas (but not smaller LCDs) often use just 1,024 pixels per row.

The number of pixels per row of the native screen resolution accordingly need not match the number of pixels per row of the input signal, which will always be 1,280 pixels for 720p or 1,920 pixels for either 1080i or 1080p. Scaling down of the input image can be required, sacrificing horizontal detail.

That's right: depending on the input signal type and the screen resolution, scaling can reduce the amount of horizontal detail in the picture. For example, if the input is 1080p (1,920 x 1,080) and the screen resolution is 1366 x 768, the effective number of pixels per row is reduced from 1,920 to 1,366, while the number of pixel rows is also reduced from 1,080 to 768.

But scaling in the upward direction cannot increase the amount of visible horizontal detail. For instance, if the screen is 1366 x 768 and the signal is 720p (1,280 x 720), scaling 1,280 pixels per row to 1,366 pixels per row will not add to the amount of detail your eye can see. It will simply spread what detail there is across a larger number of screen pixels. Scaling the input signal accordingly can lower the effective resolution of the picture, but it cannot raise it.


The same is true of any sort of format conversion the TV does — say, from 720p as an input format to 1080p as a display format, or from 1080i to 720p. If the conversion is a downconversion (1080i/p to 720p), detail is lost. If the conversion is an upconversion (720p to 1080i/p), no extra detail is gained. Seems unfair, doesn't it?

Furthermore, scaling or format conversion can jettison detail in either of two directions: horizontal detail, vertical detail ... or both. Doubly unfair, no?

That's why I believe most people with sufficient cash in hand will want to buy a 1080p HDTV of the type marketed as "Full HD." Its screen will have fully 1,080 pixel rows and — because it is "Full HD" — fully 1,920 pixels in each row. An HDTV whose native screen resolution is 1080p and which is marketed as "Full HD" will never jettison image detail during format conversion or scaling.

On the other hand, HDTVs that are marketed as "720p" — even if their screens actually use, say, 768 rows — will discard vertical and horizontal image detail for all 1080i and 1080p input signals. They can even reduce horizontal detail for 720p inputs — if their horizontal resolution is less than 1,280 pixels.

Furthermore, HDTVs that are marketed as 1080p but without the "Full HD" designation will discard horizontal detail from a 1080i/p input signal, though no vertical detail will be lost.


Over-the-air, cable, and satellite HDTV channels provide input in either the 1080i or 720p format, never in 1080p. Still, many 1080p HDTVs today can accept a true 1080p input signal from, say, a Blu-ray or HD DVD player. If they are "Full HD" sets, they can display all the horizontal resolution (i.e., 1,920 pixels per row) on the Blu-ray or HD DVD disc.

But beware: some early-model 1080p HDTVs still being sold may not accept 1080p input from a disc player! Oddly, their high-def inputs are limited to 1080i and 720p.

Keep in mind also that scaling and format conversion are always done with standard DVDs that are input to an HDTV. I'm talking about "regular" DVDs, not HD DVDs or Blu-ray discs. Regular, standard DVDs use 480i images: 480 pixel rows in two interlaced fields per frame.

The number of pixels per row on a DVD can be 704 or 720. Either way, the amount of horizontal detail is less than either 720p or 1080i/p nominally offers. Furthermore, it can be shoehorned into either a squarish 4:3 box or spread over a wider 16:9 aspect ratio. (Notice, accordingly, that pixels on a standard DVD are not "square," with width and height being exactly the same. All the pixels I have been talking about up to now are square.)

Lets say a 480i image on a standard DVD is fed into a 1080p HDTV. First it has to go from "i" to "p": interlaced to progressive. This "deinterlacing" of a DVD image is a complex subject in itself, since it is done differently for film-based material than for video-based images. For the former, the reversing of what is called "3:2 pulldown" is required. 3:2 pulldown allows film projected at 24 frames per second to be "scanned" for DVD video at 30 frames (60 fields) per second. Reversing the 3:2 pulldown, done either by the DVD player or the TV, restores the original film frames at 24 fps.

Reverse 3:2 pulldown is also called "inverse telecine." A so-called "progressive" DVD player can do it, or it can be done in the HDTV itself. Reverse 3:2 pulldown turns 480i into 480p, which then has to be upconverted to (say) 1080p. Again, the scaling and format conversion that are required can be done in the DVD player or in the HDTV. The result will be a picture with no more visible detail than on the DVD itself; it can also contain distracting "artifacts" if the reverse 3:2 pulldown is not done perfectly. Still, the image can be quite good ... even though it's not true high-def.


Scaling and format conversion are also done by a high-definition TV for standard-definition TV channels that its onboard tuner receives, or that are input to it from outboard devices such as a cable box or satellite receiver. Standard-def signals are 480i, like DVDs, but they have lower horizontal resolution than a DVD does. Standard-def over-the-air TV (or cable or satellite) signals can be transmitted in digital form or in analog form — it doesn't matter which. After being converted from analog to digital, if need be, they're still converted and scaled to the native screen resolution of the HDTV.

Any HDTV, whether 720p or 1080i/p, can theoretically do complete justice to the detail in standard-def TV images and in 480i images input from regular DVDs, provided that the deinterlacing, scaling, and format conversion the HDTV (or a source device such as a DVD player) does is done well.


As a practical matter, then, when you shop for an HDTV you are generally asked to pick from two native screen resolutions: "1080p" or "720p." The former is more expensive, but it never sheds image detail with any signal source. The latter is more affordable, but it can shed picture detail.

If you read the fine print, some "720p" HDTVs (usually flat panels) actually have "extra" vertical resolution: 768 rows. Some also have "extra" horizontal resolution: more than 1,280 pixels per row. Other "720p" HDTVs (usually rear projectors) have exactly 1,280 pixels per row. Some "720p" flat panels, unfortunately, offer less than the regulation 1,280 pixels per row. From up close, they're less sharp.

Most or all current-model 1080p or "Full HD" HDTVs offer full-fledged 1920 x 1080 native resolution, and most or all accept 1080p inputs from external devices. (Avoid non-current models; they may accept only 720p and 1080i inputs.) Some 1080p HDTVs that lack the "Full HD" designation will reduce the horizontal detail in a 1080i/p input signal.


There are plasma HDTV models that actually offer 1080i native resolution, even though they're advertised as 1080p. Hitachi plasmas come to mind. Fujitsu plasmas also use the same "ALiS" (Alternating Lighting of Surfaces) plasma technology.

ALiS plasma display panels, unlike other types, don't have gaps separating one pixel row from the next. More of the screen surface is able to be lit up, but only every other pixel row of a 1080p video frame containing 1,080 rows can be displayed at any one time. 1/60 second later, the remaining pixel rows are lit up, slightly offset vertically on the screen. In effect, in each 1/60-second frame of 720p input, either the odd-numbered pixel rows or the even-numbered pixel rows are suppressed. (Notice that no pixel rows need to be suppressed for 1080i input. But pixel-row suppression does take place for 720p input after internal scaling to 1080p.)

For the same reason, ALiS plasmas advertised as "720p" (and actually displaying, typically, 768 rows) are actually "720i" (or "768i") displays. In each 1/60-second frame of 720p input, either the odd-numbered pixel rows or the even-numbered pixel rows are suppressed. Again, this does not adversely affect the already-interlaced video in a 1080i input signal.

Many of the larger ALiS plasmas have only 1,366-pixel horizontal resolution. Some smaller models offer only 1,024-pixel horizontal resolution.

On the other hand, ALiS plasmas offer bright screens with less "screen door effect" than other plasmas have: the ability to see the gaps between the pixels when you sit close to the screen. Also, pixel-row suppression means each pixel is lit only half the time, resulting in longer panel life.


Aside from ALiS plasmas, the only HDTVs I know to use a natively interlaced screen format (1080i, for example) are CRT-based. (A CRT? It's a "cathode ray tube": an old fashioned picture tube.)

There are a few direct-view CRT-based HDTVs sold, and until recently there were also rear-projection CRT-based HDTVs still on the market, though I believe they're no longer made. They have in common that a electron beam sweeps across the CRT screen once for each scan line, the equivalent of a pixel row. The lines are scanned in an odd-even, interlaced fashion, no matter what type of format the input signal uses.


To try to reduce all the above to a few sentences:

  • Prefer "1080p" HDTVs if you can afford them.
  • Buy "720p" HDTVs if you're on a budget or for screen sizes less than 37".
  • Be aware that some plasmas suppress pixel rows for input signals with a progressive format.
  • Check the fine print to determine actual vertical and horizontal resolution.

Best of luck to you in your HDTV hunt!
Thursday, September 27, 2007

BitTorrent Content for Apple TV, Pt. 2

OK, as promised in BitTorrent Content for Apple TV, Pt. 1, here's a discussion of one of the things you need to do to maximize your success with a BitTorrent client like Azureus or Transmission.

BitTorrent is a file-sharing protocol that makes it easy to download huge files (or folders full of them). Video files such as movies ripped from DVD qualify as huge. If you want to download movie files to play (usually after a format conversion) on Apple TV, you need to use BitTorrent.

So let's say you've installed Azureus and used a BitTorrent search engine such as TorrentScan to locate and download the small torrent files associated with the online movies you covet. You've opened these downloaded torrent files in Azureus, and downloading of the actual target files has begun ... but at a snail's pace. Is there anything you can do to speed it up?

Well, maybe there is. One of the big reasons why downloads go too slow is that the BitTorrent client hasn't been given an open port.
If your setup is anything like mine, your computer (or computers, plural) is "behind a router." That phrase simply means that on your home network there is a piece of gear between your computer and the cable modem or DSL modem that affords it access to the Internet. The computer "talks to" that piece of gear, called a router, the router talks to the modem, and the modem talks to the Internet.

In my own case, the "router" is actually one of Apple's Airport Extreme Base Stations, a wireless (or Wi-Fi) "access point." Your access point may be a "real" router from Belkin or Linksys or any of the other companies that make them. And you may not be using wireless technology at all. Instead, each computer may connect to the router via Ethernet cable. No matter. You're still behind a router, and you probably need to "forward" a network "port" from the router to the computer you'll be using to run the BitTorrent client.

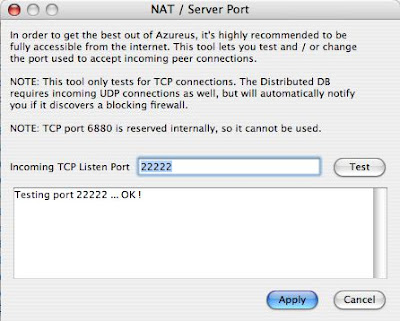
Azureus has a so-called NAT/Server Port Test which can tell you whether a certain network port is open:


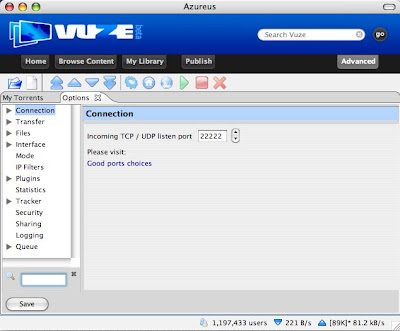
Here, I've tested port 22222, a number which I chose at random. I'll talk more in a while about how to select a port number. In my test in Azureus, port 22222 was "OK," meaning it was open and being properly port-forwarded from my router to my computer. Since it was in fact open, I clicked the Apply button to make it Azureus' official "listen port," as then revealed in the Azureus Preferences/Options pane, under Connection:


I had to set up the port forwarding myself, before running that test in Azureus. It was the first tricky part of these proceedings.

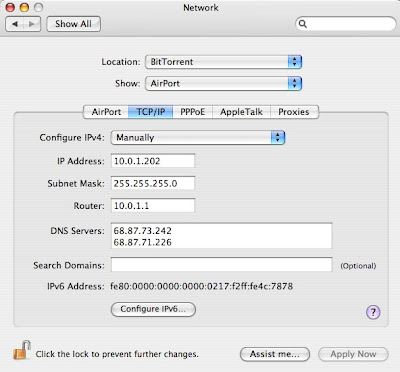
The first thing you need to do to port forward to Azureus what is to become its official listen port is give your computer a manually assigned, static IP address. If you have a Mac such as mine, open the Network panel in System Preferences, show AirPort (if that's how you connect to your access point/router, otherwise show Built-in Ethernet), and select the TCP/IP tab:


Right now, chances are you're setting Configure IPv4: to "Using DHCP." It needs to be changed to "Manually." Then, fill in the text boxes as I have done. You can change the "202" in the IP address field to any number from 201 to 255, as long as no other computer on your home network uses that number.

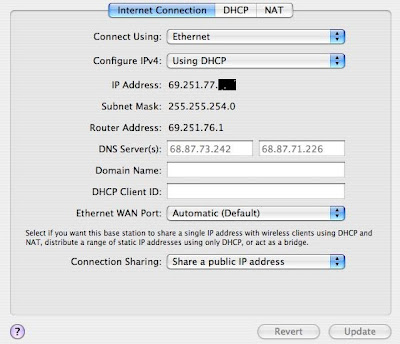
You also have to replace the DNS server addresses I'm using with the one(s) your Internet service provider provides. This is one of the tricky but essential steps. If you have an Apple base station, open it for manual setup in AirPort Utility. Go to the Internet Connection page:


The DNS server IP address(es) assigned to your Internet connection by your ISP appear in gray, meaning that you needn't enter them yourself in this AirPort Utility panel. Instead, the ISP (in my case, Comcast) filled in the addresses for you.

When you direct your Web browser to, say, the URL http://www.google.com, a DNS server is the piece of the Internet that translates the supplied URL to an actual IP (Internet Protocol) address for Google. Without access to a DNS server, your browser would be confined to using the literal IP address.

When your computer uses a static IP address such as 10.0.1.202, it no longer can take advantage of the DNS server addresses that your router knows about ... unless you copy those DNS server addresses from the router's Internet Connection panel in AirPort Utility to your computer's Network Preferences panel. So do so before going any further, and apply the changes.


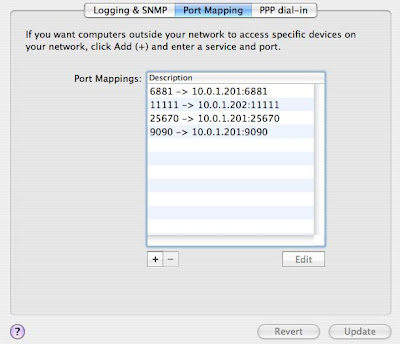
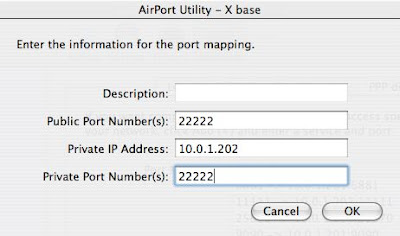
While you are still in AirPort Utility, you need to "port map," or "port forward," the listen port number you've decided on, which in my example is 22222. To do that, click on the Advanced icon and then on the Port Mapping tab:


Here you see what my setup looked like before I port forwarded 22222. I had forwarded ports 6881, 11111, 25670, and 9090 earlier, each of these port numbers to exactly one of my two computers. (You can't port forward any single port number to more than one computer.)

To port forward 22222, I clicked on the + sign and entered the following:


22222 was entered as both the public port number and the private port number, and the private IP address I entered was 10.0.1.202, the address which I assigned to my BitTorrent client computer earlier, in Network Preferences. The description field is left blank, as you cannot type anything into it.

When I clicked OK, the list of mapped ports shown in the previous figure had one more item added to it:

22222 -> 10.0.1.202:22222

After updating the base station (don't forget to do that by clicking on the Update button and waiting for the base station to restart), I was able to successfully run the Azureus NAT/Server Port Test I discussed earlier.

If you don't have an Apple base station, or if you aren't using a Mac, you can probably find instructions for doing port forwarding in your setup at PortForward.com.


I promised to talk about how you pick the port number to use with your BitTorrent client as its listen port.

The "well known" BitTorrent ports are in the range 6881-6889, so try 6881 first, if you like.

If you run more than one client either on a single computer or on more than one computer behind the same router, then for each of the clients that will be in simultaneous use you have to open up a different port. Accordingly, client number two would use 6882, number three would use 6883, and so on.

There's nothing really magic about the 6881-6889 range. The game in picking port numbers is to avoid using a number that any other application/service uses.

When a port number is used by an Internet application or service, it has to do with traffic coming into your local network from the wider Internet. When a computer or server out in cyberspace initiates contact with your computer, it uses a specific port number associated with the type of service in question. For example, the World Wide Web typically uses port 80. So if you happened to be running your own Web server, you would have to port forward port 80 to it. That way, Web browsers in cyberspace could access it.

When you open a torrent file in a BitTorrent client, it announces itself to the "tracker" whose URL is listed in the torrent file. The tracker is a special kind of server which co-ordinates between all the clients on the Internet using that same torrent file. When your client announces itself, the tracker learns (among other things) the IP address of your router and the listen port of your client. It shares that information with other clients using the same torrent file. Those other clients typically initiate contact with your client.

When they do, they use your router's IP address and your client's listen port. If your listen port isn't properly port forwarded by your router, the remote clients get no valid response from your local client. That means the remote clients won't be able to share pieces of the torrent with your client. The only source of torrent pieces your client will be able to take advantage of will be those remote clients that it, your client, initiates contact with itself. That's why downloads too too slow when the listen port isn't open.

You can actually pick any port number from 1 to 65565 for your listen port, but the numbers below 1024 are all taken, and many of those between 1024 and 49151 are too. The ones between 49152 and 65565 are less likely to be reserved. Check this list if you want to be ultra-careful. But remember: the vast majority of port numbers will probably never get external traffic coming into your network, for the simple reason that you are not running anything that requires it. If you pick a port number that is officially reserved, there may be no real harm done.

Also, some ISPs go out of their way to interfere with BitTorrent users who use the "well known" port numbers. You can learn more about that here.

Thursday, September 20, 2007

BitTorrent Content for Apple TV, Pt. 1

In Apple TV: Getting Content I talked about how BitTorrent technology can be used to exchange Apple TV and other content with other Internet users. Now I'd like to extend those remarks in a series of posts about exactly how that is done.

In the earlier post I said BitTorrent is

a peer-to-peer file sharing (P2P) protocol for distributing large amounts of data widely across cyberspace in a decentralized way. The general idea is that every file — movie or otherwise — is divided up into many, many, many tiny pieces, every one of which can be redundantly stored in different computers on the Internet. The pieces can be downloaded all at a time, in no particular sequence, from any of these locations. The BitTorrent client software that you run on your computer finds a source computer for each piece, downloads all the pieces one by one, and assembles them in their proper order to make a single file on your hard drive which is exactly like the original file.

All that still goes, but I should note that a lot of people don't think of BitTorrent as P2P, since it does things so much differently than earlier P2P methodologies such as LimeWire and KaZaA. For one thing, those earlier technologies didn't break files into pieces to be obtained from multiple sources.

Also, BitTorrent as a protocol for sharing files needs to be distinguished from BitTorrent as one of several available software clients that you can download and use to do file sharing, via the BitTorrent protocol, on the Internet. (That particular client is sometimes referred to as "the Official BitTorrent Client," or OBTC. There are other clients which in my humble opinion are better, such as Azureus. I'll talk about Azureus and some of the others in later posts.)

Furthermore, there is the official BitTorrent website, where the Official BitTorrent Client can be obtained, along with many (legal) torrent files.

And another thing: when we talk about sharing a file as a "torrent," what we really mean is that we are sharing either one individual computer file or a folder/directory containing one or more individual files. Torrents can include multiple files.

For example, a particular torrent may contain, in a single folder: a movie file, in perhaps the .avi format; one or more subtitle files in various languages, which the user may optionally apply to the movie; and perhaps a .jpg file showing DVD cover art for the movie.

(Notice that I used an .avi file as an example of a typical movie torrent's content. That was because a large proportion of movies available in the BitTorrent universe use that file format ... which does not happen to work in iTunes or Apple TV. In Apple TV: Getting Content I talked about that problem, along with some ways to deal with it by converting the .avi files to an iTunes-compatible format. I'll talk more about that concern in future posts.)


That word, "torrent," is a bit ambiguous. It can refer to the data file (or folder of many files) which is the ultimate target of the BitTorrent client. It can refer to a special file called a "torrent file" which describes the target file or folder; this so-called torrent file, which is small, contains "metadata" about the "target file," which is typically big. Or the word "torrent" can simply refer to the whole package, the target data and the metadata.

In order to download a torrent data file, also known as the target file (or folder), you first have to obtain the torrent file — the small file with metadata in it. The way you usually do that is to go to either a torrent search site on the Web or a torrent "tracker site" — more later on what a "tracker" is — find a torrent for (let us say) a movie you want to download, and download that in the "ordinary" way: click on a "Download" hotlink/button in your browser, at which point your browser will do it's customary downloading thing.

Once a copy of the torrent file is present on your desktop (or wherever you put it when you downloaded it), you simply open it in your favorite BitTorrent client software.

When you open the torrent file, the client will probably ask you where on your hard drive you intend to put the downloaded torrent target file it is about to create. Alternatively, the client may have a fixed place into which it is set up to put all its downloads. Chances are, depending on the client, you can select which of those two behavior patterns you prefer. You do this in the client's Preferences/Options. If you select to download to a fixed automatic location, you can also choose the exact location you want while you are in the client's Preferences/Options.

If all goes well, the client will then at this point do some stuff behind the scenes. Then, after a brief delay, you will see the client give you some indication that downloading has successfully begun. (If that doesn't happen pretty quickly, something is wrong. I'll talk about what may be amiss in a later post. But for now, keep in mind that some torrents aren't very popular and for that reason download slowly. If the first torrent you try is balky, try some others.)


What has actually happened when you open a torrent file? Put simply, when you open the torrent file in a BitTorrent client, the client arranges for you to join the "swarm" of "peers" all trying to download the same torrent!

That is, all the peers — in file-sharing protocols, "peers" are treated as equals — are after the same target data file or folder. Each peer presumably has some but not all of the pieces of the target. When you open the torrent metadata file, your client reads it and announces your presence to a "tracker" whose URL is contained therein.

This tracker is software running on a Web server, somewhere on the Internet. When your client announces that you have opened the torrent file, the tracker sends back current information about the "swarm" of peers for that torrent. Specifically, it tells you client what other peers are in the swarm and what the IP (Internet Protocol) address of each is. It's then up to your client to connect to the client software running on the other peers' computers.

When a connection is made by your client with a certain peer, your client and the peer's client exchange information about which pieces of the torrent each already has. When you open a torrent file for the first time, obviously you have yet to possess any of the pieces, so the respective BitTorrent clients treat that as a special situation, in order that you can get started downloading the torrent.

More generally, each peer you connect to will expect you to have some of the pieces it wants and will expect itself to have some of the pieces you want. The two clients will negotiate an exchange.

Notice that once you have downloaded some of the pieces of the torrent, you can expect peers you have yet to initiate contact with to initiate contact with you — that is, with your BitTorrent client. It is simply the mirror image of the process just described, except that it is initiated by one or more remote peers rather than by your "local" client.

Very quickly, as you can see, what you began as a download turns into an upload as well. No matter whether the other peer — the second peer— initiated the connection or you did, torrent pieces you have obtained elsewhere (i.e., from yet other peers) typically will start flying up to that second peer — or, rather, to any number of remote peers.

In fact, the BitTorrent protocol is implemented in such a way that if for any reason your client is not uploading pieces at a decent clip, other clients will "choke" their download speeds to you. Mark that well. If you want decent download speeds, you need to insure decent upload speeds.


Assume you have just begun downloading a torrent. Now it's a matter of waiting for the download to complete. Depending on any number of factors, that can take as little as two or three hours, for a full-length movie, to as much as several days.

Naturally, you want your download to go as fast as possible. One of the things I want to cover in the next post in this series has to do with avoiding a common mistake that can limit download (and upload) speeds. Hint: it has to do with making sure your client is using an "open port."

Using an open port requires that you open a particular "port number" — one of your choosing — and to tell your client what it is. Opening a port number involves, first of all, telling your computer's firewall not to screen out incoming traffic on that network port.

If your computer is "behind" a router on a local area network in your home or office, you also have to "port forward" the chosen port number from the router to your computer.

If the router also has a firewall, you have to open the port number on the router.

More about opening ports next time ...

Wednesday, August 29, 2007

Apple TV: Using an AirPort Disk, Part 2

Apple TV plays iTunes media files from your computer — movies, songs, podcasts etc. — on an HDTV via a wireless home network. In Apple TV: Using an AirPort Disk, Part 1 I told how I began using an external USB 2.0 500 GB hard drive to store large movie files. The drive connects to an AirPort Extreme 802.11n base station (an "Extreme-n"), which is Ethernet-connected to my original AirPort Extreme 802.11g base station (an "Extreme-g") ... which in turn is Ethernet-connected to my cable modem.

My original intent was to have the two base stations form a "dual-band network." The Extreme-n would handle all the traffic in the 5.0 GHz band — the one used by 802.11n transmissions, which are faster than 802.11g. The Extreme-g would handle just the 802.11g traffic, which is located in the interference-prone 2.4 GHz band.

The Apple TV is capable of using speedy 802.11n transmissions in the interference-free 5.0 GHz band, if an 802.11n-capable computer running iTunes is available to it ... otherwise, it contents itself with 802.11g. My (erroneous, as it turned out) assumption was that my MacBook Pro could use 802.11n as well, provided I ran Apple's 802.11n Enabler on it. But, no. My version of the MacBook Pro has but a lowly Intel Core Duo processor in it. Of the MacBooks, only those with the Intel Core 2 Duo can be 802.11n-enabled. Oops.

That letdown meant that (since I have only one n-enabled device, the Apple TV) I would be stuck in the 2.4 GHz band that 802.11g uses for its relatively slow traffic. Unless you have at least two devices that "speak" 802.11n, you are necessarily stuck with 802.11g all the way down the line.

Which meant that I had to revise my original configuration of the new Extreme-n. I initially set it up manually (after having completed the assisted setup phase) to use the radio mode called "802.11n only (5 GHz)." With that radio mode, neither of my Macs even saw the new base station's network (actually just a segment of the previously existing network, which was now dual-band). Because of that, I could not get my Macs to join the new network segment, and they could join only the original network segment ... the one operating at 802.11g speeds.

Not being able to join the 802.11n segment of the network, neither of my Macs could stream or sync iTunes media to the Apple TV on that relatively swift segment. Which, sadly, defeated the intended purpose of the dual-band network.

In order to get my new network segment to be one which my Macs actually could join, I had to reconfigure the Extreme-n, by way of AirPort Utility's manual setup process, to the radio mode of "802.11n (802.11b/g compatible)." That meant my Macs could join the new segment (hosted by the Extreme-n) or the old one (hosted by the Extreme-g). Alas, no matter which segment I had them join, they would be limited to using 802.11g speeds, even when talking to the Apple TV.


The next thing I wanted to do, of course, was see whether I could copy my movie files to the hard drive attached to the Extreme-n — called an "AirPort disk" in the lexicon — and then stream them via iTunes on my MacBook to the Apple TV for viewing.

Lo and behold, it worked!

But there was an issue: speed. Where the speed of 802.11g had been perfectly adequate for streaming from movie files on the internal hard drive of the MacBook, it was not adequate for streaming from the AirPort Disk, via the MacBook, to the Apple TV.

As a result, every minute or two the Apple TV's input buffer became depleted of contents, since the network couldn't keep up. The Apple TV would freeze the frame on the TV screen briefly and wait to fill up its buffer again, showing a progress bar at the screen's bottom while this went on. It took only about two seconds, but it was irritating to have to put up with the "buffer underflow" hiccup time and time again.


Experiments with other movie files tended to confirm my suspicion that this "buffer underflow" problem was likely to happen only with movies whose bitrate — the number of bits per second of video and audio — was fairly high. Lower-bitrate movies had few if any "buffer underflow" hiccups.

Still, I considered the hiccups too annoying to live with, so I looked for a fix.

I reasoned that the borderline speed insufficiency of my network just might be gotten around by having my Macs and the Apple TV join exactly the "right" respective segments of my dual-segment network. (I'll call it a dual-segment network, not a dual-band network, because it it no longer consists of one band isolated on each base station. Both base stations host network segments operating in the 2.4 GHz 802.11g band.)

Perhaps, I thought, if I had the Apple TV join the Extreme-n's segment while the Macs were on the Extreme-g's segment, that might speed things up.

And it seems to have done just that — but not enough. There were fewer hiccups, but still some. No amount of rejiggering my devices-to-segments-joined protocol seemed to eliminate the hiccups entirely.


I don't mind saying I felt a bit flummoxed at that point. It was beginning to look as if there was no way for me to painlessly achieve my original goal, which was to have all my movie files stored on a capacious hard drive attached to my new base station.

Then I hit upon the expedient of connecting my iMac to the new Extreme-n via Ethernet, where it originally used AirPort.

I ran an Ethernet cable from the iMac to one of the spare LAN ports on the Extreme-n. In the Network panel of System Preferences I selected Built-in Ethernet (rather than AirPort) under Network Status. Under Built-in Ethernet, I selected "Using DHCP" as my choice from the Configure IPv4 pop-up menu, and I entered the requisite DNS Server and Search Domain information specified by my Internet provider. I clicked "Apply Now," and my iMac switched from using AirPort to using Ethernet to contact the Extreme-n and go online!

I was worried that perhaps doing this would make it impossible to access the AirPort Disk from the iMac. I didn't have to fret: the AirPort Disk remained mountable on the iMac.

Which meant that the movies on it could be opened in the iMac's iTunes and streamed to the Apple TV. And, wonder of wonders, stringing Ethernet between the iMac and the Extreme-n had cured my "buffer underflow" hiccups!


My reasoning on that is this. When iTunes was streaming movies from my AirPort-connected MacBook to the Apple TV, all the data had to make three trips through my wireless network:

  1. From the AirPort Disk to the MacBook's iTunes, via a base station
  2. From the MacBook's iTunes back to a base station, en route to the Apple TV
  3. From the base station to the Apple TV

When the movie's bitrate was high, three trips were too many. The wireless network bogged down.

But when there was a "Fast Ethernet" (100 megabits per second) link between the iMac and the Extreme-n, only Trip 3 was wireless. Trips 1 and 2 still were being taken by all the data from the movie file, but they now took advantage of the Fast Ethernet connection. So the wireless network itself never got bogged down.


My hunch is that I could ditch the Fast Ethernet connection between the iMac and the Extreme-n if I were to replace my MacBook Pro (and/or the iMac) with a Mac that is 802.11n-capable. Then I could reconfigure my wireless network as truly dual-band, and then I could have both the replacement Mac and the Apple TV join the 802.11n segment, thereby taking advantage of its higher speeds. All three trips taken by the movie data would then happen at those speeds, which would presumably be fast enough to avoid all "buffer underflow" hiccups during streaming.

If you happen to have an 802.11n-capable Mac and an Apple TV, you can probably already take advantage of a dual-band wireless home network, using the Extreme-g base station you presumably already have, complemented by a new Extreme-n with a commodious USB 2.0 hard drive attached to it, ready to store all your movie files.

Tuesday, August 28, 2007

Apple TV: Using an AirPort Disk, Part 1

Apple TV plays iTunes media files — movies, songs, etc. — on an HDTV via a wireless home network. I first talked about my own new Apple TV in Apple TV is a Winner!. In Apple TV: Getting Content I showed how to use HandBrake and especially BitTorrent to get movies to play on it. In Apple TV: Adding Subtitles I talked about overlaying subtitles for the hearing-impaired (like me). Now in this post I would like to discuss my experiments with storing Apple TV movie files on an external USB 2.0 hard drive attached to an AirPort Extreme 802.11n base station.

The AirPort Extreme 802.11n base station is a fairly new product from Apple. It replaces the old AirPort Extreme base station that looks like a tiny spaceship and lacks support for the emerging 802.11n wireless standard. The old AirPort Extreme base station is limited to 802.11g, which is not as fast. For brevity, I'll refer to the new AirPort Extreme 802.11n base station as "Extreme-n," and to the old AirPort Extreme base station which lacks 802.11n support as "Extreme-g."

Extreme-n is the first Apple base station to which you can hook an external hard drive, one that has a USB 2.0 interface. The drive can then be mounted, server-like, on the desktop of every Mac on the network. (I'm talking about Mac networks here. Much of what I say can also be implemented on PCs running Windows an linked by non-Apple WiFi gear, but the details are different, and I have no personal experience with them.)

I just got a new Extreme-n. I already had an Extreme-g, used (among other things) to provide wireless network access to my Apple TV. On the wireless Extreme-g network were two Macs: a MacBook Pro with an Intel Core Duo (not a Core 2 Duo) processor, and an iMac. Also on the network were three AirPort Express base stations, which were being used to extend the range of the network and to stream AirTunes.

I also just got a Western Digital My Book™ Essential Edition 500GB external USB 2.0 hard drive. It comes with a USB cable that allows it to be attached directly to a Mac ... or to an Extreme-g.


My purpose in doing this was mainly so that I could have a lot of storage for movies. To that end, I could have USB-cabled the My Book directly to the MacBook Pro that I use to rip DVDs and download movie files. But that would have turned the portable MacBook into a glorified desktop machine, so I figured hanging the My Book off an Extreme-n would be a better choice.

My reasoning, as it turned out, was in one way a bit flawed. I thought the MacBook Pro was capable of 802.11n speeds and could talk to the Extreme-n in that superfast way. I had simply misread the information I'd located on the Web about which current Mac models can be 802.11n-enabled. Turns out that MacBook with a Core 2 Duo processor from Intel can; those like mine with just a Core Duo processor cannot.

But I hadn't twigged to that when I installed my Extreme-n with the 500GB My Book hooked to it.


The installation went surprisingly smoothly. Note that you need a Mac with Mac OS X v.10.4 or later for setup and administration of an Extreme-n. Though the Extreme-n can be used by Mac OS X v.10.2.7 or later — I was running 10.3.9 on my iMac — I decided to upgrade that machine to the same 10.4.10 that runs on my MacBook. That meant I could use the new setup and administration software that comes with the Extreme-n, which bears the name AirPort Utility. AirPort Utility is the all-in-one replacement for the old AirPort Setup Assistant and AirPort Admin Utility.

Since I was laboring under the misapprehension that I would be able to use swift 802.11n connections to stream movies from my MacBook to my Apple TV via the Extreme-n, I decided to set up the Extreme-n in tandem with my existing Extreme-g, creating what techies call a dual-band network. I would configure the new Extreme-n to utilize only the 5.0 GHz band, which 802.11n is capable of exploiting in its search for higher transmission speeds. Meanwhile, the Extreme-g would be responsible for handing the lowly 2.4 GHz band, wherein 802.11g transmissions take place.

To create a dual-band network using two paired base stations, you first need to decide which base station will connect to your broadband Internet source ... in my case, a cable modem. (Other possible choices include a DSL modem and a broadband Internet connection provided by a wired Ethernet network.)

I read Apple's Designing AirPort Extreme 802.11n Networks (I recommend you do, too) and came away with the impression that the Extreme-n generally ought to be made the Internet-connected one, with the Extreme-g a subsidiary to it. But that would have meant I would have had to fool with my existing Extreme-g's configuration, which I was loath to do. So I looked for alternatives.


After much head-scratching and several visits to this MacOSXHints forum thread, I realized that I could safely reverse the order of the two base stations. That would involve leaving in place the existing Ethernet cable running from my cable modem to the WAN port on my Extreme-g, while hooking a second Ethernet cable from the LAN port on the Extreme-g to a LAN port (there are three) on the Extreme-n. (In my experiments, I found I could just as well hook that second cable into the Extreme-n's WAN port! It didn't matter! My possibly incorrect understanding of this is that operating the Extreme-n as a "bridge," not a "router" — see below — turns the Extreme-n's WAN port into just another LAN port.)

Doing things in that way let me leave the configuration of my existing Extreme-g base station, and all my existing AirPort Express base stations, completely alone. All I had to do was configure the new Extreme-n as a "bridge" in AirPort Utility. This simply amounts to selecting "Off (Bridge Mode)" as its method of connection sharing, rather than "Share a public IP address."


Here are more details on that. When "Off (Bridge Mode)" is selected in the Manual Setup mode of AirPort Utility, the Extreme-n acts as a bridge between the Extreme-g and the other devices/computers on the network. Basically, what that means is that it doesn't touch the Internet addressing information — the so-called IP addresses — contained in packets it transmits on the network.

Meanwhile, the Extreme-g uses "Share a public IP address" as its connection-sharing mode — just as it always did before — which means it dynamically figures out what my Internet provider has assigned as my current IP address, and it maps all downstream devices' (my two computers, my AirPort Expresses, my Apple TV, etc.) IP addresses (which it has itself assigned to them) to that one master IP address. In this way, the Extreme-g acts as a "gateway."

Inserting the new Extreme-n logically "between" the gateway and the lesser network devices does nothing whatever to change that, as long as "Off (Bridge Mode)" is used for its connection sharing, making it a "bridge."

Though it is blind to Internet addressing, thee Extreme-n sets up its own "network," which is actually just one of two segments of the entire dual-band network. I named this new network/segment "N net," while the original Extreme-g continues to host a network (now also just a segment, actually) called "X net."


Thankfully, you don't really have to understand all this stuff about gateways, bridges, etc. to set up the Extreme-n the way I set mine up. This is because AirPort Utility defaults to an assisted setup mode, rather than manual setup (which you can select if you don't want to do an assisted setup). In assisted setup mode, when the proper time comes you simply specify that you want the Extreme-n to be used as a bridge.

My assumption (which turned out to be wrong and had to be corrected manually later) was that I also ought to set up the Extreme-n to use the 5.0 GHz frequency range of 802.11n exclusively, while the Extreme-g continued to use just the 2.4 GHz range associated with 802.11g. Had I realized from the get-go that my MacBook is not 802.11n-capable, I would instead have accepted the default option in assisted setup, the one which allows the Extreme-n to operate in both ranges.

So the actual process of hooking up and configuring an Extreme-n to act as a bridge to an existing Extreme-g's router turns out to be simple. Ignoring niggling details like installing the AirPort software from the CD that comes with the Extreme-n and then allowing Software Update to replace it with the most up-to-date version, it involves:

  • Setting up the new Extreme-n physically
  • Hooking an Ethernet cable from any Extreme-n LAN port (or even the WAN port!) to the LAN port on the existing Extreme-g
  • Setting up the external hard drive physically, plugging it in, and USB-cabling it to the Extreme-n
  • Powering up the Extreme-n
  • Running AirPort Utility in assisted mode to configure the Extreme-n
  • Designating all the parameters you typically need to designate when configuring any base station
  • Making sure you put the Extreme-n in bridge mode during the configuration process. Using assisted setup in AirPort utility, you select "Bridge mode" instead of "Share a single IP address using DHCP and NAT." Using manual setup, you click on the Internet icon and use the Connection Sharing popup menu to select "Off (Bridge mode)"
  • Optionally setting the Extreme-n during the configuration process not to use the 2.4 GHz band employed by 802.11g, provided you actually have computers and othe network devices that can take advantage of 802.11n and don't rely on 802.11g or 802.11b. When using assisted setup in AirPort Utility, you do this by selecting "802.11n (802.11a compatible)" as the Radio Mode, instead of "802.11n (802.11b/g compatible)." Better yet, use manual setup to select "802.11n only (5 GHz)," which avoids diluting transmission speeds by maintaining 802.11a compatibility
  • At the end of the configuration process, clicking Update

When you finally update the Extreme-n's config in this way, after it powers back up you will hopefully be rewarded (perhaps after all too many excruciating seconds of a slowly blinking amber status light) with a solid green light which says it has successfully established an Internet connection. That means you're good to go.

Note that the status light typically comes on solid amber at power up, then after a few seconds turns briefly green. Then the blinking amber status light takes over. Out of the box, since the Extreme-n doesn't yet know how you want it to connect to the Internet, the blinking amber light tends not to go away. But after the Extreme-n is successfully configured the way you want it, a solid green light becomes your eventual reward. (Also, there is a way in AirPort Utility's Manual Setup to change the solid green light of the Extreme-n to a green light that blinks when there is activity on the base station ... a good way for you to tell whether the Extreme-n or Extreme-g is doing the lion's share of the work.)

After I got the Extreme-n configured, it didn't take long for me to start gloating over the fact that each of my Macs could join either one of the two "networks" (actually segments of one dual-band network) I now had. That is, both "X net" (the original network) and "N net" showed up in the AirPort menu of each Mac, and whichever one I chose, from whichever Mac, worked fine.

At first, the My Book didn't just show up on my desktop, however. I had to open AirPort Disk Utility and check "Show AirPort Disks in the menu bar," at which time a new AirPort Disks menu popped onto my menu bar. It allowed me to select and mount the My Book. Also, checking "Automatically discover AirPort disks" makes them auto-mount, I found ... though you have to enter the password you assigned to the disk, earlier in AirPort Utility. (Alternatively, you can sign on to the disk as a "guest," with whatever privileges you gave guests in AirPort Utility.)


So. It turns out to be pretty easy to attach an Extreme-n as a bridge to an existing Extreme-g and its network, thus providing a second network — which is actually part of the original network, using a different network name. The second network, handled by the Extreme-n, can be just for swift 802.11n connections in the 5.0 GHz band, while all slower 802.11g connections are handled by the Extreme-g. This is what a dual-band network is all about.

In my arrangement, the Extreme-g became the Internet gateway. In Apple's literature, the Extreme-n is used as the gateway. Other than that, my arrangement started out being just the same as Apple recommends.

But that soon had to change, once I found out my MacBook Pro was not capable of being 802.11n-enabled, after all. More on that in Part 2 of this post ...

Thursday, August 23, 2007

Dispatches from the Format War, #3

In my last post in this series, I concluded that the Blu-ray/HD DVD format war was tipping decisively in favor of Blu-ray. But wait! Now comes this news of Paramount and DreamWorks dropping Blu-ray support entirely.

According to the article, Paramount and its subsidiaries, including DreamWorks Animation, will cease releasing high-def discs of their movies in both competing formats side by side. For now at least, they will put out discs only on HD DVD (and on regular DVD, of course).

But the Blu-ray camp immediately fired back with this: upcoming releases on Blu-ray include such sought-after titles as Master & Commander, Ronin, Cast Away, Independence Day, A Bridge Too Far, 28 Days Later, The Day After Tomorrow, and the Die Hard trilogy. Also, the Paramount deal doesn't include any of Steven Spielberg's movies, which Paramount releases, and the deal runs only for 18 months anyway. Spielberg's company is DreamWorks SKG, not DreamWorks Animation.

The New York Times reported in Two Studios to Support HD DVD Over Rival that "Paramount and DreamWorks Animation together will receive about $150 million in financial incentives for their commitment to HD DVD, according to two Viacom executives with knowledge of the deal but who asked not to be identified." Viacom owns Paramount.

Who ponied up the $150 million "in a combination of cash and promotional guarantees"? At least some of it came from Toshiba, prime mover of the HD DVD camp. Microsoft? It denied writing any checks.

Stay tuned ...

Wednesday, August 22, 2007

Apple TV: Using Multiple Movie Libraries

My new Apple TV plays iTunes media files — movies, songs, etc. — on my HDTV via my wireless home network. In Apple TV: Getting Content I showed how to use BitTorrent to get movies to play on it.

I also mentioned ripping DVDs you own into iTunes-playable format using HandBrake. I covered that more fully in my Apple TV is a Winner! post as well as in earlier posts in my Ripping DVDs category.

My movie library is accordingly getting way big ... which means scrolling through all the titles on Apple TV can be a chore. I wondered whether I could split them up into two separate iTunes libraries.

Apple TV can sync to just one iTunes library, but it can stream from up to five separate iTunes libraries. They can be on separate computers. But two or more of them can well be on a single Mac.

iTunes has the ability to create and use more than one library, each with different contents. You can switch among them in iTunes' Preferences/Advanced/General pane. Or you can choose which library to use — or establish a new one — by holding down the Option key (Shift key on Windows) as you start iTunes. But any one invocation of iTunes can use just one library at a time. How can you have multiple iTunes open at once, each using a separate library which Apple TV can stream from?


The answer involves setting up a separate user account for each extra open iTunes you want. If you as administrator open System Preferences and click on Accounts, you can unlock that preferences panel by clicking on the lock icon and typing in your password. Then you can create a separate new account just for running another iTunes. It's a good idea to checkmark Fast User Switching under Login Options so you will be able to toggle back and forth between the new account and your main account by selecting items in a special menu that now appears at the right end of your menu bar.

Once you have the new account set up, toggle to it (entering its password when asked). Start up iTunes for the first time in it. In iTunes Preferences/Advanced/General, de-checkmark "Copy files to iTunes music folder when adding to library," since you don't want to create new copies of big movie files each time you import one of them into the (currently empty) library of this new user environment's iTunes.

Also, under Preferences/General, make sure you see the Shared Name you want to appear as a source on Apple TV. Since I created my alter-ego "user" as dalekhound — I'm a Doctor Who fan — the default Shared Name was "dalekhound Library," which I saw no need to change.

Now toggle back to the original user environment and move the folder(s) containing your iTunes movies from wherever it is (or they are) to the Shared folder. The Shared folder is in the ~/Users folder (where '~' represents your hard drive) right alongside one folder for each separate user account on your system. The contents of your Shared folder are available to all users.

Toggle back to the new user environment. Open the Shared folder in the finder. In it you will find all your movies (possibly nested in folders within Shared). Drag any or all of their icons into the new iTunes — it's still open, right? — or onto its icon in the dock. They'll quickly show up and be playable as movies within the new iTunes.

If you toggle back to the old user environment and its iTunes, you can still see the movies originally listed there, and they play just fine. iTunes lets you move movie files around on your hard drive without losing track of them.


So now you have two iTunes libraries in two separate user environments, both active at once!

You can tailor each one to your liking. For example, I removed all my TV episodes from one of my libraries — the original one — without telling iTunes to drag their files to the trash, mind you. From the other iTunes, I deleted everything except TV episodes. Or, to be precise, I simply failed to import anything other than TV episodes into it, when I populated it for the first time.

Once all that is set up as you wish, go to your Apple TV and navigate to Sources. With some finagling, I was able to use "Connect to New iTunes" and arrange for "dalekhound Library" to appear in the sources list, right next to the Shared Name of my original iTunes, which was "Eric Stewart's MacBook." Also in the sources list was (still) the Shared Name of the iTunes I run on completely different Mac, wherein I have all my song files.

Keep in mind that each time you use "Connect to New iTunes," Apple TV gives you a new five-digit passcode that you need specifically to type into the iTunes you want to connect to. In my case, I made sure the new iTunes user environment was the active one, and I selected "Bedroom Apple TV" from the Devices list along the left side of the iTunes window. I typed in the passcode ... and lo and behold, Apple TV immediately let me start streaming movies from "dalekhound Library"!

My original "Eric Stewart's MacBook" still worked as a source for streaming movies as well! And my other Mac's music library also remained available, just as it always had been. So I had three streaming sources, two of which were separate iTunes invocations running in separate user environments at one and the same time on a single Mac!

"What about syncing?" you may ask. It's no real problem. I already had my "Eric Stewart's MacBook" iTunes set up to sync to Apple TV. After all the shenanigans I just told you about, it was still set up to sync. And syncing still worked just fine ... just as it had always done.


I intend to add copiously to my movie library in the future. Each new movie file will be created in (or moved to) my Shared folder. I'll import it into whichever iTunes library I want it in in the customary way. I.e., I'll drag its icon into the iTunes window (or onto the iTunes icon in the Dock) of whichever user environment it "belongs" to.

Nor is there any reason why I cannot have a given movie shared by both environments. I can't think of a reason why I would want to do this, offhand. After all, my original object was to keep each list of movies short and sweet in Apple TV. Yet it's still a possibility, if I should ever want to take advantage of it.

Furthermore, if I wanted to, I could expand the above to up to five separate iTunes user environments — counting the one on my other Mac as one of them — each able to stream to Apple TV, with one of them the designated syncing source for the Apple TV as well.

Tuesday, August 21, 2007

Apple TV: Adding Subtitles

In Apple TV is a Winner! I wrote about my new Apple TV, which plays iTunes media files on my HDTV via my wireless home network. In Apple TV: Getting Content I showed how to get movies to play on it using BitTorrent (plus, of course, buying them from the iTunes store or manually ripping them from DVDs using HandBrake). Now I'd like to discuss how people who are like me in being hearing-impaired can add subtitles to their content. (Of course, you don't have to be hearing-impaired to want subtitles. Maybe you don't speak the language the movie is in. What I'm about to discuss can help anyone who wants subtitles for any reason.)

If you rip your own movies using HandBrake, you have the option of telling HandBrake to burn the subtitles (a.k.a. captions) that are right on the DVD into the image on the output file. End of story.

But if you get movies in any other way, there will probably not be subtitles or captions included with it. Never fear. You can probably remedy that situation.


In broad overview, what you need to do is, first of all, obtain a movie file from, say, BitTorrent. As an example, I'll be using a copy of the 1994 movie Maverick that I downloaded as a torrent file in the .avi format.

Then, you go to one of the websites where subtitles are available, locate a subtitle file for the movie in question, and download it. I've been to two such sites so far:


I found my Maverick subtitles at OpenSubtitles.

You also need to download and install software that will let you make use of the downloaded subtitles files. I currently have two such packages for the Mac:


I'm going to show how to use TitleLAB in this post. In a coming post I'll discuss Submerge.

Edit: Since I wrote the following,
I have run into a strange problem using
movie files that TitleLAB subtitles
have been added to in QuickTime.
Although the files played fine initially,
they've ceased to work after a day or so.

In iTunes, they simply won't play when asked to;
nor will "Convert Selection for Apple TV"
in iTunes' Advanced menu work with them.

In QuickTime, they fail with the message
"The movie could not be opened. An invalid
public movie atom was found in the movie."

I don't have any idea what could account for
this strange behavior, or how to fix it. For now, I
have to recommend that no one use TitleLAB in
the way the rest of this post describes.


The Maverick subtitles I downloaded from OpenSubtitles unzipped to a folder on my desktop that contained two files. One was subtitles.nfo, whose utility I haven't a clue about. The other was anglais.srt. The .srt extension was the key: it meant this file contained the actual subtitles. (The filename, anglais, was whatever the maker chose to name the file. It could have been whatsis or lollapalooza, for all anyone cares.)

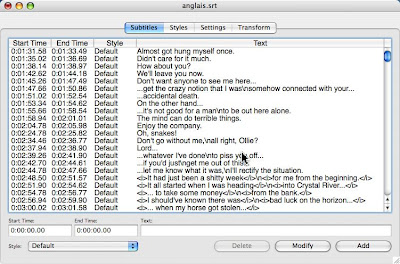
I opened anglais.srt in TitleLAB, which presented me with a window:


Each line in the window was a subtitle for a line of dialogue in the movie, with its start and ending times. I selected the first line and selected Set Sync Point A in TitleLAB's Syncing menu. I then scrolled down to one of the very last lines in the movie, selected it ...


... and selected Set Sync Point B in the Syncing menu.

Now that I had identified two widely spaced sync points in the list of subtitles, I chose Synchronize from the Syncing menu. That caused TitleLAB to ask me what movie file to sync the subtitles with. I navigated to it in the Open File dialog, and TitleLAB opened a new window. In that Window I clicked Go There under Sync Point A, and got this:


As you can see, TitleLAB had opened a viewer for the .avi file containing Maverick. The fact that it was able to do this at all had to do with my already having installed DivX and XviD codecs on my Mac — see Apple TV: Getting Content for more on that.

When I clicked Go There, TitleLAB positioned the viewer to the time given in the subtitles list for the Sync Point A subtitle, "Almost got hung myself once." It then allowed me to click the play button, and the movie started to play from that point.

Only problem was, I soon found that 0:01:31.58 wasn't the right spot for the Sync Point A subtitle. That didn't come until 0:01:47.14 in the movie. Why there was about a 15 second discrepancy I had no idea. But never mind — I simply clicked Set at the exact right spot in the movie, and 0:01:47.14 immediately became the starting time for the Sync Point A subtitle line.

Sync Point B was even further off, it turned out, so I used a similar method in the TitleLAB Sync window to change it to 2:02:11.28. Then I clicked the Apply button. The TitleLAB Sync window with the movie viewer in it closed, and I saw that the original window's list of subtitles had had their times adjusted for proper synchronization with this version of the movie.


I next clicked on the Settings tab, and got this:


I clicked on Find Best to have TitleLAB determine the optimal width and height of the subtitle area that would eventually be combined into the movie image. This is what I got:


TitleLAB had located both the widest and the tallest subtitles and set the width of the subtitle area to 433 and its height to 40. (If you don't set the subtitle area's width and height in Settings, TitleLAB will default to a square subtitle area that is much too narrow and much too tall for my taste.)

Then it was time to select Save and Preview from TitleLAB's File menu. TitleLAB let me name the output subtitles file whatever I wanted (I chose Maverick 6) and let me put it wherever I wanted on my hard drive. Notice that this is a separate file from the original anglais.srt input file, which does not change or get overwritten. After TitleLAB saves the output subtitles file, it previews it in a dropdown sheet in the main window, which shows what is in effect a little movie of just the subtitles! I closed that boring thing right away and quite TitleLAB.


At that point, I had nothing but a revised set of subtitles, synced precisely to the movie file, but not yet applied to that file. My next step was to open in QuickTime both the Maverick 6 file with the subtitles in it and the .avi file containing the movie.

That's right: there were two separate windows open in QuickTime, one for the movie and one for the Maverick 6 subtitles file, which QuickTime treats as a movie with just a Text track (no Video or Sound tracks).

I made sure both "movies" were set to their starting points, so synchronization would not be a problem, and with the subtitles window active I did Select All and then Copy (both from the Edit menu). Then I made the "real" movie window active and did Add To Movie in the Edit menu. (Note: don't use Paste instead.)

This added my subtitles to the real movie as an extra track, Text, in addition to its existing Video and Sound tracks.

Next, I had to reposition the Text track in the movie window so that the subtitles would show up centered at the bottom of the frame. (Their default position is upper-left.) To do that, I chose Show Movie Properties from QuickTime's Windows menu while the actual movie window was active. In the properties window which then opened, I made some strategic changes under the Visual Settings tab, with this as the result:


Specifically, I changed the Offset from 0 x 0 pixels to 140 x 280. The first number represents 140 pixels from the left edge of the image. The second, 280 pixels from the top. I found these offset numbers by trial and error, inasmuch as each time I changed a number the subtitle moved to a different position in the movie window. A different set of subtitles for a different movie might well have somewhat different offset numbers.

I also used the popup menu at lower-left of Properties to change Transparency to Blend so the movie image would "show through" the subtitle area behind the actual subtitles. The default behavior is for the subtitle area to have a solid black, opaque background.

Once I had done all that, I selected Export in QuickTime's File menu. In the resulting dialog I selected Export: Movie to MPEG-4, which meant that the output movie would be playable by iTunes and Apple TV. (The input version of the movie was an .avi file that iTunes can't use.) I exported the movie to a file and location of my choice, with encoding settings I discussed in Apple TV: Getting Content. The hours-long process of having QuickTime convert the input movie without subtitles to the output movie with subtitles began.

When it eventually wrapped up, I discovered I had to make sure the output filename had been given an extension iTunes would recognize. I chose .m4v, though .mp4 and .mov would have worked too. (My originally chosen filename had no extension. If I had but known, I would have specified the extension at the time I exported it from QuickTime.)

Then I added the output movie to my iTunes library, by dragging its icon in Finder to the iTunes icon in the Dock. The movie opened up in iTunes and began to play. Here's a frame from it:


Meanwhile, iTunes began automatically syncing the subtitled movie to my Apple TV. It played there just fine, too.